KitchenAid KUID508HPS Installation Instructions - Page 7
Reversing the Hinges and End Caps, Final Door Placement
 |
View all KitchenAid KUID508HPS manuals
Add to My Manuals
Save this manual to your list of manuals |
Page 7 highlights
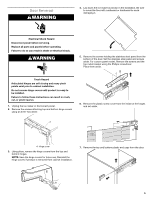
Reversing the Hinges and End Caps 1. Install the hinge screws (placed aside in step 10 of "Door Panel and Hinge Removal") half way on the desired side of the cabinet. Final Door Placement NOTE: Before placing the door back on the ice maker, check all installed parts to ensure there are no exposed screws, all screw cover caps are on, and the door is facing the correct way with the stainless steel door facing out. 1. Slide the door onto the hinges. Using Torx T25 screwdriver install the screws (removed in the step 6 of "Removing the Hinges" section) onto the door. 2. Take the original top hinge, flip it and place it in the bottom hinge position on the opposite side. Slide onto the cabinet hinge screws. The hinge tabs on the hinges should always face towards each other. A 2. Reinstall the plastic screw cover to original locations on the hinges. A. Hinge tab 3. Take the original bottom hinge, flip it and place it in the top hinge position on the opposite side. Slide onto the cabinet hinge screws. 3. Reinstall the top and bottom end caps on the door (the top right end cap is now the bottom left end cap and vice versa). NOTE: For custom wood install skip this step. 4. Fully tighten the top and bottom hinge screws. 4. Place the steel door panel back on the door once all screws are tightened. For custom door panel, skip this step. 7
-
 1
1 -
 2
2 -
 3
3 -
 4
4 -
 5
5 -
 6
6 -
 7
7 -
 8
8 -
 9
9 -
 10
10 -
 11
11 -
 12
12 -
13
-
14
-
15
-
16
-
17
-
18
-
19
-
20
-
21
-
22
-
23
-
24
-
25
-
26
-
27
-
28
-
29
-
30
-
31
-
32
-
33
-
34
-
35
-
36
-
37
-
38
-
39
-
40
-
41
-
42
-
43
-
44
-
45
-
46
-
47
-
48
-
49
-
50
-
51
-
52
-
53
-
54
-
55
-
56
 |
 |
