Kyocera FS-9500DN FS-9100/9500 Operation Guide Rev-1.3 - Page 59
ENTER, Selecting the Paper Source, Setting Duplex Printing, Binding Setups, >Cassette 1 Type, Plain
 |
UPC - 632983001073
View all Kyocera FS-9500DN manuals
Add to My Manuals
Save this manual to your list of manuals |
Page 59 highlights
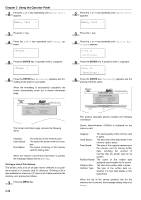
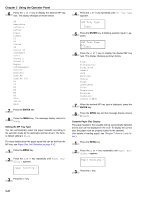
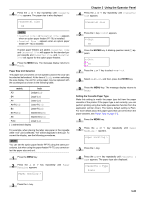
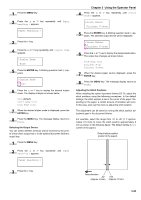
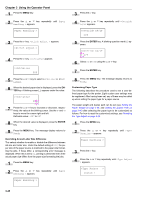
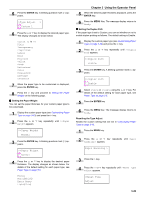
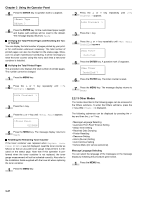
Chapter 3 Using the Operator Panel NOTE • >Cassette 3 Type or >Cassette 4 Type ap- pears when an option paper feeder (PF-70) is installed. • >Cassette 3 Type appears when an option paper feeder (PF-75) is installed. 5 Press the ENTER key. A blinking question mark (?) appears. >Cassette 1 Type ? Plain 6 Press the 3 or 4 key to display the desired cassette type. The display changes as shown below. Plain Preprinted Bond Recycled Rough Letterhead Color Prepunched Custom(1 to 8) 7 When the desired cassette type is displayed, press the ENTER key. 8 Press the MENU key. The message display returns to Ready. Selecting the Paper Source You can select from which paper source printing will be performed. If no option units are installed, the only selections are the paper cassette and MP tray of the printer. If option paper feeders are installed, they can also be selected. 1 Press the MENU key. 2 Press the 3 or 4 key repeatedly until Paper Handling > appears. Paper Handling > 3 Press the 2 key. 4 Press the 3 or 4 key repeatedly until >Feed Select appears. >Feed Select Cassette1 5 Press the ENTER key. A blinking question mark (?) appears. >Feed Select ? Cassette1 6 Press the 3 or 4 key to display the desired paper source. The display changes as shown below according to the installed option units. Cassette1 Cassette2 MP tray Cassette3 Cassette4 (Printer's standard upper cassette when option paper feeders are installed) (Printer's standard lower paper cassette) (printer's MP tray) (Option upper paper feeder) (Option lower paper feeder) 7 When the desired paper source displayed, press the ENTER key. 8 Press the MENU key. The message display returns to Ready. Setting Duplex Printing Using the duplex unit, you can automatically print on both sides of the paper. The duplex unit is installed underneath the printer. Q Binding Setups The term binding refers to the manner in which printed pages of paper are joined together (by gluing, stitching, etc.) in book form. The two possible types of binding are long-edge binding, in which pages are joined together along their long edge; and short-edge binding, in which they are joined together along their short edge. In selecting a binding type, you must also consider the orientation of the printed page. You can use long-edge or short-edge binding with either landscape or portrait printing. Depending on the binding type and print orientation, the duplex unit provides four types of binding setups. These are: (1) portrait, long-edge, (2) portrait, short edge, (3) landscape, longedge, and (4) landscape, short-edge. The figure below shows these binding setups. (1) Portrait, long-edge (3) Landscape, long-edge (2) Portrait, short-edge Landscape, short-edge (4) Binding Setups To select duplex printing and binding setup from the operator panel, proceed as follows. 3-43
-
 1
1 -
2
-
3
-
4
-
5
-
6
-
7
-
8
-
9
-
10
-
11
-
12
-
13
-
14
-
15
-
16
-
17
-
18
-
19
-
20
-
21
-
22
-
23
-
24
-
25
-
26
-
27
-
28
-
29
-
30
-
31
-
32
-
33
-
34
-
35
-
36
-
37
-
38
-
39
-
40
-
41
-
42
-
43
-
44
-
45
-
46
-
47
-
48
-
49
-
50
-
51
-
52
-
53
-
 54
54 -
 55
55 -
 56
56 -
 57
57 -
 58
58 -
 59
59 -
 60
60 -
 61
61 -
 62
62 -
 63
63 -
 64
64 -
65
-
66
-
67
-
68
-
69
-
70
-
71
-
72
-
73
-
74
-
75
-
76
-
77
-
78
-
79
-
80
-
81
-
82
-
83
-
84
-
85
-
86
-
87
-
88
-
89
-
90
-
91
-
92
-
93
-
94
-
95
-
96
-
97
-
98
-
99
-
100
-
101
-
102
-
103
-
104
-
105
-
106
-
107
-
108
-
109
-
110
-
111
-
112
-
113
-
114
-
115
-
116
-
117
-
118
-
119
-
120
-
121
-
122
-
123
-
124
-
125
-
126
-
127
-
128
-
129
-
130
-
131
-
132
-
133
-
134
-
135
-
136
-
137
-
138
-
139
-
140
-
141
-
142
-
143
 |
 |