LG DVRK687X Owners Manual - Page 10
Front, Panel
 |
View all LG DVRK687X manuals
Add to My Manuals
Save this manual to your list of manuals |
-
 1
1 -
2
-
3
-
4
-
 5
5 -
 6
6 -
 7
7 -
 8
8 -
 9
9 -
 10
10 -
 11
11 -
 12
12 -
 13
13 -
 14
14 -
 15
15 -
16
-
17
-
18
-
19
-
20
-
21
-
22
-
23
-
24
-
25
-
26
-
27
-
28
-
29
-
30
-
31
-
32
-
33
-
34
-
35
-
36
-
37
-
38
-
39
-
40
-
41
-
42
-
43
-
44
-
45
-
46
-
47
-
48
-
49
-
50
-
51
-
52
-
53
-
54
-
55
-
56
-
57
-
58
-
59
-
60
 |
 |

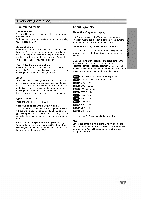
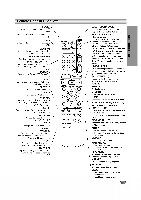
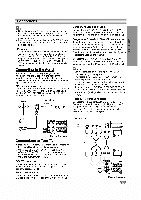
Front
Panel
10
POWER
Switches
the
Recorder
ON
or
OFF.
REC
(z)
Starts
recording.
Press
repeatedly
to
set
the
recording
time.
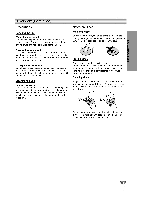
Microphone
jacks
(MIC1,
MIC2)
Connect
a
microphone
to
MIC1
or
MIC2
or
to
both
sockets.
Remote
Sensor
Point
the
Recorder
remote
control
here.
PROG.
(v
/
V)
Scans
up
or
down
through
memorized
channels.
STOP
(x)
Stops
playback
or
recording.
PLAY/PAUSE
(N/X)
Starts
playback.
Pause
playback
or
record-
ing
temporarily,
press
again
to
exit
pause
mode.
Disc
Tray
Insert
a
disc
here.
OPEN/CLOSE
(Z)
Opens
or
close
the
disc
tray.
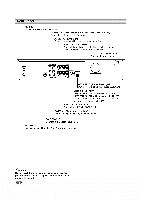
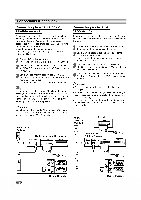
AV3
IN
(VIDEO
IN/AUDIO
IN
(Left/Right))
Connect
the
audio/video
output
of
an
external
source
(Audio
system,
TV/
Monitor,
VCR,
Camcorder,
etc.).
AV3
IN
(S-VIDEO
IN)
Connect
the
S-Video
output
of
an
external
source
(TV/
Monitor,
VCR,
Camcorder,
etc.).
DV
INPUT
Connect
the
DV
output
of
a
digital
camcorder.
EJECT
(Z)
Ejects
the
tape
in
the
VCR
deck.
DUBBING
Press
to
copy
DVD
to
VCR
(or
VCR
to
DVD).
VOL.(+/-)
Selects
microphone's
volume
level.
DVD/VCR
Toggles
control
between
the
DVD
deck
and
the
VCR
deck.
Cassette
Compartment
(VCR
deck)
Insert
a
video
cassette
here.
Display
window
Shows
the
current
status
of
the
Recorder.
P/SCAN
When
you
use
the
COMPONENT/PROGRESSIVE
SCAN
VIDEO
OUT
jacks,
you
can
change
the
resolution
576i
to
576p
for
the
Progressive
Scan
output.