Lenovo ThinkCentre A52 (English) Quick reference guide - Page 41
Troubleshooting, diagnostics
 |
View all Lenovo ThinkCentre A52 manuals
Add to My Manuals
Save this manual to your list of manuals |
Page 41 highlights
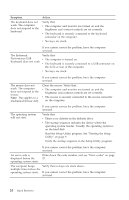
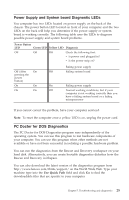
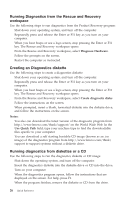
Chapter 5. Troubleshooting and diagnostics This chapter describes some basic troubleshooting and diagnostic tools. If your computer problem is not described here, use Access Help for more detailed troubleshooting information or see "Additional help" on page xv. Basic troubleshooting Symptom Action The computer does not Verify that: start when you press the v The power cord is plugged into the rear of the computer power button. and into a working electrical outlet. v If your computer has a secondary power switch on the back of the computer, ensure that it is switched on. Check the power indicator on the front of the computer to ensure that the power is on. v The power supply and system board are working. See "Power Supply and System board Diagnostic LEDs" on page 25. The monitor screen is blank. If you cannot correct the problem, have the computer serviced. Verify that: v The monitor cable is securely attached to the rear of the monitor and to the rear of the computer. v The monitor power cord is plugged into the monitor and into a working electrical outlet. v The monitor is turned on, and the brightness and contrast controls are set correctly. v The monitor signal cable is securely connected to the monitor and to the monitor connector on the computer. v The power supply and system board are working. See "Power Supply and System board Diagnostic LEDs" on page 25. Note: If your computer has two monitor connectors, verify that your monitor is connected to the one in the PCI-express (PCI-e) option connector rather than the one in the rear of the system board. See Step 4 on page 3. If you cannot correct the problem, have the computer serviced. © Lenovo 2005, 2006. Portions © IBM Corp. 2005. 23
-
 1
1 -
2
-
3
-
4
-
5
-
6
-
7
-
8
-
9
-
10
-
11
-
12
-
13
-
14
-
15
-
16
-
17
-
18
-
19
-
20
-
21
-
22
-
23
-
24
-
25
-
26
-
27
-
28
-
29
-
30
-
31
-
32
-
33
-
34
-
35
-
 36
36 -
 37
37 -
 38
38 -
 39
39 -
 40
40 -
 41
41 -
 42
42 -
 43
43 -
 44
44 -
 45
45 -
 46
46 -
47
-
48
-
49
-
50
-
51
-
52
-
53
-
54
-
55
-
56
-
57
-
58
-
59
-
60
-
61
-
62
-
63
-
64
-
65
-
66
-
67
-
68
-
69
-
70
-
71
-
72
-
73
-
74
-
75
-
76
-
77
-
78
-
79
-
80
-
81
-
82
-
83
-
84
-
85
-
86
-
87
-
88
-
89
-
90
-
91
-
92
-
93
-
94
-
95
-
96
-
97
-
98
 |
 |