Lenovo ThinkCentre Edge 62 Hardware Maintenance Manual - Page 127
Disconnect the LCD panel cable from the system board. See System board parts and connectors
 |
View all Lenovo ThinkCentre Edge 62 manuals
Add to My Manuals
Save this manual to your list of manuals |
Page 127 highlights
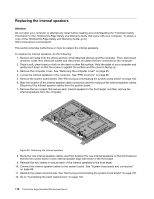
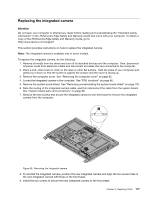
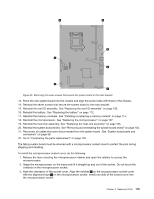
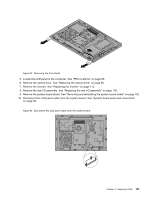
Figure 42. Removing the foot stands 5. Locate the LCD panel in the computer. See "FRU locations" on page 86. 6. Remove the optical drive. See "Replacing the optical drive" on page 98. 7. Remove the inverter. See "Replacing the inverter" on page 113. 8. Remove the rear I/O assembly. See "Replacing the rear I/O assembly" on page 100. 9. Remove the system board shield. See "Removing and reinstalling the system board shield" on page 102. 10. Disconnect the LCD panel cable from the system board. See "System board parts and connectors" on page 88. Figure 43. Disconnect the LCD panel cable from the system board Chapter 8. Replacing FRUs 121
-
 1
1 -
2
-
3
-
4
-
5
-
6
-
7
-
8
-
9
-
10
-
11
-
12
-
13
-
14
-
15
-
16
-
17
-
18
-
19
-
20
-
21
-
22
-
23
-
24
-
25
-
26
-
27
-
28
-
29
-
30
-
31
-
32
-
33
-
34
-
35
-
36
-
37
-
38
-
39
-
40
-
41
-
42
-
43
-
44
-
45
-
46
-
47
-
48
-
49
-
50
-
51
-
52
-
53
-
54
-
55
-
56
-
57
-
58
-
59
-
60
-
61
-
62
-
63
-
64
-
65
-
66
-
67
-
68
-
69
-
70
-
71
-
72
-
73
-
74
-
75
-
76
-
77
-
78
-
79
-
80
-
81
-
82
-
83
-
84
-
85
-
86
-
87
-
88
-
89
-
90
-
91
-
92
-
93
-
94
-
95
-
96
-
97
-
98
-
99
-
100
-
101
-
102
-
103
-
104
-
105
-
106
-
107
-
108
-
109
-
110
-
111
-
112
-
113
-
114
-
115
-
116
-
117
-
118
-
119
-
120
-
121
-
 122
122 -
 123
123 -
 124
124 -
 125
125 -
 126
126 -
 127
127 -
 128
128 -
 129
129 -
 130
130 -
 131
131 -
 132
132 -
133
-
134
-
135
-
136
-
137
-
138
-
139
-
140
-
141
-
142
-
143
-
144
-
145
-
146
-
147
-
148
-
149
-
150
-
151
-
152
-
153
-
154
-
155
-
156
-
157
-
158
-
159
-
160
-
161
-
162
-
163
-
164
-
165
-
166
-
167
-
168
-
169
-
170
-
171
-
172
-
173
-
174
-
175
-
176
-
177
-
178
-
179
-
180
-
181
-
182
 |
 |

Figure 42. Removing the foot stands
5. Locate the LCD panel in the computer. See “FRU locations” on page 86.
6. Remove the optical drive. See “Replacing the optical drive” on page 98.
7. Remove the inverter. See “Replacing the inverter” on page 113.
8. Remove the rear I/O assembly. See “Replacing the rear I/O assembly” on page 100.
9. Remove the system board shield. See “Removing and reinstalling the system board shield” on page 102.
10. Disconnect the LCD panel cable from the system board. See “System board parts and connectors”
on page 88.
Figure 43. Disconnect the LCD panel cable from the system board
Chapter 8
.
Replacing FRUs
121