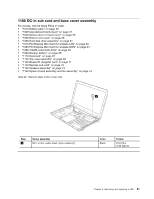
Lenovo ThinkPad Edge E425 Hardware Maintenance Manual - Page 89
If the Windows Authentication label COA, Applying labels to the base cover
 |
View all Lenovo ThinkPad Edge E425 manuals
Add to My Manuals
Save this manual to your list of manuals |
Page 89 highlights
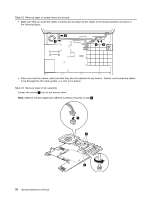
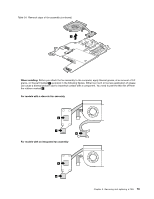
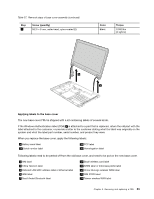
Table 27. Removal steps of base cover assembly (continued) Step 2 Screw (quantity) M2.5 × 6 mm, wafer-head, nylon-coated (2) Color Black Torque 0.392 Nm (4 kgfcm) 3 3 Applying labels to the base cover The new base cover FRU is shipped with a kit containing labels of several kinds. If the Windows Authentication label (COA) 1 is attached to a part that is replaced, return the old part with the label attached to the customer, or provide a letter to the customer stating what the label was originally on the system and what the label part number, serial number, and product key were. When you replace the base cover, apply the following labels: 4 Battery word label 19 Serial number label 18 FCC label 20 Homologation label Following labels need to be peeled off from the old base cover, and need to be put on the new base cover. 2 SIM label 3 China Telecom label 5 Onboard LAN MAC address label or Ethernet label 6 IMEI label 7 Brazil Anatel Bluetooth label 12 Brazil wireless card label 13 SIRIM label or Indonesia postel label 14 China 3G Logo wireless WAN label 15 SIM ICCID label 16 Taiwan wireless WAN label Chapter 8. Removing and replacing a FRU 83
-
 1
1 -
2
-
3
-
4
-
5
-
6
-
7
-
8
-
9
-
10
-
11
-
12
-
13
-
14
-
15
-
16
-
17
-
18
-
19
-
20
-
21
-
22
-
23
-
24
-
25
-
26
-
27
-
28
-
29
-
30
-
31
-
32
-
33
-
34
-
35
-
36
-
37
-
38
-
39
-
40
-
41
-
42
-
43
-
44
-
45
-
46
-
47
-
48
-
49
-
50
-
51
-
52
-
53
-
54
-
55
-
56
-
57
-
58
-
59
-
60
-
61
-
62
-
63
-
64
-
65
-
66
-
67
-
68
-
69
-
70
-
71
-
72
-
73
-
74
-
75
-
76
-
77
-
78
-
79
-
80
-
81
-
82
-
83
-
 84
84 -
 85
85 -
 86
86 -
 87
87 -
 88
88 -
 89
89 -
 90
90 -
 91
91 -
 92
92 -
 93
93 -
 94
94 -
95
-
96
-
97
-
98
-
99
-
100
-
101
-
102
-
103
-
104
-
105
-
106
-
107
-
108
-
109
-
110
-
111
-
112
-
113
-
114
-
115
-
116
-
117
-
118
-
119
-
120
-
121
-
122
-
123
-
124
-
125
-
126
-
127
-
128
-
129
-
130
-
131
-
132
-
133
-
134
 |
 |
