Lenovo ThinkPad L520 Hardware Maintenance Manual - Page 83
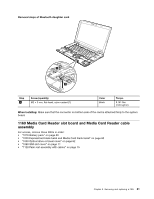
When installing, clicks into place. Refer to the following two figures.
 |
View all Lenovo ThinkPad L520 manuals
Add to My Manuals
Save this manual to your list of manuals |
Page 83 highlights
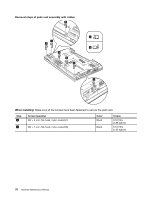
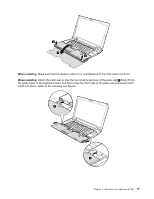
3 4 3 When installing: Make sure that the speaker cable is not overlapped with the LCD cable connector. When installing: Attach the palm rest so that the two small projections of the palm rest a firmly fit into the guide holes of the keyboard bezel, and them press the front side of the palm rest downward until it clicks into place. Refer to the following two figures. a a Chapter 8. Removing and replacing a FRU 77
-
 1
1 -
2
-
3
-
4
-
5
-
6
-
7
-
8
-
9
-
10
-
11
-
12
-
13
-
14
-
15
-
16
-
17
-
18
-
19
-
20
-
21
-
22
-
23
-
24
-
25
-
26
-
27
-
28
-
29
-
30
-
31
-
32
-
33
-
34
-
35
-
36
-
37
-
38
-
39
-
40
-
41
-
42
-
43
-
44
-
45
-
46
-
47
-
48
-
49
-
50
-
51
-
52
-
53
-
54
-
55
-
56
-
57
-
58
-
59
-
60
-
61
-
62
-
63
-
64
-
65
-
66
-
67
-
68
-
69
-
70
-
71
-
72
-
73
-
74
-
75
-
76
-
77
-
 78
78 -
 79
79 -
 80
80 -
 81
81 -
 82
82 -
 83
83 -
 84
84 -
 85
85 -
 86
86 -
 87
87 -
 88
88 -
89
-
90
-
91
-
92
-
93
-
94
-
95
-
96
-
97
-
98
-
99
-
100
-
101
-
102
-
103
-
104
-
105
-
106
-
107
-
108
-
109
-
110
-
111
-
112
-
113
-
114
-
115
-
116
-
117
-
118
-
119
-
120
-
121
-
122
-
123
-
124
-
125
-
126
-
127
-
128
-
129
-
130
-
131
-
132
-
133
-
134
-
135
-
136
-
137
-
138
-
139
-
140
-
141
-
142
-
143
-
144
-
145
-
146
-
147
-
148
-
149
-
150
-
151
-
152
-
153
-
154
-
155
-
156
-
157
-
158
-
159
-
160
-
161
-
162
-
163
-
164
 |
 |
3
3
4
When installing:
Make sure that the speaker cable is not overlapped with the LCD cable connector.
When installing:
Attach the palm rest so that the two small projections of the palm rest
a
firmly fit into
the guide holes of the keyboard bezel, and them press the front side of the palm rest downward until it
clicks into place. Refer to the following two figures.
a
a
Chapter 8
.
Removing and replacing a FRU
77