Lenovo ThinkPad X220i Hardware Maintenance Manual - Page 105
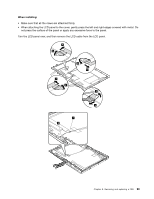
Turn the LCD panel over, and then remove the LCD cable from the LCD panel.
 |
View all Lenovo ThinkPad X220i manuals
Add to My Manuals
Save this manual to your list of manuals |
Page 105 highlights
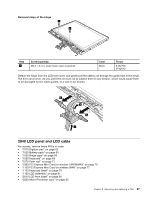
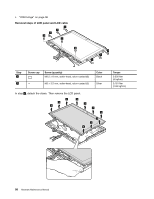
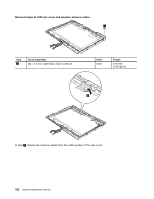
When installing: • Make sure that all the claws are attached firmly. • When attaching the LCD panel to the cover, gently press the left and right edges covered with metal. Do not press the surface of the panel or apply any excessive force to the panel. Turn the LCD panel over, and then remove the LCD cable from the LCD panel. 9 8 7 6 10 11 4 5 1 2 Chapter 8. Removing and replacing a FRU 99
-
 1
1 -
2
-
3
-
4
-
5
-
6
-
7
-
8
-
9
-
10
-
11
-
12
-
13
-
14
-
15
-
16
-
17
-
18
-
19
-
20
-
21
-
22
-
23
-
24
-
25
-
26
-
27
-
28
-
29
-
30
-
31
-
32
-
33
-
34
-
35
-
36
-
37
-
38
-
39
-
40
-
41
-
42
-
43
-
44
-
45
-
46
-
47
-
48
-
49
-
50
-
51
-
52
-
53
-
54
-
55
-
56
-
57
-
58
-
59
-
60
-
61
-
62
-
63
-
64
-
65
-
66
-
67
-
68
-
69
-
70
-
71
-
72
-
73
-
74
-
75
-
76
-
77
-
78
-
79
-
80
-
81
-
82
-
83
-
84
-
85
-
86
-
87
-
88
-
89
-
90
-
91
-
92
-
93
-
94
-
95
-
96
-
97
-
98
-
99
-
 100
100 -
 101
101 -
 102
102 -
 103
103 -
 104
104 -
 105
105 -
 106
106 -
 107
107 -
 108
108 -
 109
109 -
 110
110 -
111
-
112
-
113
-
114
-
115
-
116
-
117
-
118
-
119
-
120
-
121
-
122
-
123
-
124
-
125
-
126
-
127
-
128
-
129
-
130
-
131
-
132
-
133
-
134
-
135
-
136
-
137
-
138
-
139
-
140
-
141
-
142
-
143
-
144
-
145
-
146
-
147
-
148
-
149
-
150
 |
 |

When installing:
•
Make sure that all the claws are attached firmly.
•
When attaching the LCD panel to the cover, gently press the left and right edges covered with metal. Do
not press the surface of the panel or apply any excessive force to the panel.
Turn the LCD panel over, and then remove the LCD cable from the LCD panel.
6
7
10
11
8
9
4
5
1
2
Chapter 8
.
Removing and replacing a FRU
99