Lexmark 23B0225 Setup Guide - Page 10
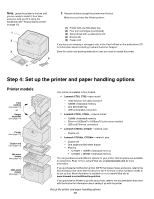
Step 4: Set up the printer and paper handling options
 |
UPC - 734646782265
View all Lexmark 23B0225 manuals
Add to My Manuals
Save this manual to your list of manuals |
Page 10 highlights
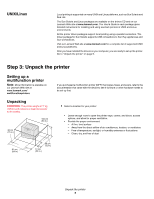
Note: Leave the printer in the box until you are ready to install it, then have someone help you lift it using the handholds (see "Positioning the printer" on page 13). 1 2 3 5 4 2 Remove all items except the printer from the box. Make sure you have the following items: (1) Printer with one 500-sheet tray (2) Four print cartridges (preinstalled) (3) Setup Guide with a publications CD (4) Drivers CD (5) Power cord If any items are missing or damaged, refer to the User's Guide on the publications CD for information about contacting Lexmark Customer Support. Save the carton and packing materials in case you need to repack the printer. Step 4: Set up the printer and paper handling options Printer models 5-bin mailbox (see page 15) or Output expander (see page 14) Printer (see page 13) Duplex unit (see page 13) 500-sheet drawer (see page 12) 2000-sheet drawer (see page 11) Your printer is available in four models: • Lexmark C760, C762-base model - 1200 dots per inch (dpi) resolution - 128MB of standard memory - One 500-sheet tray - USB and parallel connectors • Lexmark C760n, C762n-network model - 128MB of standard memory - Ethernet 100BaseTx=100BaseTX print server installed - USB and Ethernet connectors • Lexmark C760dn, C762dn-network, plus: - Duplex unit • Lexmark C760dtn, C762dtn-network, plus: - Duplex unit - One additional 500-sheet drawer - Memory: • C760dtn = 128MB of standard memory • C762dtn = 256MB of standard memory You can purchase several different options for your printer. Not all options are available for all printers. Refer to the Lexmark Web site at www.lexmark.com for more information. If you purchased a multifunction printer (MFP) that copies, faxes, and scans, refer to the documentation that came with the device to see if furniture or other hardware needs to be set up first. More information is available on our Lexmark Web site at www.lexmark.com/multifunctionprinters. If you purchased a finisher to go with your printer, refer to the documentation that came with the finisher for information about setting it up with the printer. Set up the printer and paper handling options 10
-
 1
1 -
2
-
3
-
4
-
 5
5 -
 6
6 -
 7
7 -
 8
8 -
 9
9 -
 10
10 -
 11
11 -
 12
12 -
 13
13 -
 14
14 -
 15
15 -
16
-
17
-
18
-
19
-
20
-
21
-
22
-
23
-
24
-
25
-
26
-
27
-
28
-
29
-
30
-
31
-
32
-
33
-
34
-
35
-
36
-
37
-
38
-
39
 |
 |
