Lexmark 23B0225 Setup Guide - Page 24
Installing an option card
 |
UPC - 734646782265
View all Lexmark 23B0225 manuals
Add to My Manuals
Save this manual to your list of manuals |
Page 24 highlights
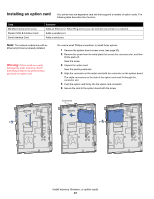
Installing an option card Your printer has one expansion card slot that supports a number of option cards. The following table describes their function. Card MarkNet internal print server Parallel 1284-B Interface Card Serial Interface Card Function Adds an Ethernet or Token-Ring port so you can connect your printer to a network. Adds a parallel port. Adds a serial port. Note: The network models ship with an Ethernet print server already installed. Warning: Option cards are easily damaged by static electricity. Touch something metal on the printer before you touch an option card. You need a small Phillips screwdriver to install these options. 1 Remove the system board access cover (see page 20). 2 Remove the screw from the metal plate that covers the connector slot, and then lift the plate off. Save the screw. 3 Unpack the option card. Save the packing materials. 4 Align the connector on the option card with the connector on the system board. The cable connectors on the side of the option card must fit through the connector slot. 5 Push the option card firmly into the option card connector. 6 Secure the card to the system board with the screw. Connectors Install memory, firmware, or option cards 24
-
 1
1 -
2
-
3
-
4
-
5
-
6
-
7
-
8
-
9
-
10
-
11
-
12
-
13
-
14
-
15
-
16
-
17
-
18
-
 19
19 -
 20
20 -
 21
21 -
 22
22 -
 23
23 -
 24
24 -
 25
25 -
 26
26 -
 27
27 -
 28
28 -
 29
29 -
30
-
31
-
32
-
33
-
34
-
35
-
36
-
37
-
38
-
39
 |
 |
