Lexmark 23B0225 Setup Guide - Page 17
Warning
 |
UPC - 734646782265
View all Lexmark 23B0225 manuals
Add to My Manuals
Save this manual to your list of manuals |
Page 17 highlights
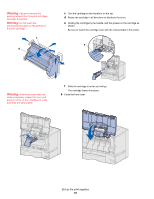
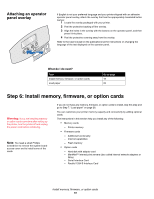
3 Remove the print cartridges. For each cartridge: a Pull up on the handhold. b Pull the cartridge straight out and use the handle to lift it off the guides. c Set the cartridge on a firm, flat, clean surface in the upright position. b a c Warning: Do not touch the image transfer unit belt with your fingers. 4 Remove the packing material from the image transfer unit belt: a Grasp the detensioner located on the right side on the inside of the machine. b Gently but firmly pull up on the detensioner and the attached sheet, then remove both items from the printer. Detensioner 1 2 1 b a 5 Reinstall the print cartridges. For each cartridge: a Turn the cartridge over so the handle is on the bottom. b Remove the red plastic packing material from the photoconductor drum. Discard the packing material. Set up the print supplies 17
-
 1
1 -
2
-
3
-
4
-
5
-
6
-
7
-
8
-
9
-
10
-
11
-
 12
12 -
 13
13 -
 14
14 -
 15
15 -
 16
16 -
 17
17 -
 18
18 -
 19
19 -
 20
20 -
 21
21 -
 22
22 -
23
-
24
-
25
-
26
-
27
-
28
-
29
-
30
-
31
-
32
-
33
-
34
-
35
-
36
-
37
-
38
-
39
 |
 |
