Lexmark Consumer Inkjet Photo Guide
Lexmark Consumer Inkjet Manual
 |
View all Lexmark Consumer Inkjet manuals
Add to My Manuals
Save this manual to your list of manuals |
Lexmark Consumer Inkjet manual content summary:
- Lexmark Consumer Inkjet | Photo Guide - Page 1
P700 Series Photo Jetprinter™ Photo Guide March 2003 www.lexmark.com - Lexmark Consumer Inkjet | Photo Guide - Page 2
. References in this publication to products, programs, or services do not imply that the manufacturer intends to make these software and documentation developed exclusively at private expense. Federal Communications Commission (FCC) compliance information statement The Lexmark P700 Series Photo - Lexmark Consumer Inkjet | Photo Guide - Page 3
15 Working with your photos 16 Organizing photos 17 Editing photos 18 Using layouts 22 E-mailing photos to a friend 24 Using the printer software 26 Using the software to select your printer settings 27 Using the software to meet your printing needs 28 Troubleshooting checklist 30 Index 32 - Lexmark Consumer Inkjet | Photo Guide - Page 4
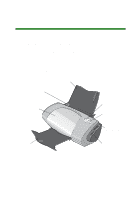
You can use the Lexmark™ P700 Series Photo Jetprinter™ to print everything from high-quality black and white text to color photos. Before you get started, follow the instructions in your setup documentation to install the printer hardware and software. Understanding the printer parts The table on - Lexmark Consumer Inkjet | Photo Guide - Page 5
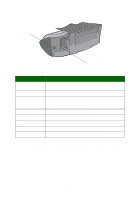
: Access cover Paper guide Paper feed button Paper tray Power button USB card reader Memory card slots Paper exit tray When you want to: • Install or change print cartridges. • Clear paper jams. Make sure paper feeds correctly into the printer. • Eject paper from the printer. • Continue printing - Lexmark Consumer Inkjet | Photo Guide - Page 6
slots. Most digital cameras use a memory card to store photos. Insert the memory card into your printer to access photos stored on the card. Then, print them or save them to your computer. Inserting a memory card Your printer supports the following digital media: • CompactFlash Type I and Type II - Lexmark Consumer Inkjet | Photo Guide - Page 7
listed in the table. Printing photos For the best photo printing results, we recommend you use: • The photo software included with your printer. • A photo cartridge. For more information on cartridges, refer to the Lexmark P700 Series Photo Jetprinter User's Guide. • Photo paper. Note: You may want - Lexmark Consumer Inkjet | Photo Guide - Page 8
If you want to print a borderless photo using another software program, you may need to manually adjust settings such as: • Paper size • Page margins • Image size Refer to your other software program's documentation for more information. 8 - Lexmark Consumer Inkjet | Photo Guide - Page 9
Printing photos Load photo paper 1 Load up to 25 sheets of coated, photo, or glossy paper vertically against the right side of the paper tray. • If your paper includes instructions, read them carefully. • Make sure the glossy or coated side is facing you. • Do not force the paper into the printer. 9 - Lexmark Consumer Inkjet | Photo Guide - Page 10
paper. Note: If you are using letter size paper, adjusting the paper guide may not be necessary. Access your photos From a computer To access photos saved on a computer: 1 Click Start Programs Lexmark Photo Software Lexmark Photo Center. The Lexmark Photo Center opens with the Page tab selected. 10 - Lexmark Consumer Inkjet | Photo Guide - Page 11
2 Click the Explore tab. 3 In the directory in the right pane, select the folder where your photos are stored. Your photos appear in the left pane. 11 - Lexmark Consumer Inkjet | Photo Guide - Page 12
From a memory card Note: Depending on the product you purchased, your printer may not have memory card slots. If it does not, see "From a computer" on page 10. 1 Insert your memory card into the corresponding memory card - Lexmark Consumer Inkjet | Photo Guide - Page 13
each time a card is inserted. 4 Click OK. 5 Click OK on the Memory Card Copying screen when it appears. The Lexmark Photo Center opens with the Page tab selected. The photos stored on your inserted memory card appear in the thumbnails pane. Click here to scroll through page layout thumbnails. If you - Lexmark Consumer Inkjet | Photo Guide - Page 14
for more image layout options, such as Repeat Photo to all Frames, Rotate Photo in Frame, or Edit Photo. Print your photos 1 Click Print. The Print dialog box appears. 2 Click View all printer settings to change the printer settings, and then click OK. 3 Click OK. 4 To prevent smudging, remove each - Lexmark Consumer Inkjet | Photo Guide - Page 15
through the layout thumbnails to select a borderless layout for your photos. 6 Click and drag your photo into the layout. 7 Print your photo. For help, see "Print your photos" on page 14. 8 To prevent smudging, remove each photo as it exits the printer, and let it dry completely before stacking. 15 - Lexmark Consumer Inkjet | Photo Guide - Page 16
Working with your photos In this chapter, learn how to use the Photo Center to meet all of your photo printing needs. To learn how to: Organize photos Edit photos Use layouts E-mail photos See page: 17 18 22 24 16 - Lexmark Consumer Inkjet | Photo Guide - Page 17
in a different folder: 1 Open the Photo Center: click Start Programs Lexmark Photo Software Lexmark Photo Center. 2 Click Explore. 3 From the directory structure in the right pane, find and select your folder. The photos stored in the folder appear in the left pane. To move photos from one folder to - Lexmark Consumer Inkjet | Photo Guide - Page 18
Editing photos Opening the Photo Editor 1 Open the Photo Center: click Start Programs Lexmark Photo Software Lexmark Photo Center. 2 Double-click a photo from the thumbnails pane of the Photo Center. The Lexmark Photo Editor dialog box opens. The photo you selected is displayed in the dialog box. - Lexmark Consumer Inkjet | Photo Guide - Page 19
of these options: • Rotate Right • Rotate Left • Flip Horizontal • Flip Vertical Change the orientation of your photo. Crop Crop your photo. Red-Eye Removal Remove red-eye from your photo. One Click Level Fix Adjust contrast and brightness. Brightness/Contrast Adjust the color levels. Blur - Lexmark Consumer Inkjet | Photo Guide - Page 20
with the foreground color or a selected color. Draw free-hand on your photo. Draw a line on your photo. Erase part of your photo and show the background color. Paint freehand on your photo. Choose a color to use on your photo. To save your changes: 1 Click File Save As. Note: If you click File - Lexmark Consumer Inkjet | Photo Guide - Page 21
Image Size, and then click Crop. An editing window appears over the photo. 3 Resize the crop area. • Move your cursor to the frame of the editing window, and then click and drag the frame to resize it. • Click Ratios on the editing window, and then select from the available size ratios. 4 Click - Lexmark Consumer Inkjet | Photo Guide - Page 22
. 6 Click Print. Using layouts Creating a new layout 1 Click the Page tab of the Photo Center. 2 From the Page layout: drop-down menu, select Create Your Own Page Layout. The Lexmark Layout Editor dialog box opens. 3 Make sure Create a new Layout is selected. 4 Select the Paper size and Orientation - Lexmark Consumer Inkjet | Photo Guide - Page 23
your layout. a Click Save. b Enter a name for your layout and choose a style from the drop-down menu. c Click OK. 8 Close the Layout Editor main window. 9 Click Page Layout and scroll to your new layout. Modifying an existing layout 1 Click the Page tab. 2 Select Create Your Own Page Layout from the - Lexmark Consumer Inkjet | Photo Guide - Page 24
. 5 Click OK. Your existing layout opens in the Layout editor ready for you to edit. E-mailing photos to a friend 1 Access your photos. For help, see page 10. 2 Click the Share tab on the Photo Center. 3 From the thumbnails pane, select the images that you want to send. 4 Consider these options - Lexmark Consumer Inkjet | Photo Guide - Page 25
5 Click Attach Now. Your computer launches your e-mail program and opens a new message. Then, it attaches your photos to the message. 6 E-mail your photos to a friend. 25 - Lexmark Consumer Inkjet | Photo Guide - Page 26
for Windows 98, Windows Me, Windows 2000, and Windows XP. To learn about using your printer with a Macintosh, or for more information on using your printer with Windows, refer to the User's Guide for your operating system. To access the guides: 1 Insert CD. 2 Wait for the Lexmark Installation dialog - Lexmark Consumer Inkjet | Photo Guide - Page 27
the software to select your printer settings Print Properties With your document open, click File Print Properties or Preferences. I Want To menu Use this: When you want to... Quality/Copies, Paper Setup, and Print Adjust your printer settings. Layout tabs I Want To menu Print photos, banners - Lexmark Consumer Inkjet | Photo Guide - Page 28
size. Using the software to meet your printing needs General printing Use the Lexmark Z700-P700 Series Solution Center for: • Aligning and maintaining cartridges • Viewing printer status information, such as ink levels and the paper type detected in paper tray 1 • Troubleshooting • Printing a test - Lexmark Consumer Inkjet | Photo Guide - Page 29
Lexmark Z700-P700 Series Lexmark Solution Center. Click Help on any tab to view the printer software Help. Photo printing Use the Lexmark Photo Center for: • Accessing photos from a memory card • Organizing photos in layouts • Editing photos • Printing photos To open the Lexmark Photo Center - Lexmark Consumer Inkjet | Photo Guide - Page 30
: Left cartridge carrier: Color cartridges only 19 20 25 Right cartridge carrier: Black or Photo cartridges 48 50 55 90 (Photo) Note: You can use the printer with just a color cartridge or just a black cartridge. You must have a color cartridge installed when you print with a photo cartridge. 30 - Lexmark Consumer Inkjet | Photo Guide - Page 31
, install the printer software. Refer to the setup documentation for installation instructions. Is your printer connected to your computer through an external device, such as a USB hub, switch box, scanner, or fax machine? If not, refer to the Troubleshooting section of the Lexmark P700 Series Photo - Lexmark Consumer Inkjet | Photo Guide - Page 32
9 test page 31 S software, printer Lexmark Solution Center 28 Photo Center 29 Print Properties 27 Solution Center 28 T test page, printing 31 troubleshooting cartridges 30 checklist 30 printer cable 30 printer software 31 test page 31 U User's Guide, accessing 26 W Windows I Want To menu 27 Print - Lexmark Consumer Inkjet | Photo Guide - Page 33
Lexmark and Lexmark with diamond design are trademarks of Lexmark International, Inc., registered in the United States and/or other countries. Photo Jetprinter is a trademark of Lexmark International, Inc. © March 2003 Lexmark International, Inc. 740 West New Circle Road Lexington, Kentucky 40550
-
 1
1 -
 2
2 -
 3
3 -
 4
4 -
 5
5 -
 6
6 -
 7
7 -
8
-
9
-
10
-
11
-
12
-
13
-
14
-
15
-
16
-
17
-
18
-
19
-
20
-
21
-
22
-
23
-
24
-
25
-
26
-
27
-
28
-
29
-
30
-
31
-
32
-
33
 |
 |

www.lexmark.com
Photo Guide
March 2003
P700 Series
Photo Jetprinter™