Lexmark MS812 Quick Reference - Page 19
Clearing jams, Avoiding jams
 |
View all Lexmark MS812 manuals
Add to My Manuals
Save this manual to your list of manuals |
Page 19 highlights
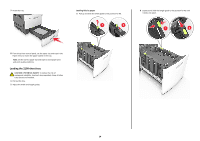
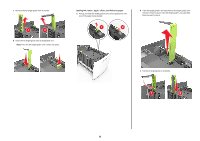
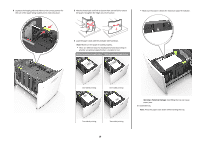
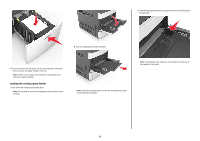
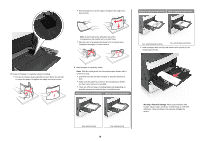
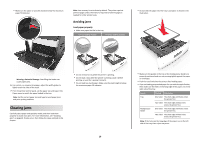
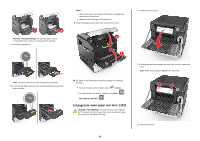
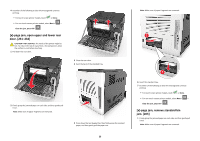
• Make sure the paper or specialty media is below the maximum paper fill indicator. Note: Jam recovery is set to Auto by default. The printer reprints jammed pages unless the memory required to hold the pages is needed for other printer tasks. Avoiding jams Load paper properly • Make sure paper lies flat in the tray. Correct loading of paper Incorrect loading of paper • Do not slide the paper into the tray. Load paper as shown in the illustration. Warning-Potential Damage: Overfilling the feeder can cause paper jams. 6 For custom- or universal-size paper, adjust the width guides to lightly touch the sides of the stack. 7 From the printer control panel, set the paper size and type in the Paper menu to match the paper loaded in the tray. Note: Set the correct paper size and type to avoid paper jams and print quality problems. Clearing jams Carefully select paper and specialty media, and then load them properly to avoid most jams. For more information, see "Avoiding jams" on page 19. If jams occur, then follow the steps outlined in this chapter. • Do not remove a tray while the printer is printing. • Do not load a tray while the printer is printing. Load it before printing, or wait for a prompt to load it. • Do not load too much paper. Make sure the stack height is below the maximum paper fill indicator. • Make sure the guides in the tray or the multipurpose feeder are properly positioned and are not pressing tightly against the paper or envelopes. • Push the tray firmly into the printer after loading paper. • If you are loading prepunched paper for use with the staple finisher, then make sure the holes on the long edge of the paper are on the right side of the tray. Source Tray Multipurpose feeder Printing Orientation One‑sided The short edge with holes enters the printer first. Two‑sided The short edge without holes enters the printer first. One‑sided The short edge with holes enters the printer first. Two‑sided The short edge without holes enters the printer first. Note: If the holes on the long edge of the paper are on the left side of the tray, then a jam may occur. 19
-
 1
1 -
2
-
3
-
4
-
5
-
6
-
7
-
8
-
9
-
10
-
11
-
12
-
13
-
 14
14 -
 15
15 -
 16
16 -
 17
17 -
 18
18 -
 19
19 -
 20
20 -
 21
21 -
 22
22 -
 23
23 -
 24
24 -
25
-
26
-
27
-
28
-
29
-
30
-
31
 |
 |
