Lexmark MS812 Quick Reference - Page 7
Using the touch-screen buttons, Setting the paper size and type, Configuring Universal paper settings
 |
View all Lexmark MS812 manuals
Add to My Manuals
Save this manual to your list of manuals |
Page 7 highlights
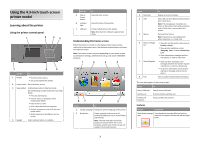
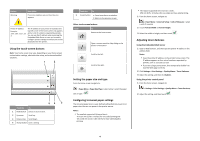
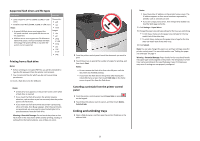
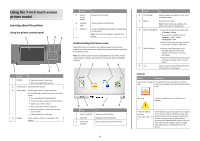
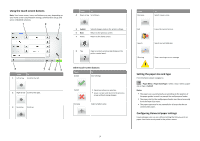
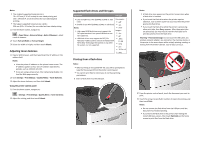
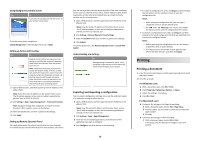
Using the touch-screen buttons Note: Your home screen, icons, and buttons may vary, depending on your home screen customization settings, administrative setup, and active embedded solutions. 1 2 3 Touch To 4 Down arrow Scroll down. 5 Submit 6 Back 7 Home Submit changes made in the printer settings. Return to the previous screen. Return to the home screen. 8 Tips Open a context-sensitive Help dialog on the printer control panel. 8 76 5 4 Touch To 1 Left arrow Scroll to the left. 2 Right arrow Scroll to the right. 3 Up arrow Scroll up. Other touch-screen buttons Touch Accept To Save settings. Cancel Increase • Cancel an action or a selection. • Leave a screen and return to the previous screen without saving changes. Select a higher value. Touch Decrease To Select a lower value. Exit Leave the current screen. Search Search current held jobs. Warning View a warning or error message. Setting the paper size and type From the home screen navigate to: > Paper Menu > Paper Size/Type > select a tray > select a paper size or type > Submit Notes: • The paper size is automatically set according to the position of the paper guides in each tray except the multipurpose feeder. • The paper size for the multipurpose feeder must be set manually from the Paper Size menu. • The paper type must be set manually for all trays that do not contain plain paper. Configuring Universal paper settings Universal paper size is a user‑defined setting that lets you print on paper sizes that are not preset in the printer menus. 7
-
 1
1 -
 2
2 -
 3
3 -
 4
4 -
 5
5 -
 6
6 -
 7
7 -
 8
8 -
 9
9 -
 10
10 -
 11
11 -
 12
12 -
13
-
14
-
15
-
16
-
17
-
18
-
19
-
20
-
21
-
22
-
23
-
24
-
25
-
26
-
27
-
28
-
29
-
30
-
31
 |
 |
