Lexmark MX812 Print Drivers for UNIX and LINUX Systems - Page 23
Creating a class, Adding to a class, Removing a queue from a class, Managing printer groups
 |
View all Lexmark MX812 manuals
Add to My Manuals
Save this manual to your list of manuals |
Page 23 highlights
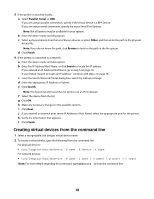
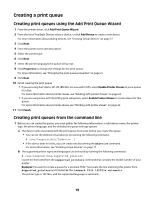
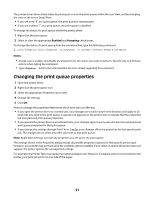
# /usr/lexprint/bin/chqueue -q myqueue -c -r class1 Note: After the last queue has been removed from a class, the class is removed automatically. Creating a class 1 Access Printer Classes. 2 Select Create a New Class. 3 Enter the name of the new class. Adding to a class 1 Access Printer Classes. 2 Select the check box next to the existing class to associate the queue with that class. Removing a queue from a class 1 Access Printer Classes. 2 Clear the check box next to the class from which you want to remove the queue. Note: A class exists as long as it contains queues. Managing printer groups Printer groups help you select a small group of print queues from the available print queues on a UNIX system. You can use the Group Manager tool to add or remove print queues in groups. Creating a printer group You can create a printer group using the Group Manager tool. You can access the New Group Manager dialog box by right-clicking All Printers and selecting New Group. 1 Enter the group name in the Group Name field. 2 From the Available Print Queues column, select the print queues you want to add to the group. 3 Click to add the print queues to the Select Print Queue column. Click to move all queues to the Select Print Queue column. 4 Click OK. Note: To remove a print queue from the Select Print Queue column, select the print queues to be removed, and then click . Adding a print queue to My Printers or another printer group You can add a print queue to My Printers or another printer group either by dragging a printer from the main window onto a printer group or by using the Group Manager tool. 1 Right-click a group name, and then select Group Manager. 2 From Available Print Queues, select the print queues you want to add to the group. 23
-
 1
1 -
2
-
3
-
4
-
5
-
6
-
7
-
8
-
9
-
10
-
11
-
12
-
13
-
14
-
15
-
16
-
17
-
 18
18 -
 19
19 -
 20
20 -
 21
21 -
 22
22 -
 23
23 -
 24
24 -
 25
25 -
 26
26 -
 27
27 -
 28
28 -
29
-
30
-
31
-
32
-
33
-
34
-
35
-
36
-
37
-
38
-
39
-
40
-
41
-
42
-
43
-
44
-
45
-
46
-
47
-
48
-
49
 |
 |
