Lexmark X864 User's Guide - Page 108
Choosing a fax connection, Using the Embedded Web Server for fax setup
 |
View all Lexmark X864 manuals
Add to My Manuals
Save this manual to your list of manuals |
Page 108 highlights
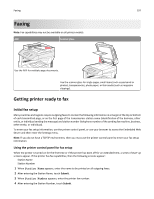
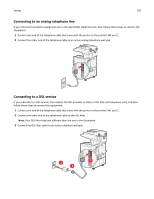
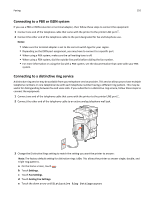
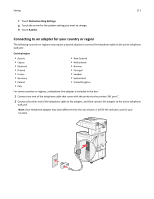
Faxing 108 Using the Embedded Web Server for fax setup 1 Type the printer IP address into the address field of your Web browser. Note: If you do not know the IP address of the printer, then print a network setup page and locate the address in the TCP/IP section. 2 Click Settings. 3 Click Fax Settings. 4 Click Analog Fax Setup. 5 Click inside the Station Name box, and then enter the name to be printed on all outgoing faxes. 6 Click inside the Station Number box, and then enter the printer fax number. 7 Click Submit. Choosing a fax connection You can connect the printer with equipment such as a telephone, an answering machine, or a computer modem. To determine the best way to set up the printer, see the following table. Notes: • The printer is an analog device that works best when directly connected to the wall outlet. Other devices (such as a telephone or answering machine) can be successfully attached to pass through the printer, as described in the setup steps. • If you want a digital connection such as ISDN, DSL, or ADSL, a third-party device (such as a DSL filter) is required. Contact your DSL provider for a DSL filter. The DSL filter removes the digital signal on the telephone line that can interfere with the ability of the printer to fax properly. • You do not need to attach the printer to a computer, but you do need to connect it to an analog telephone line to send and receive faxes. Equipment and service options Fax connection setup Connect directly to the telephone line See "Connecting to an analog telephone line" on page 109. Connect to a Digital Subscriber Line (DSL or ADSL) service See "Connecting to a DSL service" on page 109. Connect to a Private Branch eXchange (PBX) or Integrated See "Connecting to a PBX or ISDN system" on page 110. Services Digital Network (ISDN) system Use a Distinctive Ring service See "Connecting to a distinctive ring service" on page 110. Connect through an adapter used in your area See "Connecting to an adapter for your country or region" on page 111.
-
 1
1 -
2
-
3
-
4
-
5
-
6
-
7
-
8
-
9
-
10
-
11
-
12
-
13
-
14
-
15
-
16
-
17
-
18
-
19
-
20
-
21
-
22
-
23
-
24
-
25
-
26
-
27
-
28
-
29
-
30
-
31
-
32
-
33
-
34
-
35
-
36
-
37
-
38
-
39
-
40
-
41
-
42
-
43
-
44
-
45
-
46
-
47
-
48
-
49
-
50
-
51
-
52
-
53
-
54
-
55
-
56
-
57
-
58
-
59
-
60
-
61
-
62
-
63
-
64
-
65
-
66
-
67
-
68
-
69
-
70
-
71
-
72
-
73
-
74
-
75
-
76
-
77
-
78
-
79
-
80
-
81
-
82
-
83
-
84
-
85
-
86
-
87
-
88
-
89
-
90
-
91
-
92
-
93
-
94
-
95
-
96
-
97
-
98
-
99
-
100
-
101
-
102
-
 103
103 -
 104
104 -
 105
105 -
 106
106 -
 107
107 -
 108
108 -
 109
109 -
 110
110 -
 111
111 -
 112
112 -
 113
113 -
114
-
115
-
116
-
117
-
118
-
119
-
120
-
121
-
122
-
123
-
124
-
125
-
126
-
127
-
128
-
129
-
130
-
131
-
132
-
133
-
134
-
135
-
136
-
137
-
138
-
139
-
140
-
141
-
142
-
143
-
144
-
145
-
146
-
147
-
148
-
149
-
150
-
151
-
152
-
153
-
154
-
155
-
156
-
157
-
158
-
159
-
160
-
161
-
162
-
163
-
164
-
165
-
166
-
167
-
168
-
169
-
170
-
171
-
172
-
173
-
174
-
175
-
176
-
177
-
178
-
179
-
180
-
181
-
182
-
183
-
184
-
185
-
186
-
187
-
188
-
189
-
190
-
191
-
192
-
193
-
194
-
195
-
196
-
197
-
198
-
199
-
200
-
201
-
202
-
203
-
204
-
205
-
206
-
207
-
208
-
209
-
210
-
211
-
212
-
213
-
214
-
215
-
216
-
217
-
218
-
219
-
220
-
221
-
222
-
223
-
224
-
225
-
226
-
227
-
228
-
229
-
230
-
231
-
232
-
233
-
234
-
235
-
236
-
237
-
238
-
239
-
240
-
241
-
242
-
243
-
244
-
245
-
246
-
247
-
248
-
249
-
250
-
251
-
252
-
253
-
254
-
255
-
256
-
257
-
258
-
259
-
260
-
261
-
262
-
263
-
264
-
265
-
266
-
267
-
268
-
269
-
270
-
271
-
272
-
273
-
274
-
275
-
276
-
277
-
278
-
279
-
280
-
281
-
282
-
283
-
284
-
285
-
286
-
287
-
288
-
289
-
290
-
291
-
292
-
293
-
294
-
295
-
296
-
297
-
298
-
299
-
300
-
301
-
302
-
303
-
304
-
305
-
306
-
307
-
308
-
309
-
310
-
311
-
312
-
313
-
314
-
315
 |
 |