Lexmark X945e Quick Reference - Page 4
Copying
 |
View all Lexmark X945e manuals
Add to My Manuals
Save this manual to your list of manuals |
Page 4 highlights
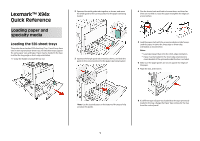
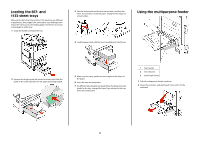
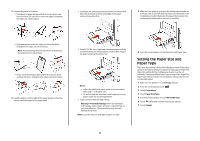
Copying Copying using the ADF 1 Load an original document faceup, short-edge first into the ADF or facedown on the scanner glass. Note: Do not load postcards, photos, small items, transparencies, photo paper, or thin media (such as magazine clippings) into the ADF. Place these items on the scanner glass. 2 If you are loading a document into the ADF, adjust the paper guides. 3 On the home screen, touch Copy, or use the keypad to enter the number of copies. The copy screen appears. 4 Change the copy settings as needed. 5 Touch Copy It. Copying using the scanner glass (flatbed) 1 Place an original document facedown on the scanner glass in the upper left corner. 2 On the home screen, touch Copy, or use the keypad to enter the number of copies. The copy screen appears. 3 Change the copy settings as needed. 4 Touch Copy It. 5 Place the next document on the scanner glass, and then touch Scan Next if you have more pages to scan, or touch Finish the Job if you are done. Touching Finish the Job returns the printer to the copy screen. Copying from one size to another 1 Load an original document faceup, short-edge first into the ADF or facedown on the scanner glass. Note: Do not load postcards, photos, small items, transparencies, photo paper, or thin media (such as magazine clippings) into the ADF. Place these items on the scanner glass. 2 If you are loading a document into the ADF, adjust the paper guides. 3 On the home screen, touch Copy. 4 Touch Copy from, and then identify the size of the original document. 5 Touch Copy to, and then select the size you want the copy to be. Note: If you select a paper size that is different from the "Copy from" size, the printer will scale the size automatically. 6 Touch Copy It. Copying a document that contains mixed paper sizes Use the ADF to copy an original document that contains mixed paper sizes. Depending on the paper sizes loaded and the "Copy to" and "Copy from" settings, each copy is either printed on mixed paper sizes (Example 1) or scaled to fit a single paper size (Example 2). Example 1: Copying to mixed paper sizes The printer has two paper trays, one tray loaded with letter-size paper and the other with legal-size paper. A document that contains letter- and legal-size pages needs to be copied. 1 Load an original document faceup, short-edge first into the ADF or facedown on the scanner glass. Note: Do not load postcards, photos, small items, transparencies, photo paper, or thin media (such as magazine clippings) into the ADF. Place these items on the scanner glass. 2 If you are loading a document into the ADF, adjust the paper guides. 3 On the home screen, touch Copy. 4 Touch Copy from, and then touch Mixed Sizes. 5 Touch Copy to, and then touch Auto Size Match. 6 Touch Copy It. The scanner identifies the mixed paper sizes as they scan. Copies are printed on mixed paper sizes corresponding to the paper sizes of the original document. Example 2: Copying to a single paper size The printer has one paper tray, loaded with letter-size paper. A document that contains letter- and legal-size pages needs to be copied. 1 Load an original document faceup, short-edge first into the ADF or facedown on the scanner glass. Note: Do not load postcards, photos, small items, transparencies, photo paper, or thin media (such as magazine clippings) into the ADF. Place these items on the scanner glass. 2 If you are loading a document into the ADF, adjust the paper guides. 3 On the home screen, touch Copy. 4 Touch Copy from, and then touch Mixed Letter/Legal. 4
-
 1
1 -
 2
2 -
 3
3 -
 4
4 -
 5
5 -
 6
6 -
 7
7 -
 8
8 -
 9
9 -
 10
10 -
11
-
12
 |
 |