Lexmark X945e Troubleshooting Guide - Page 6
Solving option problems - manual
 |
View all Lexmark X945e manuals
Add to My Manuals
Save this manual to your list of manuals |
Page 6 highlights
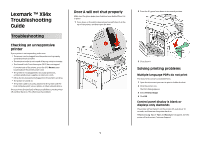
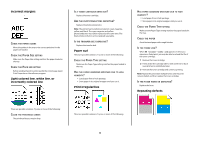
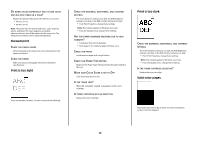
IS THE DOCUMENT LOADED PROPERLY? Load the original document faceup, short-edge first into the ADF or facedown on the scanner glass in the upper left corner. Note: Do not load postcards, photos, small items, transparencies, photo paper, or thin media (such as magazine clippings) into the ADF. Place these items on the scanner glass. MAKE SURE THE SHORTCUT NUMBER IS SET UP PROPERLY • Check to make sure the shortcut number has been programmed for the number that you want to dial. • As an alternative, dial the telephone number manually. Received fax has poor print quality These are possible solutions. Try one or more of the following: CAN THE DOCUMENT BE RE-SENT? Ask the person who sent you the fax to: • Check that the quality of the original document is satisfactory. • Resend the fax. There may have been a problem with the quality of the telephone line connection. • Increase the fax scan resolution, if possible. IS THE TONER LOW? When 88 toner low appears or when you experience faded print, replace the cartridge(s). MAKE SURE THE FAX TRANSMISSION SPEED IS NOT SET TOO HIGH Decrease the incoming fax transmission speed: 1 Open a Web browser. 2 In the address bar, type the IP address of the printer, and then press Enter. 3 Click Configuration. 4 Click Fax Settings. 5 Click Analog Fax Setup. 6 In the Max Speed box, click on one of the following: 2400 4800 9600 14400 33600 7 Click Submit. Blocking junk faxes 1 Open a Web browser. 2 In the address bar, type the IP address of the printer and, then press Enter. 3 Click Configuration. 4 Click Fax Settings. 5 Click Analog Fax Setup. 6 Click the No Name Fax option. This option blocks all incoming faxes that have a private caller ID or no fax station name. 7 In the Banned Fax List field, enter the phone numbers or fax station names of specific fax callers you want to block. Solving option problems Option does not operate correctly or quits after it is installed These are possible solutions. Try one or more of the following: RESET THE PRINTER Turn the printer off, wait for about 10 seconds, and then turn the printer on. CHECK TO SEE IF THE OPTION IS CONNECTED TO THE PRINTER 1 Turn the printer off. 2 Unplug the printer. 3 Check the connection between the option and the printer. 6 MAKE SURE THE OPTION IS INSTALLED Print a menu settings page and check to see if the option is listed in the Installed Options list. If the option is not listed, reinstall it. MAKE SURE THE OPTION IS SELECTED From the program you are using, select the option. Mac OS 9 users should make sure the printer is set up in the Chooser. Drawers MAKE SURE THE PAPER IS LOADED CORRECTLY 1 Open the paper tray. 2 Check for paper jams or misfeeds. 3 Make sure paper guides are aligned against the edges of the paper. 4 Make sure the paper tray closes properly. 5 Close the door. RESET THE PRINTER Turn the printer off. Wait 10 seconds. Turn the printer back on. Finisher If the finisher does not operate correctly, these are possible solutions. Try one or more of the following: MAKE SURE THE CONNECTION BETWEEN THE FINISHER AND THE PRINTER IS SECURE If the finisher is listed on the menu settings page, but paper jams when it exits the printer and enters the finisher, it may not be properly installed. Reinstall the finisher. For more information, see the hardware setup documentation that shipped with the finisher.
-
 1
1 -
 2
2 -
 3
3 -
 4
4 -
 5
5 -
 6
6 -
 7
7 -
 8
8 -
 9
9 -
 10
10 -
 11
11 -
 12
12 -
13
 |
 |
