LiftMaster 3850 3850 Elite Series Manual - Page 23
Adjustment, Program the Travel Limits, ADJUSTMENT STEP 1 - remote
 |
View all LiftMaster 3850 manuals
Add to My Manuals
Save this manual to your list of manuals |
Page 23 highlights
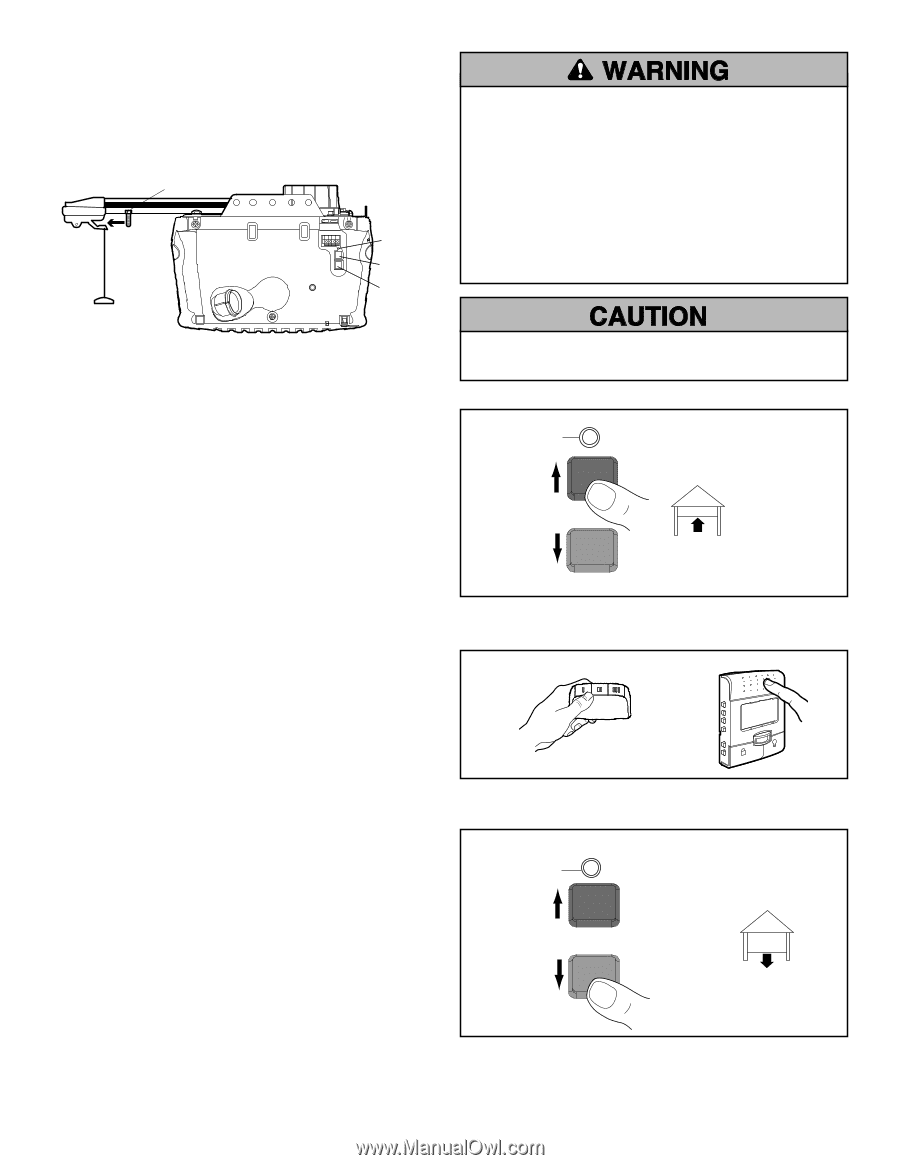
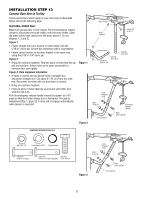
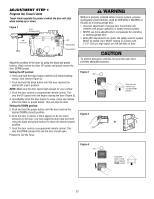
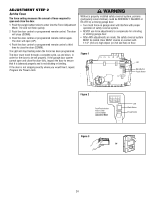
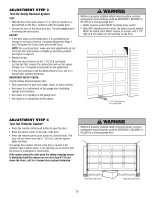
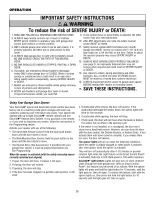
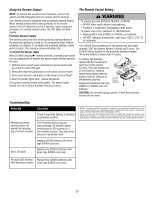
ADJUSTMENT STEP 1 Program the Travel Limits Travel limits regulate the points at which the door will stop when moving up or down. Figure 1 Cover Protection Bolt 2-4" (5-10 cm) LED Black Button Purple Button Without a properly installed safety reversal system, persons (particularly small children) could be SERIOUSLY INJURED or KILLED by a closing garage door. • Incorrect adjustment of garage door travel limits will interfere with proper operation of safety reversal system. • NEVER use force adjustments to compensate for a binding or sticking garage door. • After ANY adjustments are made, the safety reversal system MUST be tested. Door MUST reverse on contact with 1-1/2" (3.8 cm) high object (or 2x4 laid flat) on floor. Adjust the position of the door by using the black and purple buttons. Black moves the door UP (open) and purple moves the door DOWN (close). Setting the UP position: 1. Press and hold the black button until the LED starts flashing slowly, then release (Figure 2). 2. Push and hold the black button until the door reaches the desired UP (open) position. NOTE: Make sure the door opens high enough for your vehicle. 3. Push the door control or programmed remote control. This sets the UP (open) limit and begins closing the door (Figure 3). 4. Immediately when the door begins to close, press and release either the black or purple button. This will stop the door. Setting the DOWN position: 5. Push and hold the purple button until the door reaches the desired DOWN (closed) position. 6. Once the door is closed, if there appears to be too much pressure on the door, you may toggle the door back and forth using the black and purple buttons to reach the desired closed position. 7. Push the door control or programmed remote control. This sets the DOWN (close) limit and the door should open. Proceed to Set the Force. To prevent damage to vehicles, be sure fully open door provides adequate clearance. Figure 2 LED BLACK PURPLE Push and hold until the door is at desired UP position Figure 3 or LOCK LIGHT Figure 4 LED BLACK PURPLE Push either button to stop door at desired DOWN position 23
-
 1
1 -
2
-
3
-
4
-
5
-
6
-
7
-
8
-
9
-
10
-
11
-
12
-
13
-
14
-
15
-
16
-
17
-
 18
18 -
 19
19 -
 20
20 -
 21
21 -
 22
22 -
 23
23 -
 24
24 -
 25
25 -
 26
26 -
 27
27 -
 28
28 -
29
-
30
-
31
-
32
-
33
-
34
-
35
-
36
-
37
-
38
-
39
-
40
 |
 |