LiftMaster CAPXS Installation Manual - English French Spanish - Page 14
Setup Capxs, 5 Mounting Capxs, Introduction, Account Setup, Network/mounting, Power, Access Control
 |
View all LiftMaster CAPXS manuals
Add to My Manuals
Save this manual to your list of manuals |
Page 14 highlights
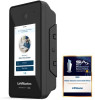
INTRODUCTION ACCOUNT SETUP POWER NETWORK/MOUNTING ACCESS CONTROL 4INTRODSUCeTtIOuNp CAAPCXCOSUNT SETUP POWER NETWORK/MOUNTING On the display, select each tab in Admin Mode to validate setup (network, inputs, outputs, etc.). Once you have validated the setup, exit Admin Mode. ACCESS CONTROL 5 Mounting CAPXS Insert the CAPXS in the mounting bracket until the unit snaps into place. Using screws provided, tighten the screws through the side of the mounting bracket to securely affix the CAPXS to the Mounting Bracket. 14
-
 1
1 -
2
-
3
-
4
-
5
-
6
-
7
-
8
-
 9
9 -
 10
10 -
 11
11 -
 12
12 -
 13
13 -
 14
14 -
 15
15 -
 16
16 -
 17
17 -
 18
18 -
 19
19 -
20
-
21
-
22
-
23
-
24
-
25
-
26
-
27
-
28
-
29
-
30
-
31
-
32
-
33
-
34
-
35
-
36
-
37
-
38
-
39
-
40
-
41
-
42
-
43
-
44
-
45
-
46
-
47
-
48
-
49
-
50
-
51
-
52
-
53
-
54
-
55
-
56
-
57
-
58
-
59
-
60
-
61
-
62
-
63
-
64
 |
 |

14
INTRODUCTION
ACCOUNT SETUP
NETWORK/MOUNTING
POWER
ACCESS CONTROL
On the display, select each tab in Admin Mode to validate setup (network,
inputs, outputs, etc.). Once you have validated the setup, exit Admin Mode.
Setup CAPXS
4
Insert the CAPXS in the mounting bracket until the unit snaps into
place. Using screws provided, tighten the screws through the side of the
mounting bracket to securely affix the CAPXS to the Mounting Bracket.
Mounting CAPXS
5