Marantz AV8003 AV8003 User Manua - Page 5
Starting The Network Player
 |
View all Marantz AV8003 manuals
Add to My Manuals
Save this manual to your list of manuals |
Page 5 highlights
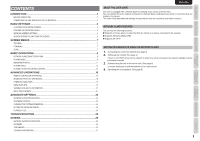
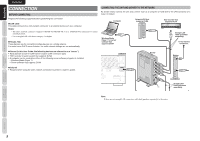
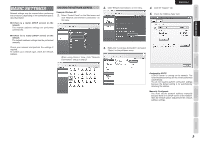
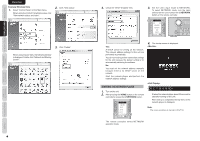
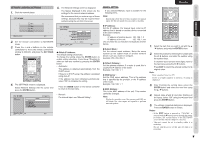
OTHERS TROUBLESHOOTING ADVANCED SETTINGS ADVANCED OPERATION BASIC OPERATION CONNECTION BASIC SETTINGS SCREEN MENUS ENGLISH Example: Windows Vista 1. Select "Control Panel" on the Start menu. When using the Control Panel Home view, click "View network status and tasks". 2. Click "View status". 3. Click "Details". When using Classic View, the following window is displayed. Double-click "Network and Sharing Center". 4 4. Check the "DHCP Enabled" item. 3. Set the unit's input mode to NETWORK. To select NETWORK mode, turn the input selector on the unit or press the 3. NETWORK button on the remote controller. STANDBY POWER ON/OFF AV PRE TUNER AV8003 PURE DIRECT H M-DAX INPUT SELECTOR SURROUND MODE AUTO ZONE MULTI SPEAKER PURE DIRECT THX 7.1CH INPUT PHONES SETUP MIC MENU EXIT ENTER BAND T-MODE TOP M-DAX Yes: A DHCP server is running on the network. The network address settings for the unit are performed automatically. You do not need to perform connection settings for the unit because the default setting is for automatically obtaining the address. No: You must set the network address manually because there is no DHCP server on the network. Start the network player and perform the network address settings. 4. The startup screen is displayed. STARTING THE NETWORK PLAYER 1. Turn on the unit. 2. After pressing the HOME button on the remote controllerler, press the 3. NETWORK button. NETWORK It takes the network player about 30 seconds to start after turning on the unit. After start-up is completed, the top menu of the network player is displayed. Note: The screen resolution at start-up is 480i/576i. The remote controller enters NETWORK operation mode.
-
 1
1 -
 2
2 -
 3
3 -
 4
4 -
 5
5 -
 6
6 -
 7
7 -
 8
8 -
 9
9 -
 10
10 -
 11
11 -
12
-
13
-
14
-
15
-
16
-
17
-
18
-
19
-
20
-
21
-
22
-
23
-
24
-
25
-
26
-
27
-
28
-
29
-
30
-
31
-
32
-
33
-
34
-
35
-
36
-
37
-
38
-
39
-
40
 |
 |
