Marantz AV8003 AV8003 User Manua - Page 6
Network Address Settings - reset
 |
View all Marantz AV8003 manuals
Add to My Manuals
Save this manual to your list of manuals |
Page 6 highlights
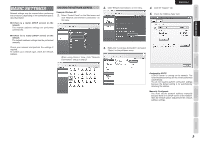
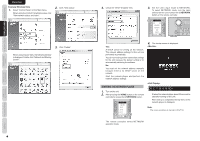
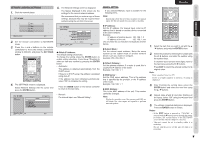
SCREEN MENUS BASIC SETTINGS CONNECTION BASIC OPERATION ENGLISH NETWORK ADDRESS SETTINGS 1. Start the network player. NETWORK Music Photo Video Server Select ENTER Enter 1 2. Set the remote controllerler to NETWORK mode. 3. Press the < and > buttons on the remote controllerler to move the remote controllerler window to 005/005, and press the SETTINGS button. 4. The SETTINGS window is displayed. Select Network Settings with the cursor and press the ENTER button. SETTINGS 1/5 TITLE Network Settings Settings Network Settings Preferences System Reset Software Update System Information Select ENTER Enter Exit 1 5. The Network Settings screen is displayed. The figures displayed in this screen are the settings for the current network address. We recommend that you make a copy of these settings, because they may be required when authenticating the unit from the server. SETTINGS Notwork Settings Obtain IP Address Automatic IP Address 192 . 168 . 0 . 80 Subnet Mask 255 . 255 . 255 . 0 Default Gateway . . . DNS Server . . . MAC Address 00 : 06 : 78 : xx : xx : xx OK CANCEL Select ENTER Enter Exit 1 ● Obtain IP Address : The default setting is Automatic. To change the setting, press the ENTER button to enable setting selections. Press the 3 / 4 buttons to select an item and confirm by pressing the ENTER button. • Automatic : The address is obtained automatically from the DHCP server. If there is no DHCP server, the address is assigned using Auto-IP. If the address has been obtained automatically, select "OK" to complete the setting. Press the GUIDE button on the remote controller to return to the top menu. • Manual : For manual input, see "Manual Setting". MANUAL SETTING If you selected Manual, input is possible for the following items. Note: Knowledge about the network is required for manual input. See the user guide for your router or modem. ● IP Address: Set the IP address. For manual input, enter an IP address that is based on another device connected to the same network. Example: IP address of another device: 192. 168. 1. 2 IP address of the unit: 192. 168. 1. xxx Use a number for xxx that does not duplicate another device. ● Subnet Mask : Set the subnet mask address. Enter the same number as the subnet mask of another network device, such as a router or computer. Example: 255. 255. 255. 0 ● Default Gateway : Set the gateway address. If a router is used, this is usually the IP address of the router. Example: 192. 168. 1. 1 ● DNS Server : Set the DNS server address. This is the address that is specified by the provider, or the IP address of the router. Example: 192. 168. 1. 1 ● MAC Address : This is the MAC address of the unit. This number cannot be changed. Note: Playback is possible even if the gateway and DNS are left blank, but value inputs are required to perform network updates. 1. Select the item that you want to set with the 3 / 4 buttons and press the ENTER button. 2. Select the position for entering the number with the 1 / 2 buttons, and enter the number using the number keys. If a number does not have three digits, move to the next value using the 1 / 2 buttons. Press EXIT to return the entered number to its original value. Note: Enter a number from 0 to 255. If 256 or a higher number is entered, a warning is displayed 3. After finishing the setting input, press the ENTER button and select the next item using the 3 / 4 buttons. 4. Repeat steps 2 and 3, and after finishing all the inputs, select "OK" using the 4 button and press the ENTER button. 5. The settings completed dialog box is displayed. Press the ENTER button to restart. Notes: • If the EXIT button is pressed or "CANCEL" is selected with the 4 button partway through the setting procedure, the screen returns to the SETTINGS screen and the entered settings are canceled. • The unit cannot be set to standby while it is restarting. Do not turn the power of this unit off while it is restarting. ADVANCED OPERATION ADVANCED SETTINGS TROUBLESHOOTING OTHERS 5
-
 1
1 -
 2
2 -
 3
3 -
 4
4 -
 5
5 -
 6
6 -
 7
7 -
 8
8 -
 9
9 -
 10
10 -
 11
11 -
 12
12 -
13
-
14
-
15
-
16
-
17
-
18
-
19
-
20
-
21
-
22
-
23
-
24
-
25
-
26
-
27
-
28
-
29
-
30
-
31
-
32
-
33
-
34
-
35
-
36
-
37
-
38
-
39
-
40
 |
 |
