Marantz M-CR603 M-CR603 User Manual - English - Page 15
Basic operations - remote
 |
View all Marantz M-CR603 manuals
Add to My Manuals
Save this manual to your list of manuals |
Page 15 highlights
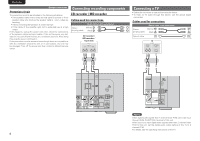
Getting Started Connections Basic Operations Advanced Operations Information Explanation terms Troubleshooting Specifications Index Basic operations Symbols used to indicate buttons in this guide Button located on both the main unit and the remote control BUTTON Button only on the main unit Button only on the remote control [BUTTON] ON/STANDBY ON/STANDBY ENGLISH This section provides information on basic operations such as settings and playback procedures. For other operations, see the sections below. n Setting the timer [Timer] (vpage 28) n Setting the others [Other] (vpage 32) Preparations Turning the power on Press ON/STANDBY. Setting the current time (Auto Adjust) (12-Hour Display) • When the unit is connected to the Internet, the current time is set automatically. • The default Time Zone setting of this unit is the Eastern Standard Time zone. To change the Time Zone and Summer Time, see "Adjusting the clock automatically [Clock]" (vpage 29). • When the unit is not connected to the Internet, set the current time manually. See "Setting the current time (Manual Adjust) (12-Hour Display)" (vpage 29). NOTE • Power continues to be supplied to some of the circuitry even when the power is in the standby mode. When leaving home for long periods of time, either press ON/STANDBY to turn off the power, or unplug the power cord from the power outlet. • Be sure to stop playback before turning the power off. n Completely turning off the power Unplug the power cord from the wall outlet. • Note that the time setting is cleared when the power cord is unplugged from the outlet. • The settings made for the various functions may be cleared if the power cord is left unplugged from a power outlet for an extended period of time. Turning the power off Press ON/STANDBY. NOTE • Be sure to stop playback before turning the power off. 11
-
 1
1 -
2
-
3
-
4
-
5
-
6
-
7
-
8
-
9
-
 10
10 -
 11
11 -
 12
12 -
 13
13 -
 14
14 -
 15
15 -
 16
16 -
 17
17 -
 18
18 -
 19
19 -
 20
20 -
21
-
22
-
23
-
24
-
25
-
26
-
27
-
28
-
29
-
30
-
31
-
32
-
33
-
34
-
35
-
36
-
37
-
38
-
39
-
40
-
41
-
42
-
43
-
44
-
45
-
46
-
47
-
48
-
49
-
50
-
51
-
52
 |
 |
