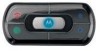
Motorola T605 User Manual - Page 9
Installing the Handsfree Car Kit, Installing the Electronic Control Module
 |
UPC - 723755987999
View all Motorola T605 manuals
Add to My Manuals
Save this manual to your list of manuals |
Page 9 highlights
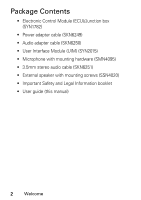
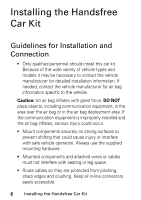
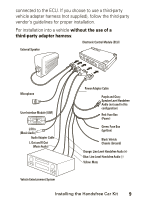
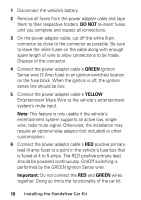
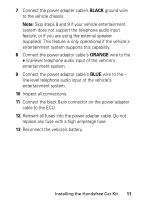
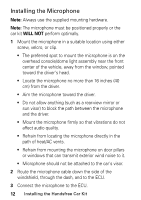
• The car kit is intended for use in 12 Volt negative ground systems only. The car kit draws less than 3 Amps. Confirm that the vehicle's electrical system can supply this current. • The installation steps are in no particular order. In general, you should first pick the locations where you will be mounting the UIM, microphone, speaker, and ECU. Mount the UIM, speaker and microphone and route the cables to the ECU mounting location. Install the power adaptor cable. Plug everything into the ECU, and then mount the ECU. • The car kit has separate output paths for the handsfree audio (line and speaker levels) and music (RCA line-level output). Both handsfree and music audio paths need to be connected for full system operation. Installing the Handsfree Car Kit Caution: This car kit must be connected to a maximum 5 Amp fuse in the car fuse panel to prevent fire or other damages should a short circuit occur in the ECU. Before installation, unpack, assemble, and test all components on a service bench. Installing the Electronic Control Module (ECU) Mount the ECU securely. Installing the Handsfree Car Kit 7
-
 1
1 -
2
-
3
-
 4
4 -
 5
5 -
 6
6 -
 7
7 -
 8
8 -
 9
9 -
 10
10 -
 11
11 -
 12
12 -
 13
13 -
 14
14 -
15
-
16
-
17
-
18
-
19
-
20
-
21
-
22
-
23
-
24
-
25
-
26
-
27
-
28
-
29
-
30
-
31
-
32
-
33
-
34
-
35
-
36
-
37
-
38
-
39
-
40
-
41
-
42
-
43
-
44
-
45
-
46
-
47
-
48
-
49
-
50
-
51
-
52
-
53
-
54
-
55
-
56
-
57
-
58
-
59
-
60
-
61
-
62
-
63
-
64
-
65
-
66
-
67
-
68
-
69
-
70
-
71
-
72
-
73
-
74
-
75
-
76
-
77
-
78
-
79
-
80
-
81
-
82
-
83
-
84
-
85
-
86
-
87
-
88
-
89
-
90
-
91
-
92
-
93
-
94
-
95
-
96
-
97
-
98
-
99
-
100
-
101
-
102
-
103
-
104
-
105
-
106
-
107
-
108
-
109
-
110
-
111
-
112
-
113
-
114
-
115
-
116
-
117
-
118
-
119
-
120
-
121
-
122
-
123
-
124
-
125
-
126
-
127
-
128
-
129
-
130
-
131
-
132
-
133
-
134
-
135
-
136
-
137
-
138
-
139
-
140
-
141
-
142
-
143
-
144
-
145
-
146
-
147
-
148
-
149
-
150
-
151
-
152
-
153
-
154
-
155
-
156
-
157
-
158
-
159
-
160
-
161
-
162
-
163
-
164
-
165
-
166
-
167
-
168
-
169
-
170
-
171
-
172
-
173
-
174
-
175
-
176
-
177
-
178
-
179
-
180
-
181
-
182
-
183
-
184
-
185
-
186
-
187
-
188
-
189
-
190
-
191
-
192
-
193
-
194
-
195
-
196
-
197
-
198
-
199
-
200
-
201
-
202
-
203
-
204
-
205
-
206
-
207
-
208
-
209
-
210
-
211
-
212
 |
 |
