NEC NP-PX700W-08ZL User Manual - Page 133
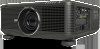
NEC NP-PX700W-08ZL Manual
 |
View all NEC NP-PX700W-08ZL manuals
Add to My Manuals
Save this manual to your list of manuals |
Page 133 highlights
5. Using On-Screen Menu [INSTALLATION(2)] Disabling the Cabinet Buttons [CONTROL PANEL LOCK] This option turns on or off the CONTROL PANEL LOCK function. NOTE: • This CONTROL PANEL LOCK does not affect the remote control functions. • When the control panel is locked, pressing and holding the EXIT button on the projector cabinet for about 10 seconds will change the setting to [OFF]. TIP: When the [CONTROL PANEL LOCK] is turned on, a key lock icon [ ] will be displayed at the bottom right of the menu. Enabling Security [SECURITY] This feature turns on or off the SECURITY function. Unless the correct keyword is entered, the projector cannot project an image. (→ page 42) NOTE: Your setting will not be affected even when [RESET] is done from the menu. Selecting Communication Speed [COMMUNICATION SPEED] This feature sets the baud rate of the PC Control port (D-Sub 9P). It supports data rates from 4800 to 115200 bps. The default is 38400 bps. Select the appropriate baud rate for your equipment to be connected (depending on the equipment, a lower baud rate may be recommended for long cable runs). NOTE: • Select [38400bps] or less when using the User Supportware. • Your selected communication speed will not be affected even when [RESET] is done from the menu. Turning On or Off Remote Sensor [REMOTE SENSOR] This option determines which remote sensor on the projector is enabled in wireless mode. The options are: FRONT/BACK, FRONT, and BACK. If the remote control system does not function when direct sunlight or strong illumination strikes the remote control sensor of the projector, change another option. Setting ID to the Projector [CONTROL ID] You can operate multiple projectors separately and independently with the single remote control that has the CONTROL ID function. If you assign the same ID to all the projectors, you can conveniently operate all the projectors together using the single remote control. To do so, you have to assign an ID number to each projector. CONTROL ID NUMBER Select a number from 1 to 254 you wish to assign to your projector. CONTROL ID Select [OFF] to turn off the CONTROL ID setting and select [ON] to turn on the CONTROL ID setting. 119
-
 1
1 -
2
-
3
-
4
-
5
-
6
-
7
-
8
-
9
-
10
-
11
-
12
-
13
-
14
-
15
-
16
-
17
-
18
-
19
-
20
-
21
-
22
-
23
-
24
-
25
-
26
-
27
-
28
-
29
-
30
-
31
-
32
-
33
-
34
-
35
-
36
-
37
-
38
-
39
-
40
-
41
-
42
-
43
-
44
-
45
-
46
-
47
-
48
-
49
-
50
-
51
-
52
-
53
-
54
-
55
-
56
-
57
-
58
-
59
-
60
-
61
-
62
-
63
-
64
-
65
-
66
-
67
-
68
-
69
-
70
-
71
-
72
-
73
-
74
-
75
-
76
-
77
-
78
-
79
-
80
-
81
-
82
-
83
-
84
-
85
-
86
-
87
-
88
-
89
-
90
-
91
-
92
-
93
-
94
-
95
-
96
-
97
-
98
-
99
-
100
-
101
-
102
-
103
-
104
-
105
-
106
-
107
-
108
-
109
-
110
-
111
-
112
-
113
-
114
-
115
-
116
-
117
-
118
-
119
-
120
-
121
-
122
-
123
-
124
-
125
-
126
-
127
-
 128
128 -
 129
129 -
 130
130 -
 131
131 -
 132
132 -
 133
133 -
 134
134 -
 135
135 -
 136
136 -
 137
137 -
 138
138 -
139
-
140
-
141
-
142
-
143
-
144
-
145
-
146
-
147
-
148
-
149
-
150
-
151
-
152
-
153
-
154
-
155
-
156
-
157
-
158
-
159
-
160
-
161
-
162
-
163
-
164
-
165
-
166
-
167
-
168
-
169
-
170
-
171
-
172
-
173
-
174
-
175
-
176
-
177
-
178
-
179
-
180
-
181
-
182
-
183
-
184
-
185
-
186
-
187
-
188
-
189
-
190
-
191
-
192
-
193
-
194
-
195
-
196
-
197
-
198
-
199
-
200
-
201
-
202
-
203
-
204
-
205
-
206
-
207
-
208
-
209
-
210
-
211
-
212
-
213
-
214
-
215
-
216
-
217
-
218
-
219
-
220
-
221
-
222
-
223
-
224
-
225
-
226
-
227
-
228
-
229
-
230
-
231
-
232
-
233
-
234
-
235
-
236
-
237
-
238
-
239
-
240
-
241
-
242
-
243
-
244
 |
 |
