NEC X552S Users Manual
NEC X552S Manual
 |
View all NEC X552S manuals
Add to My Manuals
Save this manual to your list of manuals |
NEC X552S manual content summary:
- NEC X552S | Users Manual - Page 1
User's Manual MultiSync X401S MultiSync X462S MultiSync X552S - NEC X552S | Users Manual - Page 2
-Display) LCD monitor via LAN Control English-34 Connecting to a Network ...English-34 Network Setting by Using an HTTP Browser English-34 Features ...English-38 Troubleshooting ...English-39 Specifications - X401S ...English-40 Specifications - X462S ...English-41 Specifications - X552S - NEC X552S | Users Manual - Page 3
: NEC Display Solutions of America, Inc. Address: 500 Park Boulevard, Suite 1100 Itasca, Illinois 60143 Tel. No.: (630) 467-3000 Type of Product: Display Monitor Equipment Classification: Class B Peripheral Model: MultiSync X401S (X401S) MultiSync X462S (X462S) MultiSync X552S (X552S) We - NEC X552S | Users Manual - Page 4
operating the MultiSync monitor with serviced in the country where it was purchased. • The intended primary use of this product is as an Information Technical Equipment in an office or domestic environment. • The product is intended to be connected to a computer and is not intended for the display - NEC X552S | Users Manual - Page 5
Code (NEC), in particular Section 820.93, Grounding of Outer Conductive Shield of a Coaxial Cable. • The screen of the coaxial cable is intended to be connected to earth in the building installation. Immediately unplug your monitor from the wall outlet and refer servicing to qualified service - NEC X552S | Users Manual - Page 6
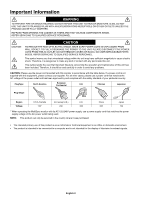
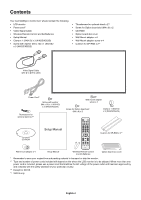
Contents Your new MultiSync monitor box* should contain the following: • LCD monitor • Power cord*1 • Video Signal Cable • Wireless Remote Control and AA Batteries • Setup Manual • Clamp x 1 (X401S)/ x 3 (X462S/X552S) • Screw with washer (M4 x 10) x 1 (X401S)/ x 3 (X462S/X552S) • Thumbscrew for - NEC X552S | Users Manual - Page 7
to insure that it is strong enough to support the weight of the unit so that the unit will be safe from harm. • Refer to the instructions included with the mounting equipment for detailed information. • Make sure there is no gap between the monitor and the bracket. Using an optional wall mount - NEC X552S | Users Manual - Page 8
monitor, so that heat can properly dissipate away from the unit and mounting apparatus. Mounting on ceiling • Ensure that the ceiling is sturdy enough to support the weight problems that may occur with the mounting apparatus. If a problem is detected, please refer to qualified personnel for service. - NEC X552S | Users Manual - Page 9
of the internal speakers will differ according to the acoustics of the room. 6. Prevent Tipping When using the display with the optional table top stand fasten the LCD to a wall using a cord or chain that can support the weight of the monitor in order to prevent the monitor from falling. Fasten - NEC X552S | Users Manual - Page 10
steps to connect to the speaker to the monitor. 1. Turn off the power to the monitor. 2. Attach the cushion for SP-RM2 to the back side of the monitor (F). 3. Connect the speaker and the monitor. The red cable (+) connects For more information, please refer to the SP-RM2 Quick Start Guide. English-8 - NEC X552S | Users Manual - Page 11
the monitor. *: included in speaker. A. Flat head screw B. Pan head screw C. Mounting bracket D. Holder E. Pad F. Screw hole NOTE: NOTE: Do not use devices other than specified. Use the SP-RM1 for the X462S and the X552S. For more information, please refer to the SP-RM1 Quick Start Guide. English - NEC X552S | Users Manual - Page 12
remote control (when using the wireless remote control). See also page 13. Glows green when the LCD monitor is in active mode*. Glows red when the LCD is in POWER OFF mode. Glows amber when the monitor is in Power Save Mode. Green and Amber blink alternately while in Power Standby mode with the - NEC X552S | Users Manual - Page 13
output. * This connector does not support analog input. OUT connector: To output PC in order to control RS-232C functions. OUT connector: Connect RS-232C output. To connect multiple MultiSync monitors speaker, use a stereo mini jack that has a L-shaped connector head under 29 mm. ¹ EXTERNAL SPEAKER - NEC X552S | Users Manual - Page 14
SOUND button Artificial surround sound for internal/external speakers. Audio out is disabled when surround is set change channel and set REMOTE ID. ¶ ENT button*2 º DISPLAY button Turns on/off the information OSD. See page 20 level. ƻ CH UP/DOWN button*2 Ƽ GUIDE button*2 ƽ MUTE button Turns on/off - NEC X552S | Users Manual - Page 15
's action depends on which option board you use. Refer to the option board's manual for further information. Operating Range for the Remote Control Point the top of the remote control toward the LCD monitor's remote sensor during button operation. Use the remote control within a distance of about - NEC X552S | Users Manual - Page 16
LCD monitor so as not to scratch the panel. 2. Install the remote control batteries The remote control is powered by two 1.5V AA batteries. To install or replace batteries: NEC equipment user manual for further information. NOTE: Do not connect/disconnect cables when turning on the monitor or - NEC X552S | Users Manual - Page 17
all the attached external equipment When connected with a computer, switch on the power of the computer first. 6. Operate the attached external equipment Display the signal from the desired input source. 7. Adjust the sound Make volume adjustments when required. 8. Adjust the screen (See pages 22 and - NEC X552S | Users Manual - Page 18
manual included with each separate piece of equipment. Wiring Diagram Solid lines = video signal Dotted lines = audio signal Stereo Amplifier DVD player with HDMI out DVD player Second monitor : VIDEO D-SUB MODE: COMPONENT DVI MODE: DVI-PC RAW/EXPAND*1 Input signal name DVI HDMI SCART VIDEO1 - NEC X552S | Users Manual - Page 19
Connecting a Personal Computer Connecting your computer to your LCD monitor will enable you to display your computer's screen image. Some video cards with a pixel clock over 162MHz may not display an image correctly. Your LCD monitor displays proper image by adjusting the factory preset timing - NEC X552S | Users Manual - Page 20
turn red or amber while powered off. NOTE: The Main Power Switch must be in the ON position in order to power up the monitor using the remote control or the Power Button on the front of the LCD. OFF ON Main Power Switch Power Button Using the remote control English-18 - NEC X552S | Users Manual - Page 21
(See Troubleshooting page 39) *1 If "OFF" is selected in POWER INDICATOR (page 25), the LED will not light when the LCD monitor is in active mode. *2 Without any option, with factory settings, VGA input only. Using Power Management The LCD monitor follows the VESA approved DPM Display Power - NEC X552S | Users Manual - Page 22
Monitor ID, Input Source, Picture Size, etc. Press the DISPLAY button on the remote to bring up the Information OSD. ᕡ ID number assigned to current monitor*1 ᕢ ID number assigned monitor AMBIENT2 HIGHBRIGHT AMBIENT Mode The backlight of the LCD screen can be set to increase or decrease depending - NEC X552S | Users Manual - Page 23
English OSD (On-Screen-Display) Controls NOTE: Some functions may not be available 50 50 THANK YOU FOR SAVING THE ENVIRONMENT. CARBON FOOTPRINT 86.0 % Goto Adjustment Return Close Key Guide Adjustment Settings Press UP or DOWN button to select sub-menu. Press SET. Press UP or DOWN, - NEC X552S | Users Manual - Page 24
sRGB is selected in picture mode, this function cannot be changed. Gamma correction is handled by the LCD panel. NATIVE* (except sRGB setting) 2.2 Typical display gamma for use with a PC. 2.4 Good for video (DVD, etc.) S GAMMA Special gamma for certain types of movies. Raises the dark parts - NEC X552S | Users Manual - Page 25
only V RESOLUTION Adjusts the vertical size of the image. - VGA input only INPUT RESOLUTION VGA input only If there is a problem with signal detection, this function forces the monitor to display the signal at the desired resolution. After selection, execute "AUTO SETUP" if required. If no - NEC X552S | Users Manual - Page 26
, SCHEDULE SETTINGS and SCHEDULE LIST. PIP KEEP PIP MODE Allows the monitor to remain in "PIP" and "TEXT TICKER" mode after powering off Y = 92 FULL OFF Depends on signal input ENGLISH (Depends on destination) MENU DISPLAY TIME OSD POSITION UP DOWN RIGHT LEFT Turns off the OSD after a period of - NEC X552S | Users Manual - Page 27
of the monitor. If "OFF" is selected, LED will not light when the LCD monitor is GROUP ID), is replying or not. When you need reply, please select "ON". If you connect the multiple monitors that are daisy-chained from second monitor by RS-232C, you need to select "OFF" from second monitor. Displays - NEC X552S | Users Manual - Page 28
settings are copied when you select this item. Default is off. RESET Resets "MULTI DISPLAY" options back to factory settings except LAN SETTING and TILE - MATRIX MEM. DISPLAY PROTECTION POWER SAVE Sets how long the monitor waits to go into power save mode after the signal is lost. ON Note - NEC X552S | Users Manual - Page 29
When the monitor is displaying a signal from the current source and a new secondary source is supplied to the monitor, the monitor will of DVI-D equipment which is connected to the DVI input. Select "DVI-PC" when PC or other computer equipment is connected. Select "DVI-HD" when DVD player - NEC X552S | Users Manual - Page 30
Image size stays within the display area. The whole image is displayed on the screen. NOTE: When monitor power is turned off by OFF TIMER setting or SCHEDULE setting. Monitor power is automatically "OFF" when connected PC is OFF or the monitor is in power save mode. When ON is selected, connected PC - NEC X552S | Users Manual - Page 31
Unlike CRT monitors, LCD monitors' image persistence is not permanent, but constant images being displayed for a long display devices, NEC DISPLAY SOLUTIONS recommends displaying moving images and using a moving screen saver at regular intervals whenever the screen is idle or turning off the monitor - NEC X552S | Users Manual - Page 32
number is shown in white on the display, the MONITOR ID number and the REMOTE CONTROL ID are not the same. This LCD monitor can be controlled via personal computer or wireless remote control using an RS-232C connection. MONITOR ID and IR CONTROL Using one PC or one infrared wireless controller, up - NEC X552S | Users Manual - Page 33
will be shown at top left side of the screen. Monitor ID: Displays the ID number of the current monitor within the daisy chain. Target ID: Displays the ID number of the monitor that to be controlled via daisy chain from the current monitor. Press the "+" or "-" buttons to change the "Target ID" to - NEC X552S | Users Manual - Page 34
Connection LCD Monitor + PC MultiSync MultiSync PC (Out monitor or multiple monitors that are daisy-chained together please use the control command. Instructions for the control command can be found on the CD included with the display. The file is called "External_control.pdf". Multiple monitors - NEC X552S | Users Manual - Page 35
English 2) Control command diagram For other commands, please see "External_Control.pdf" file on the CD-ROM. Function (Monitor ID = 1) Power ON Power OFF Input Source Select DisplayPort Input Source Select DVI Input Source Select VGA Input Source Select HDMI Input Source Select DVD/ - NEC X552S | Users Manual - Page 36
F5 keys to refresh your web browser (or clear the cache). The display or button's response can be slowed down or operation may not be your network. Should this happen, consult your network administrator. The LCD monitor may not respond if its buttons are repeatedly pressed in rapid intervals - NEC X552S | Users Manual - Page 37
in the "HOSTS" file of the computer being used, you can then access the network settings of the display via that host name using a compatible browser. Example 1: When the host name of the monitor has been set to "pd.nec.co.jp", access is gained to the network setting by specifying http://pd - NEC X552S | Users Manual - Page 38
when using wired LAN. An error message notification will be sent when an error occurs in the monitor. Alert Mail Checking [ENABLE] will turn on the Alert Mail feature. Checking [DISABLE] will turn menu. For Control command diagram, please see file "External_Control.pdf" on the CD-ROM. English-36 - NEC X552S | Users Manual - Page 39
Option board abnormal Please contact your supplier. Reconfirm the setting condition from OSD (DISPLAY PROTECTION-FAN CONTROL) or please contact your supplier. Please check "No picture" in "Troubleshooting". Please contact your supplier. Sample: The following examples are content of Alert Mail that - NEC X552S | Users Manual - Page 40
LCD monitor to any VESA standard (FDMIv1) third party mounting arm or bracket. NEC recommends using mounting interface that comply with TÜV-GS and/or UL1678 standard in North America. DVI-D: The digital-only subset of DVI ratified by the Digital Display Working Group of this display supports HDCP. - NEC X552S | Users Manual - Page 41
the power indicator option in the OSD is set to ON. RED LED on monitor is blinking • A certain failure might have occurred, please contact your nearest authorized NEC DISPLAY SOLUTIONS service facility. • If the monitor is powered off by the inside temperature being higher than the normal operating - NEC X552S | Users Manual - Page 42
x (Temp - 40°C) regarding over 40°C Dimension 925.1 (W) x 537.1 (H) x 55.6 (D) mm / 36.4 (W) x 21.1 Weight 14.9 kg (32.8 lbs) VESA compatible mounting interface 300 mm x 300 mm (M6, 4 Holes) Power Management VESA DPM Plug & Play VESA DDC2B, DDC/CI, DisplayPort Accessories Setup manual - NEC X552S | Users Manual - Page 43
Specifications LCD Module 46"/1168 Speaker Output Control Power Supply Operational Environment Storage Environment Dimension Weight VESA x 300 mm (M6, 4 Holes) VESA DPM VESA DDC2B, DDC/CI, DisplayPort Setup manual, Power Cord, Video Signal cable, Remote Control, AA Battery x 2, Clamp x 3, - NEC X552S | Users Manual - Page 44
X552S Product Specifications LCD Speaker Output External Speaker Jack 10 W + 10 W (8 ohm) Internal Speaker down position/with Slot 2 type PC) Humidity: 20 - 80% x (Temp - 40°C) regarding over 40°C Dimension 1254.5 (W) x 725.3 (H) x 65 without handle and stand holder) Weight 24.5 kg (54.0 manual - NEC X552S | Users Manual - Page 45
Mini D-SUB 15P 1 5 6 10 11 15 2) RS-232C input/output Pin No 1 2 3 4 5 6 7 8 9 Name NC RXD TXD NC GND NC NC NC NC D-SUB 9P 1 6 This LCD monitor uses RXD, TXD and GND lines for RS-232C control. 5 9 English-43 - NEC X552S | Users Manual - Page 46
that waste electrical and electronic products carrying the mark (left) must be disposed of separately from normal household waste. This includes monitors and electrical accessories, such as signal cables or power cords. When you need to dispose of your NEC display products, please follow the
-
 1
1 -
 2
2 -
 3
3 -
 4
4 -
 5
5 -
 6
6 -
 7
7 -
8
-
9
-
10
-
11
-
12
-
13
-
14
-
15
-
16
-
17
-
18
-
19
-
20
-
21
-
22
-
23
-
24
-
25
-
26
-
27
-
28
-
29
-
30
-
31
-
32
-
33
-
34
-
35
-
36
-
37
-
38
-
39
-
40
-
41
-
42
-
43
-
44
-
45
-
46
 |
 |

User’s Manual
MultiSync X401S
MultiSync X462S
MultiSync X552S