NEC X552S Users Manual - Page 10
Attaching optional external speaker X401S, When connecting AUDIO OUT or
 |
View all NEC X552S manuals
Add to My Manuals
Save this manual to your list of manuals |
Page 10 highlights
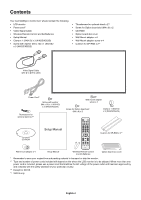
7. Attaching optional external speaker (X401S) Follow these steps to connect to the speaker to the monitor. 1. Turn off the power to the monitor. 2. Attach the cushion for SP-RM2 to the back side of the monitor (F). 3. Connect the speaker and the monitor. The red cable (+) connects to the red (+) terminal and the black cable (-) connects to the black (-) terminal (J). When using a stereo mini jack to connect external equipment, the stereo mini jack may need to be L-shaped and under 29 mm of connector head (H, I). 4. Use the pan head screws* to attach the wires with washers* to the speakers (A, C). 5. Use the step screws* to attach the speakers to the monitor (B, D, E). To manage excess speaker wire: Coil the speaker wire and wrap it using clamps* (G). *: included in speaker. A. Pan head screw B. Step screw C. Wire with washer D. Washer E. Screw hole F. Cushion for SP-RM2 position G. Clamp H. Audio out I. Audio in J. External speaker terminal NOTE: When connecting AUDIO OUT or AUDIO IN, please note that a stereo mini jack has under 29 mm L-shaped connector head. under 29 mm NOTE: NOTE: Do not use devices other than specified. Use the SP-RM2 for the X401S. For more information, please refer to the SP-RM2 Quick Start Guide. English-8
-
 1
1 -
2
-
3
-
4
-
 5
5 -
 6
6 -
 7
7 -
 8
8 -
 9
9 -
 10
10 -
 11
11 -
 12
12 -
 13
13 -
 14
14 -
 15
15 -
16
-
17
-
18
-
19
-
20
-
21
-
22
-
23
-
24
-
25
-
26
-
27
-
28
-
29
-
30
-
31
-
32
-
33
-
34
-
35
-
36
-
37
-
38
-
39
-
40
-
41
-
42
-
43
-
44
-
45
-
46
 |
 |
