Nikon Coolpix L16 L18 / L16 User's Manual - Page 58
Movies, Recording Movies
 |
UPC - 018208096046
View all Nikon Coolpix L16 manuals
Add to My Manuals
Save this manual to your list of manuals |
Page 58 highlights
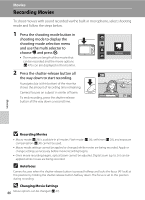
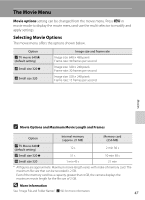
Movies Recording Movies To shoot movies with sound recorded via the built-in microphone, select shooting mode and follow the steps below. 1 Press the shooting mode button in shooting mode to display the shooting-mode selection menu and use the multi selector to choose D and press k. • The maximum length of the movie that can be recorded and the movie options (A 47) icon are displayed in the monitor. 2 Press the shutter-release button all the way down to start recording. A progress bar at the bottom of the monitor shows the amount of recording time remaining. Camera focuses on subject in center of frame. To end recording, press the shutter-release button all the way down a second time. Movie 8s Movies B Recording Movies • Macro mode (A 29) is available in all modes. Flash mode (A 26), self-timer (A 28), and exposure compensation (A 30) cannot be used. • Macro mode settings cannot be applied or changed while movies are being recorded. Apply or change settings as necessary before movie recording begins. • Once movie recording begins, optical zoom cannot be adjusted. Digital zoom (up to 2×) can be applied while movies are being recorded. C Autofocus Camera focuses when the shutter-release button is pressed halfway and locks the focus (AF lock) at this position by holding the shutter-release button halfway down. The focus is set to this position during recording. D Changing Movie Settings 46 Movie options can be changed (A 47).
-
 1
1 -
2
-
3
-
4
-
5
-
6
-
7
-
8
-
9
-
10
-
11
-
12
-
13
-
14
-
15
-
16
-
17
-
18
-
19
-
20
-
21
-
22
-
23
-
24
-
25
-
26
-
27
-
28
-
29
-
30
-
31
-
32
-
33
-
34
-
35
-
36
-
37
-
38
-
39
-
40
-
41
-
42
-
43
-
44
-
45
-
46
-
47
-
48
-
49
-
50
-
51
-
52
-
 53
53 -
 54
54 -
 55
55 -
 56
56 -
 57
57 -
 58
58 -
 59
59 -
 60
60 -
 61
61 -
 62
62 -
 63
63 -
64
-
65
-
66
-
67
-
68
-
69
-
70
-
71
-
72
-
73
-
74
-
75
-
76
-
77
-
78
-
79
-
80
-
81
-
82
-
83
-
84
-
85
-
86
-
87
-
88
-
89
-
90
-
91
-
92
-
93
-
94
-
95
-
96
-
97
-
98
-
99
-
100
-
101
-
102
-
103
-
104
-
105
-
106
-
107
-
108
-
109
-
110
-
111
-
112
-
113
-
114
-
115
-
116
-
117
-
118
-
119
-
120
-
121
-
122
-
123
-
124
 |
 |
