Nikon D3100 D3100 User's Manual - Page 70
Self-Timer Mode
 |
UPC - 018208254729
View all Nikon D3100 manuals
Add to My Manuals
Save this manual to your list of manuals |
Page 70 highlights
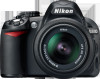
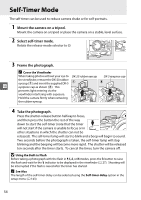
Self-Timer Mode The self-timer can be used to reduce camera shake or for self-portraits. 1 Mount the camera on a tripod. Mount the camera on a tripod or place the camera on a stable, level surface. 2 Select self-timer mode. Rotate the release-mode selector to E. 3 Frame the photograph. A Cover the Viewfinder When taking photos without your eye to DK-20 rubber eyecup DK-5 eyepiece cap the viewfinder, remove the DK-20 rubber eyecup (q) and insert the supplied DK-5 q w k eyepiece cap as shown (w). This prevents light entering via the viewfinder interfering with exposure. Hold the camera firmly when removing the rubber eyecup. 4 Take the photograph. Press the shutter-release button halfway to focus, and then press the button the rest of the way down to start the self-timer (note that the timer will not start if the camera is unable to focus or in other situations in which the shutter can not be released). The self-timer lamp will start to blink and a beep will begin to sound. Two seconds before the photograph is taken, the self-timer lamp will stop blinking and the beeping will become more rapid. The shutter will be released ten seconds after the timer starts. To cancel the timer, turn the camera off. D Using the Built-in Flash Before taking a photograph with the flash in P, S, A, or M modes, press the M button to raise the flash and wait for the M indicator to be displayed in the viewfinder (0 27). Shooting will be interrupted if the flash is raised after the timer has started. A See Also The length of the self-timer delay can be selected using the Self-timer delay option in the setup menu (0 143). 54
-
 1
1 -
2
-
3
-
4
-
5
-
6
-
7
-
8
-
9
-
10
-
11
-
12
-
13
-
14
-
15
-
16
-
17
-
18
-
19
-
20
-
21
-
22
-
23
-
24
-
25
-
26
-
27
-
28
-
29
-
30
-
31
-
32
-
33
-
34
-
35
-
36
-
37
-
38
-
39
-
40
-
41
-
42
-
43
-
44
-
45
-
46
-
47
-
48
-
49
-
50
-
51
-
52
-
53
-
54
-
55
-
56
-
57
-
58
-
59
-
60
-
61
-
62
-
63
-
64
-
 65
65 -
 66
66 -
 67
67 -
 68
68 -
 69
69 -
 70
70 -
 71
71 -
 72
72 -
 73
73 -
 74
74 -
 75
75 -
76
-
77
-
78
-
79
-
80
-
81
-
82
-
83
-
84
-
85
-
86
-
87
-
88
-
89
-
90
-
91
-
92
-
93
-
94
-
95
-
96
-
97
-
98
-
99
-
100
-
101
-
102
-
103
-
104
-
105
-
106
-
107
-
108
-
109
-
110
-
111
-
112
-
113
-
114
-
115
-
116
-
117
-
118
-
119
-
120
-
121
-
122
-
123
-
124
-
125
-
126
-
127
-
128
-
129
-
130
-
131
-
132
-
133
-
134
-
135
-
136
-
137
-
138
-
139
-
140
-
141
-
142
-
143
-
144
-
145
-
146
-
147
-
148
-
149
-
150
-
151
-
152
-
153
-
154
-
155
-
156
-
157
-
158
-
159
-
160
-
161
-
162
-
163
-
164
-
165
-
166
-
167
-
168
-
169
-
170
-
171
-
172
-
173
-
174
-
175
-
176
-
177
-
178
-
179
-
180
-
181
-
182
-
183
-
184
-
185
-
186
-
187
-
188
-
189
-
190
-
191
-
192
-
193
-
194
-
195
-
196
-
197
-
198
-
199
-
200
-
201
-
202
-
203
-
204
-
205
-
206
-
207
-
208
-
209
-
210
-
211
-
212
-
213
-
214
-
215
-
216
-
217
-
218
-
219
-
220
-
221
-
222
-
223
-
224
 |
 |
