NordicTrack Ebu Nt 9600 Bike Canadian English Manual - Page 11
How To Use The Quick Start Mode
 |
View all NordicTrack Ebu Nt 9600 Bike manuals
Add to My Manuals
Save this manual to your list of manuals |
Page 11 highlights
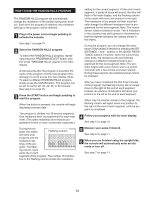
HOW TO USE THE QUICK START MODE 5 Follow your progress with the matrix and the main display. 1 Plug in the power cord or begin pedaling to activate the console. If the upright bike has a Basic console, it can be used with or without the included power cord. To use the power cord, see HOW TO CONNECT THE POWER CORD on page 6. To use the upright bike without the power cord, begin pedaling at a cadence of about 20 revolutions per minute (RPM) or faster. After a moment, the console displays will light and a series of tones will sound. While you pedal, power will be supplied by a generator; remember to continue pedaling while using the upright bike. The matrix-When the QUICK START mode is selected, the matrix will show a graph of the resistance levels that you select. The flashing column shows the current resistance level. Every thirty seconds, all columns will move one position to the left. As you increase or decrease the resistance, additional indicators will light or darken in the flashing column (and in all columns to the right). Flashing Column If the upright bike has a Workout TV console, the power cord must be used for the TV to be operated. 2 Select the QUICK START mode. When the power is turned on, the QUICK START mode will be selected. If you have already selected a program, select the QUICK START mode again by repeatedly pressing the PROGRAM SELECT button until the words "QUICK START" appear in the main display. A few seconds after the mode is selected, the words "QUICK START" will begin to scroll across the main display. Note: The matrix shows relative resistance levels. As you increase or decrease the resistance, the lit indicators in all columns may shift upward or downward so that the highest indicators are always shown in the matrix. The main display-The main display will show the following information: Resistance-The left end of the main display will show the resistance level of the pedals. 3 Press the START button and begin pedaling. When the button is pressed, the console will begin displaying exercise data. 4 Change the resistance of the pedals as desired. As you pedal, change the resistance of the pedals by pressing the RESISTANCE + and - buttons. To change the resistance quickly, press the QUICK RESISTANCE buttons. There are twenty resistance levels, from level 0.5 to level 10. Pace/Time-When the Quick Start mode is selected, this section of the main display will show your pedaling pace (in minutes per mile) and the elapsed time. The display will change from one number to the other every few seconds. Note: Any time that the resistance level changes, the display will show your pedaling pace. Note: When a preset program or a pulse program is selected, the display will show your pedaling pace, the time remaining in the program, and the time remaining in the current segment of the program. During the fitness test program, the display will show the elapsed time. 10
-
 1
1 -
2
-
3
-
4
-
5
-
 6
6 -
 7
7 -
 8
8 -
 9
9 -
 10
10 -
 11
11 -
 12
12 -
 13
13 -
 14
14 -
 15
15 -
 16
16 -
17
-
18
-
19
-
20
-
21
-
22
-
23
-
24
-
25
-
26
-
27
-
28
-
29
-
30
-
31
-
32
-
33
-
34
-
35
 |
 |
