NordicTrack Ebu Nt 9600 Bike Canadian English Manual - Page 13
How To Use The Timed Workout Program
 |
View all NordicTrack Ebu Nt 9600 Bike manuals
Add to My Manuals
Save this manual to your list of manuals |
Page 13 highlights
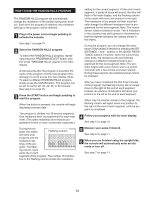
HOW TO USE THE TIMED WORKOUT PROGRAM The TIMED WORKOUT program will count down the time remaining in your workout as you control the resistance of the pedals. 1 Plug in the power cord or begin pedaling to activate the console. See step 1 on page 10. 2 Select the TIMED WORKOUT program. To select the TIMED WORKOUT program, repeatedly press the PROGRAM SELECT button until the words "TIMED WORKOUT" appear in the main display. A few seconds after the program is selected, the name of the program and the total program time will begin to scroll across the main display. Note: The program can be set to last for 20, 30, 40, 50, or 60 minutes. See step 8 on page 20. 3 Press the START button and begin pedaling to start the program. When the button is pressed, the console will begin displaying exercise data. The TIMED WORKOUT program is divided into 30-second segments. During the program, the matrix will show your progress and the resistance levels that you se- lect. The flashing column represents Flashing Column the current seg- ment of the pro- gram. The number of lit indicators in the flashing col- umn shows the re- sistance level for the current segment. At the end of each segment, a series of tones will sound, the time will flash in the main display, and the flashing column of the matrix will move one position to the right. During the program, change the resistance of the pedals as desired by pressing the RESISTANCE + and - buttons or the QUICK RESISTANCE buttons. As you increase or decrease the resistance, additional indicators will light or darken in the flashing column (and in all columns to the right). Note: The matrix shows relative resistance levels. As you increase or decrease the resistance, the lit indicators in the columns may shift upward or downward so that the highest indicators are always shown in the matrix. After you have completed the first three minutes of the program, the flashing column will no longer move to the right at the end of each segment. Instead, all columns of indicators will move one position to the left at the end of each segment. When only 12 minutes remain in the program, the flashing column will again move one position to the right at the end of each segment, until the program is completed. 4 Follow your progress with the main display. See step 5 on page 10. 5 Measure your pulse if desired. See step 6 on page 11. 6 When you are finished using the upright bike, the console will automatically enter an idle mode or turn off. See step 7 on page 11. 12
-
 1
1 -
2
-
3
-
4
-
5
-
6
-
7
-
 8
8 -
 9
9 -
 10
10 -
 11
11 -
 12
12 -
 13
13 -
 14
14 -
 15
15 -
 16
16 -
 17
17 -
 18
18 -
19
-
20
-
21
-
22
-
23
-
24
-
25
-
26
-
27
-
28
-
29
-
30
-
31
-
32
-
33
-
34
-
35
 |
 |
