NordicTrack Walkfit 5500 Treadmill English Manual - Page 7
Position, Exerciser, Assembly, Install, Computer
 |
View all NordicTrack Walkfit 5500 Treadmill manuals
Add to My Manuals
Save this manual to your list of manuals |
Page 7 highlights
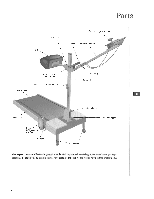
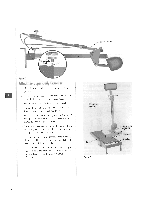
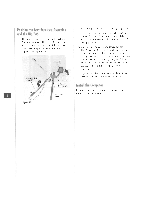
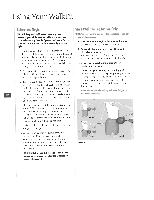
Position the Arm-Exerciser Assembly and the Hip Pad 1. Litt tile arm-exerciser assembly into position. The snap buttons \vitt lock into place to secure it. Re sure the snap buttons arc hilly extended and locked into position on both sides of the hip-pad slide (Figure l0). Hip-pad Pivot (he hip pad down ens far as it will go (Figure 10). 3. Loosen the slide-clamp knobs on each side of the hip-pad slide. Hoid firmly onto the. hip-pail slide. and keep your fingers away ibrrn the underside of the hip-pad slide. 4. Mote Ile hip-pad slide to the desired position. The hip pad should rest al hip level. about one inch below your navel. The hip pad should be high enough so it doers not restrict leg movement arid low enough snit does not press against your abdomen. The Ilcight or the hip pad can be readjusted when yoni are ready to exercise. See page I 2 for additional tips. Arm-exerciser assembly 5. Tighten the slide-clamp knobs to hold tine hip pad. in position. Make sure both knobs are secure. 1-lip-pad slide Install the Computer Refer to Illy instructions in your electronics package t❑ 8 Slide-clamp knob install. Enid use Your computer. Figure 10
-
 1
1 -
 2
2 -
 3
3 -
 4
4 -
 5
5 -
 6
6 -
 7
7 -
 8
8 -
 9
9 -
 10
10 -
 11
11 -
 12
12 -
13
-
14
-
15
-
16
-
17
-
18
-
19
-
20
-
21
-
22
-
23
-
24
-
25
-
26
 |
 |
