NordicTrack Walkfit 5500 Treadmill English Manual - Page 9
Front, Elevation
 |
View all NordicTrack Walkfit 5500 Treadmill manuals
Add to My Manuals
Save this manual to your list of manuals |
Page 9 highlights
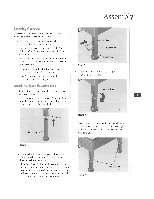
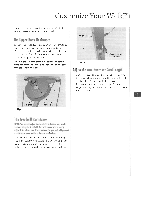
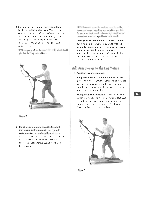
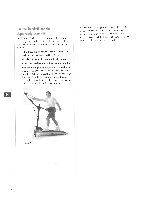
The Front Elevation You call change the front eievolimi of your MARI - to vary your workout. Ilse a higher elevation for getting started. Vary your elevation setting to work your entire lower body. 6. Rotate the bent side of the pin down onto the elevation leg to secure the easy-lock pin in place (Figure 3). 1. Tilt the \'ValkI'it aerobic exerciser to one side so there is enough clearance to adjust the elevation leg. Eitsy4orit_ pin 2. Rotate the bent side of the pin off' the elevation leg to release the easy-lock pin. 3. Remove the easy-lock pin. 4. Adjust the elevation leg to tile desired elevation and align the holes in the elevation leg with Ilic corresponding holes in the sleeve. While you are learning to use the treadmill. choose an elevation Figure 3 setting near the middle. 7. Repeat steps I through 6 with the other elevation 5. Insert the straight end of an easy-lock pin leg and sleeve. Make sure both legs are set to the completely through the holes. Be sure that the end same elevation level. 10 of the pin extends completely through both sides of the front elevation leg.
-
 1
1 -
2
-
3
-
 4
4 -
 5
5 -
 6
6 -
 7
7 -
 8
8 -
 9
9 -
 10
10 -
 11
11 -
 12
12 -
 13
13 -
 14
14 -
15
-
16
-
17
-
18
-
19
-
20
-
21
-
22
-
23
-
24
-
25
-
26
 |
 |
