Oki C710n C710 User's Guide, English - Page 88
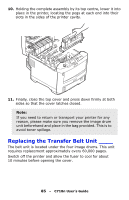
Turn the two fasteners 90° to the left. This will release the, belt from the printer chassis.
 |
View all Oki C710n manuals
Add to My Manuals
Save this manual to your list of manuals |
Page 88 highlights
4. Locate the two fasteners (a) at each side of the belt and the lifting bar (b) at the front end. a c b a 5. Turn the two fasteners 90° to the left. This will release the belt from the printer chassis. 6. Pull the lifting bar (b) upwards so that the belt tilts up towards the front, and withdraw the belt unit (c) from the printer. 7. Lower the new belt unit into place, with the lifting bar at the front and the drive gear towards the rear of the printer. Locate the drive gear into the gear inside the printer by the 88 - C710n User's Guide
-
 1
1 -
2
-
3
-
4
-
5
-
6
-
7
-
8
-
9
-
10
-
11
-
12
-
13
-
14
-
15
-
16
-
17
-
18
-
19
-
20
-
21
-
22
-
23
-
24
-
25
-
26
-
27
-
28
-
29
-
30
-
31
-
32
-
33
-
34
-
35
-
36
-
37
-
38
-
39
-
40
-
41
-
42
-
43
-
44
-
45
-
46
-
47
-
48
-
49
-
50
-
51
-
52
-
53
-
54
-
55
-
56
-
57
-
58
-
59
-
60
-
61
-
62
-
63
-
64
-
65
-
66
-
67
-
68
-
69
-
70
-
71
-
72
-
73
-
74
-
75
-
76
-
77
-
78
-
79
-
80
-
81
-
82
-
 83
83 -
 84
84 -
 85
85 -
 86
86 -
 87
87 -
 88
88 -
 89
89 -
 90
90 -
 91
91 -
 92
92 -
 93
93 -
94
-
95
-
96
-
97
-
98
-
99
-
100
-
101
 |
 |

88
– C710n User’s Guide
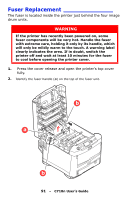
4.
Locate the two fasteners (
a
) at each side of the belt and the lifting
bar (
b
) at the front end.
5.
Turn the two fasteners 90° to the left. This will release the
belt from the printer chassis.
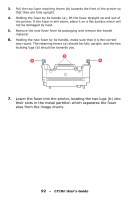
6.
Pull the lifting bar (b) upwards so that the belt tilts up towards the
front, and withdraw the belt unit (c) from the printer.
7.
Lower the new belt unit into place, with the lifting bar at the
front and the drive gear towards the rear of the printer.
Locate the drive gear into the gear inside the printer by the
a
a
b
c