Oki ML186 OKI MICROLINE 186 User's Guide
Oki ML186 Manual
 |
View all Oki ML186 manuals
Add to My Manuals
Save this manual to your list of manuals |
Oki ML186 manual content summary:
- Oki ML186 | OKI MICROLINE 186 User's Guide - Page 1
- Oki ML186 | OKI MICROLINE 186 User's Guide - Page 2
Oki Data. Copyright 2004 by Oki Data. All Rights Reserved Document: MICROLINE ML186 User's Guide Revised Edition: July, 2004 Written and produced by the Oki Data visit Oki Data's multilingual web site at: http://www.okidata.com. OKI, Oki Data and MICROLINE are registered trademarks of Oki Electric - Oki ML186 | OKI MICROLINE 186 User's Guide - Page 3
42 Front Panel Operation 42 Setting Printer Defaults 45 Using the Pull Tractor Unit 53 Using the Roll Paper Stand 56 Maintenance 60 Replacing the Ribbon Cartridge 60 Testing Your Printer 62 Cleaning the Housing 64 Parts & Options 66 Replacement Parts 66 Options 67 Specifications 68 Index - Oki ML186 | OKI MICROLINE 186 User's Guide - Page 4
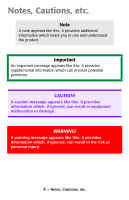
use and understand the product. Important An important message appears like this. It provides supplemental information which can prevent potential problems. CAUTION! A caution message appears like this. It provides information which, if ignored, can result in equipment malfunction or damage. WARNING - Oki ML186 | OKI MICROLINE 186 User's Guide - Page 5
missing, contact your dealer immediately. • Keep your packing materials and carton in case you ever need to ship or transport the printer. • Interface cables and paper are sold separately. . 1 ML186 Printer 2 Paper Separator 3 Platen Knob 4 Ribbon Cartridge 5 Power Cord 6 CD 5 • Getting Started - Oki ML186 | OKI MICROLINE 186 User's Guide - Page 6
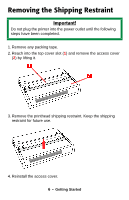
Removing the Shipping Restraint Important! Do not plug the printer into the power outlet until the following steps have been completed. 1. Remove any packing tape. 2. Reach into the top cover slot (1) and remove the access - Oki ML186 | OKI MICROLINE 186 User's Guide - Page 7
Installing/Replacing the Ribbon Cartridge Use only genuine Oki Data ribbon cartridges. When replacing a ribbon cartridge, make sure you have the correct replacement ribbon for your printer. The wrong ribbon will not print when installed in your printer. Important • Leave unused ribbon cartridges in - Oki ML186 | OKI MICROLINE 186 User's Guide - Page 8
2. Remove the access cover and center the printhead. 3. If you are replacing the ribbon cartridge, remove the used one: Important Do not remove the ribbon shield (1) from the new ribbon! 8 • Getting Started - Oki ML186 | OKI MICROLINE 186 User's Guide - Page 9
and install it on the printhead. Note If the ribbon won't load easily, turn the take- up knob slightly until the x-shaped notch on the bottom of the ribbon cartridge aligns with the x-shaped insert on the ribbon plate. 5. Press gently on the ribbon cartridge until you feel it click into place - Oki ML186 | OKI MICROLINE 186 User's Guide - Page 10
6. Turn the take-up knob (1) in the direction of the molded arrow to take up any ribbon slack. 7. Replace the access cover. Installing the Platen Knob Align the notch (1) with the pin on the platen shaft and push it firmly into place. 10 • Getting Started - Oki ML186 | OKI MICROLINE 186 User's Guide - Page 11
print quality and easy paper feed CAUTION! Incorrect setting of the head gap can cause printhead damage or ribbon jams. To avoid these problems lb. (75 g/m2) Forms, 2-part [maximum thickness 0.28 mm] Forms, 3-part [maximum thickness 0.28 mm] Forms, 4-part [maximum thickness 0.28 mm] Lever Position - Oki ML186 | OKI MICROLINE 186 User's Guide - Page 12
Installing the Paper Separator The paper separator is used for printing on single sheets (no carbons). With continuous forms paper, it is used to 2. Place the tabs (1) on the paper separator in the two corresponding slots ( ) on the printer. 3. Press down to release the paper separator onto the - Oki ML186 | OKI MICROLINE 186 User's Guide - Page 13
Power Connection 1. Make sure the printer is turned off. 2. Plug the power cord supplied with your printer into the back of the printer. Important The outlet voltage must match the voltage marked on the printer label. 3. Plug the other end of the power cord into an appropriate grounded outlet - Oki ML186 | OKI MICROLINE 186 User's Guide - Page 14
Loading Paper Three types of paper can be used with your printer: • Continuous Forms Paper (with or without the optional Pull Tractor) • Single Sheets • Roll Paper, using the optional Roll Paper Stand Before You Start 1 Bail Arm - Oki ML186 | OKI MICROLINE 186 User's Guide - Page 15
Paper Lever Positions = Single Sheet Feed = Continuous Forms Setting the Head Gap Before you load paper, be sure to check the head gap lever setting (see page 11). Important Do not plug the printer into the power outlet until the following steps have been completed. 15 • Setting Up Your Printer - Oki ML186 | OKI MICROLINE 186 User's Guide - Page 16
Continuous Forms, Rear Feed 1. Make sure the printer is turned off. 2. Place the stack of continuous forms paper behind the printer. 3. Remove the access cover (1). 4. Pull the bail arm lever (2) - on the left side of the printer - toward the front of the printer to lift the bail arm. 16 • Setting - Oki ML186 | OKI MICROLINE 186 User's Guide - Page 17
5. Move the paper lever (3) - on the right side of the printer - toward the front of the printer to the continuous forms symbol. 6. Pull the lock levers (A) on the sprocket wheels at either end of the using. 7. Push the levers back to lock the sprocket wheels in position. 17 • Setting Up Your Printer - Oki ML186 | OKI MICROLINE 186 User's Guide - Page 18
push it through the paper separator. 9. Place the paper between the sprocket feed guides (6) and feed it behind the platen, gently positioning it so that its holes engage the sprockets on the side. Otherwise the paper will feed in skewed and paper jams will occur. 18 • Setting Up Your Printer - Oki ML186 | OKI MICROLINE 186 User's Guide - Page 19
engaging the sprockets (A). If they are not evenly matched and the paper is skewed (B), back the paper out and try again! 19 • Setting Up Your Printer - Oki ML186 | OKI MICROLINE 186 User's Guide - Page 20
on the bail arm lever (2) to lower the bail arm. 12. Use the platen knob (7) to set the position of the paper to the first printing line. 13. Replace the access cover, being sure to feed the edge of the paper through the slot in the cover. 14. Turn the - Oki ML186 | OKI MICROLINE 186 User's Guide - Page 21
Forms, Bottom Feed 1. Make sure the printer is turned off. 2. Place the printer on a slotted printer stand, carefully aligning the slot in the stand with the slot in the base of the printer. 3. Place a box of continuous forms paper on the stand, under the printer. 4. Remove the access cover (1). 21 - Oki ML186 | OKI MICROLINE 186 User's Guide - Page 22
you are using. 6. Push the levers back to lock the sprocket wheels in position. 7. Pull the bail arm lever (3) - on the left side of the printer - toward the front of the printer to lift the bail arm. 8. Move the paper lever (4) - on the right side of the - Oki ML186 | OKI MICROLINE 186 User's Guide - Page 23
9. Insert the first sheet of continuous forms paper through the opening in the printer stand and into the bottom of the printer, gently feeding it into the printer until it appears in front of the platen, and above the bail arm. Important Check to be sure that the matching holes on either side - Oki ML186 | OKI MICROLINE 186 User's Guide - Page 24
10. Move the bail arm lever (3) back to lower the bail arm. 11. Use the platen knob (5) to advance the paper to the first printing line. 12. Replace the access cover, being sure to feed the edge of the paper through the slot in the cover. 13. Turn the printer on. 24 • Setting Up Your Printer - Oki ML186 | OKI MICROLINE 186 User's Guide - Page 25
Loading Single Sheets Note Before printing single sheets, you must remove the Pull Tractor or Roll Paper Stand, if installed. Your printer can accommodate single sheets up to 9.5 inches (241 mm) wide. Note In order to use paper wider than traditional letter size, you must move the - Oki ML186 | OKI MICROLINE 186 User's Guide - Page 26
2. Move the paper lever (1) - on the right side of the printer - toward the rear of the printer, to the single sheet symbol. 3. Ensure that the printer is off-line (SELECT light off): press SELECT if necessary. 4. If you are using paper wider than 8.5 inches (216 mm), move the sprocket wheels to - Oki ML186 | OKI MICROLINE 186 User's Guide - Page 27
c. Push back on the levers to lock the sprocket wheels in position. 5. Raise the paper separator. 27 • Setting Up Your Printer - Oki ML186 | OKI MICROLINE 186 User's Guide - Page 28
6. Adjust the sheet guide (3) on the paper separator to position the left edge of the sheet, then insert a single sheet along the guide until it reaches the pinch roller. 7. Pull the bail arm lever (2) toward the front of the printer. 28 • Setting Up Your Printer - Oki ML186 | OKI MICROLINE 186 User's Guide - Page 29
8. Use the platen knob to wind the paper through to the front of the printer and adjust the top of form. Press the TOF SET button while the printer is deselected (SELECT light offf) to set top of form. 9. Push back the bail arm lever, ensuring that the paper has been positioned correctly - Oki ML186 | OKI MICROLINE 186 User's Guide - Page 30
FEED while turning the printer on. The test print begins. 3. To stop the test, press SELECT or turn the printer off. Important The top of each test printout contains information about your printer. Be sure to have a copy of the printout handy if you have to call for service. 30 • Setting Up Your - Oki ML186 | OKI MICROLINE 186 User's Guide - Page 31
of the same type. they appear as 2), *****(3), etc. These numbers depend on the order of connecting or turning on of each printer. • USB is a "hot-pluggable" protocol. This means that the printer and computer do not necessarily have to be switched OFF. • Interface cables are not supplied with your - Oki ML186 | OKI MICROLINE 186 User's Guide - Page 32
1. Attach a suitable USB cable to the USB series "B" port on the back of the printer. 2. Connect the other end of the cable to the computer. 3. If you turned the computer and printer off, turn them back on. 32 • Setting Up Your Printer - Oki ML186 | OKI MICROLINE 186 User's Guide - Page 33
/USB Model Only Notes • Interface cables are not supplied with your printer. • It is not recommended that you connect parallel and USB cables to the printer simultaneously. Parallel Cable Requirements • bi-directional • max. length 6 ft. (1.8 m) • 36-pin Centronics type connector CAUTION! Make - Oki ML186 | OKI MICROLINE 186 User's Guide - Page 34
computer back on. Serial (COM) Connection, RS-232C Serial/USB Model Only Notes • Interface cables are not supplied with your printer. • It is not recommended that you connect serial and USB cables to the printer simultaneously. • When the serial interface is installed the parallel port is disabled - Oki ML186 | OKI MICROLINE 186 User's Guide - Page 35
CSA approved • Max. length 50 ft. (15 m) • 25-pin serial connector. CAUTION! Make sure the printer and computer are both turned OFF. 1. Switch both the computer and the printer OFF. 2. Plug the cable into the serial port on the back of the printer and tighten the screws. 3. Plug the cable into the - Oki ML186 | OKI MICROLINE 186 User's Guide - Page 36
the table on page 37 for a list of the serial interface defaults. To change the settings for the serial interface, use the two banks of switches on the serial interface board: 1. Turn the printer off. 2. Use a Phillips bit screwdriver to remove the serial switch access cover (1) at the back of the - Oki ML186 | OKI MICROLINE 186 User's Guide - Page 37
Serial Interface Parameters Note: Defaults are underlined. Switch Bank 1 Switch Bank 2 Parity Type Odd Parity Even Parity Parity No parity With parity Data Bits 8 bits 7 bits Protocol ReadyBusy X-ON/X-OFF Test Select Circuit Monitor Mode Select Print power on Space when printer selected Not Used - Oki ML186 | OKI MICROLINE 186 User's Guide - Page 38
in your printer driver. • Settings made in the printer driver normally override settings made in the printer menu or via the front panel. Windows XP, 2000, Me, 98, 95, NT 4.0: Install the Printer Driver To print from a Windows-based system, install the printer driver located in the Drivers folder on - Oki ML186 | OKI MICROLINE 186 User's Guide - Page 39
Oemsetup.inf \Drivers \ NT40 \ English \ Printer.inf 6. Follow the on-screen instructions to finish loading the driver. Non-Windows Systems: Set the Emulation in the Printer Menu Your printer has three emulations: • IBM® 2480 - the factory default • Epson® ESC/P2 • Oki Data® MICROLINE® Standard If - Oki ML186 | OKI MICROLINE 186 User's Guide - Page 40
Printer Plus, IBM Graphics Printer) work well with the printer, but do not provide full use of the printer's capabilities. ML186 Emulation Mode IBM Epson ML Compatible Printers/Drivers IBM 2480 IBM Graphics Printer Plus IBM Graphics Printer Epson ESC/P2 Epson LX Plus Epson LX Okidata MICROLINE - Oki ML186 | OKI MICROLINE 186 User's Guide - Page 41
engage appears in the right-hand column. Each time you press TOF SET, a new line prints and the setting which appears in the last column changes. For example: Printer Control Emulation Mode Printer Control Emulation Mode Epson ML 6. Press PITCH and MODE together to save your setting and exit the - Oki ML186 | OKI MICROLINE 186 User's Guide - Page 42
SELECT light flashing = auto diagnostics have detected an error. Flashing, SELECT light on = printer has overheated. Normal print operation will resume only after a cooling period. On = printer is turned on. Off = printer is turned off. The one lit indicates which character pitch -in characters per - Oki ML186 | OKI MICROLINE 186 User's Guide - Page 43
LED Status, Function The one lit indicates which print mode is engaged: NLQ = Near Letter Quality UTILITY = Draft mode HSD = High Speed Draft mode, or SSD (Super Speed Draft) if 12 cpi is selected. 43 • Operating Your Printer - Oki ML186 | OKI MICROLINE 186 User's Guide - Page 44
through the settings for each item within a group. Sets printer to 17 cpi. Toggles the printer on and off line. Prints list of current menu settings. Places printer in Menu Mode. Selects the character pitch setting (cpi). Sets print mode (NLQ, Utility, HSD). PITCH + MODE = save settings and - Oki ML186 | OKI MICROLINE 186 User's Guide - Page 45
computer. Using the Menu Mode Entering the Menu Mode To enter the Menu Mode, press SELECT while turning on the printer. The 12 and UTILITY LEDs flash. Printing a List of Current Menu Settings With the printer in the Menu Mode, press SELECT to print the complete menu. The current default settings - Oki ML186 | OKI MICROLINE 186 User's Guide - Page 46
(10CPI) 17.1 CPI Set-Up SI Select Pitch (12CPI) 12 CPI Set-Up Time Out Print Invalid Set-Up Auto Select No Set-Up ESC SI Pitch 17.1 CPI Set-Up Impact Mode Normal Parallel I/F Parallel I/F Parallel I/F I-Prime Pin 18 Bi-direction Buffer Print +5v Enable 46 • Operating Your Printer - Oki ML186 | OKI MICROLINE 186 User's Guide - Page 47
Changing Menu Settings 1. Press SELECT while turning on the printer. 2. Change settings: a. Press LINE FEED to select the relevant group that needs to be and exit the Menu Mode. Important Exiting the Menu Mode by turning off the printer will cancel any changes you have made. 47 • Operating Your - Oki ML186 | OKI MICROLINE 186 User's Guide - Page 48
setting for the zero character is slashed. To change the setting to unslashed: 1. Press and hold SELECT while turning the printer on. The following line prints: Printer Control Emulation Mode IBM 2. Press LINE FEED several times until the Symbol Sets group line appears: Symbol Sets Character Set - Oki ML186 | OKI MICROLINE 186 User's Guide - Page 49
Default Menu Selections Default settings are indicated in bold italic. Group Printer Control Font Item Emulation Mode Print Mode (Font) (Font) DRAFT Mode Pitch (Font) (Font) (Font) Proportional Spacing Style Size Setting IBM, Epson, ML Utility, NLQ Courier, NLQ Gothic, Draft HSD, SSD 10 CPI, - Oki ML186 | OKI MICROLINE 186 User's Guide - Page 50
Set Set I, Set II, Standard, Line Graphics, Block Graphics (ML mode only) (Symbol Sets) Language Set American, French, German Bi-directional, Uni-directional (Set-Up) (Set-Up) 7 or 8 Bits Graphics 8, 7 ML emulation only. Receive Buffer Size 1 Line*, 32K, 64K, 128K * When 1 Line is selected - Oki ML186 | OKI MICROLINE 186 User's Guide - Page 51
8 Bits Data Word ML emulation only Print Suppress Effective No, Yes Auto LF No, Yes Auto CR No, Yes SI Select Pitch (10 15 CPI, 17.1 CPI CPI) SI Select Pitch (12 12 CPI, 20 CPI CPI) TIme Out Print Auto Select Valid, Invalid No, Yes ESC SI Pitch 17.1 CPI, 20CPI 51 • Operating Your Printer - Oki ML186 | OKI MICROLINE 186 User's Guide - Page 52
Group Item (Set-Up) Impact Mode Parallel I/F I-Prime Only appears for printers equipped with Parallel Interface. (Parallel I*/F) Pin 18 (Parallel I*/F) Auto Feed XT (Parallel I/F) Bi-Direction Setting Normal, Quiet Invalid, Buffer Print, Buffer Clear +5v, Open Valid, Invalid Enable, - Oki ML186 | OKI MICROLINE 186 User's Guide - Page 53
Using the Pull Tractor Unit (if installed) Paper can be loaded from the rear of the printer or, if you have a slotted printer stand, it can be loaded from the bottom. 1. Remove the acoustic cover (1) and access cover position, then push the lever back to lock it in place. 53 • Operating Your Printer - Oki ML186 | OKI MICROLINE 186 User's Guide - Page 54
of the tractor unit. 5. Open the sprocket covers (A) at either end of the pull tractor. 6. Pull the paper lever (on the right side of the printer) forward to the continuous forms position. 54 • Operating Your - Oki ML186 | OKI MICROLINE 186 User's Guide - Page 55
at either end of the pull tractor. Misalignment will cause paper jams and/or ripping. 8. Replace the access cover and acoustic cover. 55 • Operating Your Printer - Oki ML186 | OKI MICROLINE 186 User's Guide - Page 56
Stand (if installed) Loading the Paper Correct Paper Path 1 Paper Roll 2 Roll Paper Stand 3 Paper Guide 4 Platen 5 Paper Separator 1. Remove the access cover from the printer. 2. Place the paper lever (right side of printer) in the single sheet position (back) and the bail arm lever (left side of - Oki ML186 | OKI MICROLINE 186 User's Guide - Page 57
3. Open the paper separator (1). 4. Remove the paper roller. Note that there is a disk (2) on the left end of the roller. 5. Slide the roller into a roll of paper, making sure that the disk (2) is on the left side and that the paper rolls up from the bottom. 57 • Operating Your Printer - Oki ML186 | OKI MICROLINE 186 User's Guide - Page 58
into the stand, with the disc (2) on the left side. 7. Feed the paper over (not under!) the roller (3) on the stand, adjusting the round paper guides on either end (4) to the paper width. 8. Feed the paper down behind the platen and use the platen knob to bring the paper through the - Oki ML186 | OKI MICROLINE 186 User's Guide - Page 59
from under the separator and exits the printer going over the separator (see "Correct Paper Path" diagram on page 56). 15. Turn the platen knob to move the paper to the point where you want printing to start. (Many word processing packages automatically allow for a top margin of 1 inch [25 mm - Oki ML186 | OKI MICROLINE 186 User's Guide - Page 60
Maintenance Replacing the Ribbon Cartridge For more details, see page 7. WARNING! If the printer has been recently used, the printhead may be HOT! Turn the printer off! 60 • Maintenance - Oki ML186 | OKI MICROLINE 186 User's Guide - Page 61
61 • Maintenance - Oki ML186 | OKI MICROLINE 186 User's Guide - Page 62
turned off, then press and hold LINE FEED while turning the printer on. The test print begins. 3. To stop the test, press SELECT or turn the printer off. Note The top of each test printout contains information about your printer. Be sure to have a copy of the printout handy if you have to call - Oki ML186 | OKI MICROLINE 186 User's Guide - Page 63
Test begins. 3. To stop the test, press SELECT or turn the printer off. Hex Dump Mode In Hex Dump Mode, all data sent to the printer, including text and printer commands, prints in both hexadecimal and ASCII format. • To place the printer in the Hex Dump Mode, press and hold SELECT and FORM FEED - Oki ML186 | OKI MICROLINE 186 User's Guide - Page 64
use solvents or strong detergents on the cabinet: they could damage the housing. You should clean the printer every six months (or after about 300 hours of operation). 1. Turn the printer off. 2. Remove any paper from the path. 3. Remove the access cover. (1) 4. Pull the bail arm lever (2) forward - Oki ML186 | OKI MICROLINE 186 User's Guide - Page 65
7. Push the bail arm lever back and reinstall the access cover. 8. Reload paper. 9. Turn the printer on. 65 • Maintenance - Oki ML186 | OKI MICROLINE 186 User's Guide - Page 66
Parts & Options Replacement Parts Ribbon Cartridge (Oki 52102001) Platen Knob (Oki 53459807) Power Cord (Oki 56609701) Access Cover (Oki 53467410) Paper Separator (Oki 53459303) 66 • Parts & Options - Oki ML186 | OKI MICROLINE 186 User's Guide - Page 67
Options Pull Tractor (Oki 70009701) Includes Pull Tractor (1), Acoustic Cover (2) and Access Cover (3). Roll Paper Stand (Oki 70007701) 67 • Parts & Options - Oki ML186 | OKI MICROLINE 186 User's Guide - Page 68
Specifications General Print Method Impact dot matrix Printhead Emulations (co-resident) 9 pins, 0.30 mm (0.0118") diameter, with thermal protection IBM 2480 Epson ESC/P2 Okidata MICROLINE Standard Print Speed, characters per second (cps) Super Speed Draft (SSD) High Speed Draft (HSD) Utility - Oki ML186 | OKI MICROLINE 186 User's Guide - Page 69
lb. US Bond (60 to 81 g/m²) 3" to 9.5" (76 to 241 mm) Continuous, Single Part Rear/Bottom 14 to 20 lb. US Bond (53 to 75 g/m²) 3'" to 9.9" (76 to Bond (53 to 75 g/m²) 3'" to 9.9" (76 to 251 mm) Reliability Ribbon Life Printhead Life Mean Time Between Failures (MTBF) Mean Time to Repair (MTTR) - Oki ML186 | OKI MICROLINE 186 User's Guide - Page 70
Physical Height Width Depth Weight Electrical Voltage Frequency Environmental Temperature Operating Storage Humidity Operating Storage Noise level 3.15" (80 mm) 14.65" (372 mm) 10.83" (275 mm) 9.9 lb. (4.5 Kg) 120V, +6%, -15% 230V, +15%, -14% 50 or 60 Hz, ±2% 41 to 104°F (5 to 40°C) -40 to 158°F (- - Oki ML186 | OKI MICROLINE 186 User's Guide - Page 71
Interfaces Centronics Parallel, IEEE-1284 compliant Parallel Models USB 1.1 Serial Models RS-232C Serial USB 1.1 71 • Specifications - Oki ML186 | OKI MICROLINE 186 User's Guide - Page 72
serial 34-35 USB 31 Continuous forms loading bottom feed 21-24 rear feed 16-20 specifications 69 Cut sheet paper 69 D Default menu settings 49 Defaults 45-46 menu mode 51-52 Dimensions 70 Drivers, printer 70 I Important boxes 4 Interfaces parallel 71 serial 71 USB 71 I-Prime 52 K - Oki ML186 | OKI MICROLINE 186 User's Guide - Page 73
42 Print speed 68 Printer defaults 45 dimensions 70 drivers 38 emulations 39 reliability 69 weight 70 Printhead 66 gap 11 life 69 shipping restraint 6 specifications 68 Pull tractor 67 using 53, 55 R Rear feed paper loading 16-20 Reliability 69 Replacement parts 66 Ribbon cartridge - Oki ML186 | OKI MICROLINE 186 User's Guide - Page 74
SELECT light 42 Self test 30, 62 Separator, paper 12 Serial interface connection ..34-35 Shipping restraints 6 Single sheet paper loading 25-26, 28-29 specifications 69 Specifications 68-71 T Take-up knob, ribbon 10 Temperature specifications .......70 Testing 30 Tests font sample 62 hex
-
 1
1 -
 2
2 -
 3
3 -
 4
4 -
 5
5 -
 6
6 -
 7
7 -
8
-
9
-
10
-
11
-
12
-
13
-
14
-
15
-
16
-
17
-
18
-
19
-
20
-
21
-
22
-
23
-
24
-
25
-
26
-
27
-
28
-
29
-
30
-
31
-
32
-
33
-
34
-
35
-
36
-
37
-
38
-
39
-
40
-
41
-
42
-
43
-
44
-
45
-
46
-
47
-
48
-
49
-
50
-
51
-
52
-
53
-
54
-
55
-
56
-
57
-
58
-
59
-
60
-
61
-
62
-
63
-
64
-
65
-
66
-
67
-
68
-
69
-
70
-
71
-
72
-
73
-
74
 |
 |
