Onkyo A-9150 Owners Manual - English - Page 10
Remote Controller
 |
View all Onkyo A-9150 manuals
Add to My Manuals
Save this manual to your list of manuals |
Page 10 highlights
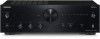
Remote Controller ª * Not used with the integrated amplifier For detailed information, see the pages in parentheses. 1 Í button (Ä page 21) Sets the integrated amplifier to On or Standby. 2 D/C/B/A and ENTER buttons Select and adjust settings. 3 VOLUME 3/4 buttons (Ä page 22) Adjust the volume of the integrated amplifier. 4 INPUTD/C buttons (Ä page 23) Select an input source. En 10 5 SETUP button (Ä page 25, page 26) Switch to the mode for setting speaker impedance and selecting the jacks for RI docking. 6 RETURN button Returns to the previous display when changing settings. 7 MUTING button (Ä page 24) Mutes or unmutes the integrated amplifier. You can also use the remote controller to control your Onkyo CD Player, Onkyo Network Audio Player, Onkyo Dock, or Onkyo Tuner. Note • With some components, the remote controller may not work, or only partially. • To control the Onkyo Dock and Onkyo Tuner, an connection is required (Ä page 26). • When connecting a network audio player and an dock simultaneously, the feature will work with only one of the devices, so connect the cable to the device you have selected to be linked. • Refer to the manuals supplied with your Onkyo CD Players, Tuner, Network Audio Player or Docks. ∫ Controlling the Onkyo CD player 2 DIMMER button 3 D/C/B/A and ENTER buttons 4 Í CD button 5 DISPLAY button 6 Playback mode buttons 8 INPUT SELECTOR button Note • Point the remote controller at the CD player when pressing 4 and 6. ∫ Controlling the Onkyo Tuner 1 Í button 2 DIMMER button 3 D/C/B/A and ENTER buttons 5 DISPLAY button 7 Tuner control buttons 8 INPUT SELECTOR or BAND buttons ∫ Controlling the Onkyo Network Audio Player 1 Í button 2 DIMMER button 3 D/C and ENTER buttons 5 DISPLAY button 7 Network Audio Player control buttons 8 INPUT SELECTOR button ∫ Controlling the Onkyo Dock 1 Í button 3 D/C and ENTER buttons 7 Dock control buttons
-
 1
1 -
2
-
3
-
4
-
 5
5 -
 6
6 -
 7
7 -
 8
8 -
 9
9 -
 10
10 -
 11
11 -
 12
12 -
 13
13 -
 14
14 -
 15
15 -
16
-
17
-
18
-
19
-
20
-
21
-
22
-
23
-
24
-
25
-
26
-
27
-
28
-
29
-
30
-
31
-
32
 |
 |
