Onkyo A-9150 Owners Manual - English - Page 8
Getting to Know the Integrated Amplifier
 |
View all Onkyo A-9150 manuals
Add to My Manuals
Save this manual to your list of manuals |
Page 8 highlights
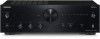
Getting to Know the Integrated Amplifier Front Panel For detailed information, see the pages in parentheses. 1 ÍON/STANDBY button (Ä page 21) Sets the integrated amplifier to On or Standby. 2 Remote control sensor (Ä page 7) Receives control signals from the remote controller. 3 MAIN IN LED (Ä page 19) Lights when the settings are enabled to use this unit as a power amplifier. 4 Volume controller (Ä page 22) Adjusts the volume. 5 Input source LEDs (Ä page 23) Lights according to the selected input source. 6 INPUT selector (Ä page 23) Selects the input sources in sequence. 7 SPEAKERS button (Ä page 22) Selects Speakers A, Speakers B, or both. 8 A/B LEDs (Ä page 22) Lights according to the selected speaker output. 9 BASS -/+ controller (Ä page 24) Adjusts the level of bass sounds. : TREBLE -/+ controller (Ä page 24) Adjusts the level of treble sounds. ; BALANCE L/R controller (Ä page 24) Adjusts the balance of left and right channels. < DIRECT LED (Ä page 23) Lights when the integrated amplifier is in Direct mode. = DIRECT button (Ä page 19, page 23) Enables or disables the Direct function. Also used when this unit is used as a power amplifier. > PHASE MATCHING BASS LED (Ä page 23) Lights when the integrated amplifier is in Phase matching bass mode. ? PHASE MATCHING BASS button (Ä page 23) Enables or disables the Phase matching bass function. @ PHONO/MC button, MC LED (Ä page 27) Switch the input setting to match the type of cartridge used in the turntable. A PHONES jack (Ä page 24) Connects headphones with a standard plug (1/4 inch or 6.3 mm). En 8
-
 1
1 -
2
-
 3
3 -
 4
4 -
 5
5 -
 6
6 -
 7
7 -
 8
8 -
 9
9 -
 10
10 -
 11
11 -
 12
12 -
 13
13 -
14
-
15
-
16
-
17
-
18
-
19
-
20
-
21
-
22
-
23
-
24
-
25
-
26
-
27
-
28
-
29
-
30
-
31
-
32
 |
 |
