Onkyo NS-6130 User Manual English etc. - Page 4
Rear Panel
 |
View all Onkyo NS-6130 manuals
Add to My Manuals
Save this manual to your list of manuals |
Page 4 highlights
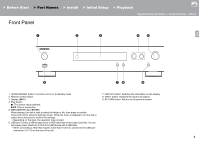
> Before Start > Part Names > Install > Initial Setup > Playback Supplementary information | Advanced Setup | Others Rear Panel E N 1. AC INLET: Connect the supplied power cord. 2. Wireless antenna: Used for Wi-Fi connection. Adjust their angles according to the connection status. 3. USB port: Connect a USB storage device or HDD (hard disk drive) to play music files. You can also supply power (maximum 5 V/1 A) to USB devices with a USB cable. 4. AUDIO OUTPUT DIGITAL COAXIAL jack: Connect a pre-main amplifier with digital coaxial cable. 5. ETHERNET jack: Connect to the network with an ethernet cable. 6. REMOTE CONTROL jack: Connect an Onkyo product with an RI jack using the included RI cable to synchronized with this unit. ( P8) 7. AUDIO OUTPUT ANALOG jacks: Connect a pre-main amplifier with the included analog audio cable. 4 90° 180°
-
 1
1 -
 2
2 -
 3
3 -
 4
4 -
 5
5 -
 6
6 -
 7
7 -
 8
8 -
 9
9 -
 10
10 -
11
-
12
-
13
-
14
-
15
-
16
-
17
-
18
-
19
-
20
-
21
-
22
-
23
-
24
-
25
-
26
-
27
-
28
-
29
-
30
 |
 |
