Onkyo TX-L50 User Manual English
Onkyo TX-L50 Manual
 |
View all Onkyo TX-L50 manuals
Add to My Manuals
Save this manual to your list of manuals |
Onkyo TX-L50 manual content summary:
- Onkyo TX-L50 | User Manual English - Page 1
Setup > Playback Supplementary Information | Advanced Setup | Others NETWORK AV RECEIVER TX-L50 Instruction Manual Before Start What's in the box 2 Part Names Front Panel 3 53 Advanced Setup Setup Menu 54 Firmware Update 68 Others Troubleshooting 71 General Specifications 76 About HDMI - Onkyo TX-L50 | User Manual English - Page 2
in the future. Furthermore, available services may vary depending on your area of residence. 0 Specifications and appearance are subject to change without prior notice. 0 We plan to provide support for the Dolby Atmos and DTS:X audio format through a firmware update for this unit. Refer to our - Onkyo TX-L50 | User Manual English - Page 3
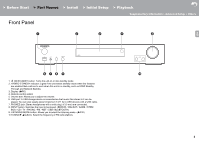
> Before Start > Part Names > Install > Initial Setup > Playback Supplementary Information | Advanced Setup | Others Front Panel PartNames E N 1. Í ON/STANDBY button: Turns the unit on or into standby mode. 2. HYBRID STANDBY indicator: Lights if the unit enters standby mode - Onkyo TX-L50 | User Manual English - Page 4
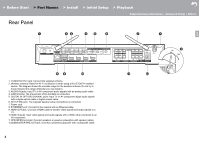
> Before Start > Part Names > Install > Initial Setup > Playback Supplementary Information | Advanced Setup | Others Rear Panel E N 90° 180° 1. TUNER FM 75Њ jack: Connect the supplied antenna. 2. Wireless antenna: Raise for Wi-Fi connection or when using a BLUETOOTH - Onkyo TX-L50 | User Manual English - Page 5
display. 13. button: Returns the display to the previous state during setting. 14.MODE button: Switches tuning to an FM station between automatic tuning and manual tuning. 15.MEMORY button: Used to register FM radio stations. 30° 30° Approx.5 m (16 ft - Onkyo TX-L50 | User Manual English - Page 6
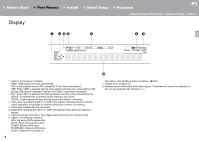
> Before Start > Part Names > Install > Initial Setup > Playback Supplementary Information | Advanced Setup | Others Display E N Neo:6 1. Lights in the following conditions. HDMI: HDMI signals are input and selected. ARC: Audio signals from the ARC compatible TV are input and selected. - Onkyo TX-L50 | User Manual English - Page 7
> Before Start > Part Names > Install > Initial Setup > Playback Supplementary Information | Advanced Setup | Others 1.Install Speaker Layout ˎ1 ˎ2 5.1 Channel System E Front speakers output front stereo sound and the center N speaker outputs sounds emanating from the center of the screen, - Onkyo TX-L50 | User Manual English - Page 8
directly above the front speakers, angled to face the listening position. 0 We plan to provide support for the Dolby Atmos audio format through firmware updates for this unit. After this firmware update, by installing height speakers, you can select the Dolby Atmos listening mode, which realizes the - Onkyo TX-L50 | User Manual English - Page 9
each pair should match the distance between the two front speakers. 0 We plan to provide support for the Dolby Atmos audio format through firmware updates for this unit. After this firmware update, by installing height speakers, you can select the Dolby Atmos listening mode, which realizes the - Onkyo TX-L50 | User Manual English - Page 10
. Place Dolby enabled speakers (front) above the front speakers. 0 We plan to provide support for the Dolby Atmos audio format through firmware updates for this unit. After this firmware update, by installing height speakers, you can ˎ1 select the Dolby Atmos listening mode, which realizes - Onkyo TX-L50 | User Manual English - Page 11
> Before Start > Part Names > Install > Initial Setup > Playback Supplementary Information | Advanced Setup | Others Speaker combinations E N Speaker Channels FRONT CENTER SURROUND HEIGHT 2.1 ch 3.1 ch 4.1 ch 5.1 ch 2.1.2 ch 3.1.2 ch 11 - Onkyo TX-L50 | User Manual English - Page 12
> Before Start > Part Names > Install > Initial Setup > Playback Supplementary Information | Advanced Setup | Others 2. Connect the Speakers 1 E N 1/2˝ (12 mm) a 2 a b 3 b a Speaker cable, b Subwoofer cable 12 - Onkyo TX-L50 | User Manual English - Page 13
> Before Start > Part Names > Install > Initial Setup > Playback Supplementary Information | Advanced Setup | Others Refer to the illustration to connect the speaker system. Twist the wires of the speaker cable tightly before inserting E N into the SPEAKERS terminals. Make correct connection - Onkyo TX-L50 | User Manual English - Page 14
the TV 1 DIGITAL OPTICAL OUT b a To ARC TV E For a TV that supports the ARC (Audio Return Channel) N (ÄP78) feature, use an HDMI cable and Initial Setup. 0 Please refer to the TV's operation manual for directions on connections and setup for the TV. a HDMI cable, b Digital optical cable - Onkyo TX-L50 | User Manual English - Page 15
> Before Start > Part Names > Install > Initial Setup > Playback Supplementary Information | Advanced Setup | Others 4. Connect the HDMI AV Components 1 E N a HDMI OUT a e.g. BD a HDMI cable BD/DVD Cable/Satellite set-top box Streaming media player GAME This is an example of connection - Onkyo TX-L50 | User Manual English - Page 16
> Before Start > Part Names > Install > Initial Setup > Playback Supplementary Information | Advanced Setup | Others 5. Connect the Audio Components Connecting a CD player E Use a digital coaxial cable to connect a CD player to the N DIGITAL IN COAXIAL jack. Connecting a turntable You can also - Onkyo TX-L50 | User Manual English - Page 17
-Fi, then after selecting "Wireless" in "3. Network Connection" (ÄP20) in Initial Setup, select the desired setting method and follow the onscreen instructions to configure the connection. Power Cord Hookup Connect the power cord of this unit only after all other connections are completed. a FM - Onkyo TX-L50 | User Manual English - Page 18
settings required for start up. Initial Setup Language Select English Deutsch Français Español Italiano Nederlands Svenska Exit 4. Follow the on-screen instructions to select the item with the cursors of the remote controller and press ENTER to confirm your selection. 0 To return to the previous - Onkyo TX-L50 | User Manual English - Page 19
AccuEQ Room Calibration partway through, disconnect the speaker setup microphone. 2. Select the connected speaker configuration. AccuEQ Room Calibration Review Crossover E N Subwoofer : Yes speakers, then the unit automatically sets the optimum Front : 100Hz volume level for each speaker - Onkyo TX-L50 | User Manual English - Page 20
with an access point such as a If you have connected a TV that supports ARC, select N wireless LAN router. There are the following two methods of the X button on the remote controller and press ENTER, then follow the on-screen instructions. Wi-Fi Setup abcde f gh i j k l m nopq r s t uvwx - Onkyo TX-L50 | User Manual English - Page 21
> Before Start > Part Names > Install > Initial Setup > Playback Supplementary Information | Advanced Setup | Others AV Playback Component Playback Basic operations E Play an AV component or TV connected to this unit with an N HDMI cable or other cable. 1. Switch the input on the TV to that - Onkyo TX-L50 | User Manual English - Page 22
a 22 3. Follow the on-screen instructions, using the cursors to select radio stations and programs, then press ENTER (a) to play. Play starts when 100% is displayed for buffering. 0 To return to the previous screen, press (b). 0 If you cannot select a network service, it will become selectable when - Onkyo TX-L50 | User Manual English - Page 23
selector changes to NET and streaming of Spotify starts. 0 If "5. Hardware" - "Power Management" - "Network Standby" is set to "Off" in the Setup menu, manually turn the unit on and then press NET on the remote controller. 0 Refer to the following for Spotify settings: www.spotify.com/connect - Onkyo TX-L50 | User Manual English - Page 24
> Before Start > Part Names > Install > Initial Setup > Playback Supplementary Information | Advanced Setup | Others Music Server 1 a b e f 24 c d g h It is possible to stream music files stored on PCs or NAS devices connected to the same network as this unit. The network servers this unit is - Onkyo TX-L50 | User Manual English - Page 25
"Play to" window. 0 Remote playback is not possible when using a network service or playing music files on a USB storage device. 0 Depending of the version of Windows®, there may be .3G2): 0 Supported formats: MPEG-2/MPEG-4 Audio 0 Supported sampling rates: 44.1 kHz, 48 kHz, 64 kHz, 88.2 kHz, 96 - Onkyo TX-L50 | User Manual English - Page 26
> Before Start > Part Names > Install > Initial Setup > Playback Supplementary Information | Advanced Setup | Others USB Storage Device 1 Basic play E Play music files on a USB storage device. N a 1. Switch the input on the TV to that assigned to the unit. 2. Plug your USB storage device with - Onkyo TX-L50 | User Manual English - Page 27
, 192 kHz 0 Quantization bit: 8 bit, 16 bit, 24 bit AIFF (.aiff/.aif/.aifc/.afc/.AIFF/.AIF/.AIFC/.AFC): AIFF files include uncompressed PCM digital audio. 0 Supported sampling rates: 44.1 kHz, 48 kHz, 64 kHz, 88.2 kHz, 96 kHz, 176.4 kHz, 192 kHz 0 Quantization bit: 8 bit, 16 bit, 24 bit AAC (.aac - Onkyo TX-L50 | User Manual English - Page 28
play E You can wirelessly enjoy the music files on an iPhone®, N iPod touch®, or iPad® connected to the same access point as this unit. 0 Update the OS version on your iOS device to the latest version. 1. Connect the iOS device to the access point. 2. Press NET. 3. Tap the AirPlay icon - Onkyo TX-L50 | User Manual English - Page 29
> Before Start > Part Names > Install > Initial Setup > Playback Supplementary Information | Advanced Setup | Others BLUETOOTH® Playback Pairing 1 Playing Back 1 Pairing E 1. When you press the button on the remote controller, N "Now Pairing..." is displayed on this unit's display, and the - Onkyo TX-L50 | User Manual English - Page 30
Station 1. Press TUNER on the remote controller. 2. Press the cursor W/X buttons (a) on the remote controller to select a preset number. Tuning Manually b Deleting a Preset Radio Station 1. Press TUNER on the remote controller. 1. Press TUNER on the remote controller. 2. Press MODE (e) on the - Onkyo TX-L50 | User Manual English - Page 31
> Before Start > Part Names > Install > Initial Setup > Playback Supplementary Information | Advanced Setup | Others Using RDS RDS stands for Radio Data System and is a method of transmitting data in FM radio signals. In regions using RDS, the radio station name is displayed when you tune into a - Onkyo TX-L50 | User Manual English - Page 32
mode last selected for the source is remembered for each of the MOVIE/TV, MUSIC, and GAME buttons. If content you play is not supported by the listening mode you selected last, the listening mode that is standard for that content is selected automatically. Press (a) repeatedly to switch the - Onkyo TX-L50 | User Manual English - Page 33
Initial Setup > Playback Supplementary Information | Advanced Setup | Others Listening Mode Effects Updating of listening modes We plan to provide support for the Dolby Atmos and DTS:X audio format through firmware updates for this unit. This means that the selectable listening modes depend on the - Onkyo TX-L50 | User Manual English - Page 34
output surround back channel added for a maximum of 7.1ch. It DTS Neural:X setting on your Blu-ray Disc/DVD player is not set to also supports low bit rates. This listening mode allows you to expand the playback DSD. 0 To enable transfer of this audio format, connect via HDMI signal to - Onkyo TX-L50 | User Manual English - Page 35
input. 0 Listening modes available when headphones are connected are: Mono, Direct and Stereo. Updating of listening modes We plan to provide support for the Dolby Atmos and DTS:X audio format through firmware updates for this unit. This means that the selectable listening modes depend on the - Onkyo TX-L50 | User Manual English - Page 36
> Before Start > Part Names > Install > Initial Setup > Playback Supplementary Information | Advanced Setup | Others MOVIE/TV button This is a list of listening modes you can select according to the audio format of the input signal. Input Format Listening Mode Analog Direct Mono Dolby - Onkyo TX-L50 | User Manual English - Page 37
> Before Start > Part Names > Install > Initial Setup > Playback Supplementary Information | Advanced Setup | Others Input Format DSD Listening Mode Direct DSD ˎ 1 ˎ 2 Dolby Surround Surround Enhancer PL ᶘ Movie ˎ 3 Neo:6 Cinema ˎ 3 DTS Neural:X TV Logic ˎ 4 AllCh Stereo ˎ 2 Full Mono ˎ 2 - Onkyo TX-L50 | User Manual English - Page 38
> Before Start > Part Names > Install > Initial Setup > Playback Supplementary Information | Advanced Setup | Others Input Format Dolby TrueHD Listening Mode Direct Dolby TrueHD ˎ 1 ˎ 2 Dolby Surround Surround Enhancer PL ᶘ Movie ˎ 3 Neo:6 Cinema ˎ 3 TV Logic ˎ 4 AllCh Stereo ˎ 2 Full Mono - Onkyo TX-L50 | User Manual English - Page 39
> Before Start > Part Names > Install > Initial Setup > Playback Supplementary Information | Advanced Setup | Others Input Format DTS Express Listening Mode Direct DTS Express ˎ 1 ˎ 2 PL ᶘ Movie ˎ 3 Neo:6 Cinema ˎ 3 DTS Neural:X TV Logic ˎ 4 AllCh Stereo ˎ 2 Full Mono ˎ 2 T-D ˎ 1: Cannot - Onkyo TX-L50 | User Manual English - Page 40
> Before Start > Part Names > Install > Initial Setup > Playback Supplementary Information | Advanced Setup | Others MUSIC button This is a list of listening modes you can select according to the audio format of the input signal. Input Format Listening Mode Analog Direct Stereo Dolby Surround - Onkyo TX-L50 | User Manual English - Page 41
> Before Start > Part Names > Install > Initial Setup > Playback Supplementary Information | Advanced Setup | Others Input Format DSD Listening Mode Direct Stereo DSD ˎ 1 ˎ 2 Dolby Surround Surround Enhancer PL ᶘ Music ˎ 3 Neo:6 Music ˎ 3 DTS Neural:X Orchestra ˎ 4 Unplugged ˎ 4 Studio- - Onkyo TX-L50 | User Manual English - Page 42
> Before Start > Part Names > Install > Initial Setup > Playback Supplementary Information | Advanced Setup | Others Input Format Dolby D+ Listening Mode Direct Stereo Dolby D+ ˎ 1 ˎ 2 Dolby Surround Surround Enhancer PL ᶘ Music ˎ 3 Neo:6 Music ˎ 3 Orchestra ˎ 4 Unplugged ˎ 4 Studio-Mix ˎ - Onkyo TX-L50 | User Manual English - Page 43
> Before Start > Part Names > Install > Initial Setup > Playback Supplementary Information | Advanced Setup | Others Input Format Listening Mode DTS 96/24 Direct Stereo DTS 96/24 ˎ 1 ˎ 2 PL ᶘ Music ˎ 3 Neo:6 Music ˎ 3 DTS Neural:X Orchestra ˎ 4 Unplugged ˎ 4 Studio-Mix ˎ 4 AllCh Stereo ˎ - Onkyo TX-L50 | User Manual English - Page 44
> Before Start > Part Names > Install > Initial Setup > Playback Supplementary Information | Advanced Setup | Others Input Format Listening Mode DTS-HD MSTR Direct Stereo DTS-HD MSTR ˎ 1 ˎ 2 PL ᶘ Music ˎ 3 Neo:6 Music ˎ 3 DTS Neural:X Orchestra ˎ 4 Unplugged ˎ 4 Studio-Mix ˎ 4 AllCh - Onkyo TX-L50 | User Manual English - Page 45
> Before Start > Part Names > Install > Initial Setup > Playback Supplementary Information | Advanced Setup | Others Input Format Listening Mode PCM Music files (except DSD/ Dolby TrueHD) Direct Dolby Surround Surround Enhancer PL ᶘ Game ˎ 1 DTS Neural:X Game-RPG ˎ 2 Game-Action ˎ 2 Game- - Onkyo TX-L50 | User Manual English - Page 46
> Before Start > Part Names > Install > Initial Setup > Playback Supplementary Information | Advanced Setup | Others Input Format Dolby Atmos Listening Mode Direct Dolby Atmos Surround Enhancer Game-RPG Game-Action Game-Rock Game-Sports AllCh Stereo Full Mono T-D Input Format Dolby D Listening - Onkyo TX-L50 | User Manual English - Page 47
> Before Start > Part Names > Install > Initial Setup > Playback Supplementary Information | Advanced Setup | Others Input Format Dolby TrueHD Listening Mode Direct Dolby TrueHD ˎ 1 ˎ 2 Dolby Surround Surround Enhancer PL ᶘ Game ˎ 3 Game-RPG ˎ 4 Game-Action ˎ 4 Game-Rock ˎ 4 Game-Sports ˎ 4 - Onkyo TX-L50 | User Manual English - Page 48
> Before Start > Part Names > Install > Initial Setup > Playback Supplementary Information | Advanced Setup | Others Input Format DTS Express Listening Mode Direct DTS Express ˎ 1 ˎ 2 PL ᶘ Game ˎ 3 DTS Neural:X Game-RPG ˎ 4 Game-Action ˎ 4 Game-Rock ˎ 4 Game-Sports ˎ 4 AllCh Stereo ˎ 2 - Onkyo TX-L50 | User Manual English - Page 49
> Before Start > Part Names > Install > Initial Setup > Playback Supplementary Information | Advanced Setup | Others Input Format Listening Mode E N DTS:X Direct DTS:X Game-RPG ˎ 1 Game-Action ˎ 1 Game-Rock ˎ 1 Game-Sports ˎ 1 AllCh Stereo ˎ 2 Full Mono ˎ 2 T-D ˎ 1: Surround speakers - Onkyo TX-L50 | User Manual English - Page 50
> Before Start > Part Names > Install > Initial Setup > Playback Supplementary Information | Advanced Setup | Others Quick Menu 1 50 By pressing the Q button on the remote controller during play, you can adjust frequently used settings, such as the ˙ AccuEQ AccuEQ Room Calibration: Enable or - Onkyo TX-L50 | User Manual English - Page 51
to concentrate sound in the middle. Set a large number to distribute the central sound out to the left and right. We plan to provide support for the Dolby Atmos and DTS:X audio format through firmware updates for this unit. This means that the selectable listening modes depend on the version of - Onkyo TX-L50 | User Manual English - Page 52
> Before Start > Part Names > Install > Initial Setup > Playback Supplementary Information | Advanced Setup | Others Other Functions Playing Audio and Video from Separate E Sources N It is possible to play audio and video from different sources. For example, you can play audio from the CD - Onkyo TX-L50 | User Manual English - Page 53
player functions Due to firmware (the software for the system) updates after you make your purchase or firmware changes during E N production of the product, there may be additions or changes to the features available compared to what is in the instruction manual. For information about player - Onkyo TX-L50 | User Manual English - Page 54
upscaled to 4K for output. "Off (Default Value)": When not using this function "Auto": Use this function 0 Select "Off" if your TV does not support 4K. Super Resolution When you have set "1080p -> 4K Upscaling" to "Auto", you can select the degree of video signal correction from "Off" and between - Onkyo TX-L50 | User Manual English - Page 55
> Before Start > Part Names > Install > Initial Setup > Playback Supplementary Information | Advanced Setup | Others Impose OSD Screen Saver Set whether or not to display the information on the TV when the volume is adjusted or input is changed, for example. "On (Default Value)": OSD displayed on - Onkyo TX-L50 | User Manual English - Page 56
Part Names > Install > Initial Setup > Playback Supplementary Information | Advanced Setup | Others 0 Supported sampling rates for PCM signals (stereo, mono) from a digital input are 32kHz, 44.1kHz from the front speakers. Refer to the instruction manual of your speakers to make the setting. 56 - Onkyo TX-L50 | User Manual English - Page 57
> Before Start > Part Names > Install > Initial Setup > Playback Supplementary Information | Advanced Setup | Others Center Height Surround LPF of LFE Select the crossover frequency from "40Hz" to "200Hz" to start outputting frequencies for each channel. (Default Value is "100Hz") "Full Band": - Onkyo TX-L50 | User Manual English - Page 58
> Before Start > Part Names > Install > Initial Setup > Playback Supplementary Information | Advanced Setup | Others ˙ 4. Level Calibration Front Left Center Front Right Height Left Height Right Surround Right Surround Left Subwoofer Select a value between "j12 dB" and "i12 dB" (in 1 dB - Onkyo TX-L50 | User Manual English - Page 59
> Before Start > Part Names > Install > Initial Setup > Playback Supplementary Information | Advanced Setup | Others Surround After selecting the speaker frequency from between "25 Hz" and 3. Audio Adjust E "16 kHz" with the cursors W/X, adjust the volume of that frequency between "j6.0 dB" and - Onkyo TX-L50 | User Manual English - Page 60
Information | Advanced Setup | Others ˙ 3. DTS 4. Source E 0 We plan to provide support for the DTS:X audio format through firmware updates for this unit. This setting will become possible after updating. ˙ 1. IntelliVolume N Adjust the volume level difference between the devices connected to - Onkyo TX-L50 | User Manual English - Page 61
> Before Start > Part Names > Install > Initial Setup > Playback Supplementary Information | Advanced Setup | Others ˙ Audio Select Select the priority for input selection when multiple audio sources are connected to one input PCM Fixed Mode Select whether to fix input signals to PCM (except - Onkyo TX-L50 | User Manual English - Page 62
> Before Start > Part Names > Install > Initial Setup > Playback Supplementary Information | Advanced Setup | Others 5. Hardware ˙ 1. HDMI HDMI CEC Setting to "On" enables the input selection link and other link functions with HDMI connected CEC compliant device. "On": Use this function "Off ( - Onkyo TX-L50 | User Manual English - Page 63
configuration without DHCP If selecting "Disable", you must set "IP Address", "Subnet Mask", "Gateway", and "DNS Server" manually. Displays/Sets the IP address. Displays/Sets the subnet mask. Displays/Sets the gateway. Displays/Sets the primary DNS server. Proxy URL Displays/Sets the - Onkyo TX-L50 | User Manual English - Page 64
to the network to an easily recognized name. This is set to Onkyo TX-L50 at the time of purchase. (" ˎ " stand for alphanumeric characters Usage Data As a means of improving the quality of our products and services, our company may collect information about your usage over the network. Select - Onkyo TX-L50 | User Manual English - Page 65
Through is on. how to clear the pairing information, refer to the BLUETOOTH "On": The setting will be enabled. Device enabled device's instruction manual. Displays the name of the BLUETOOTH enabled device connected to the unit. "Off": The setting will be disabled. 0 This setting cannot be - Onkyo TX-L50 | User Manual English - Page 66
You will not be able to select this setting if a USB storage device is not connected or there is nothing to update in the USB storage device. 0 Wait for a while if "Firmware Update" cannot be selected. It will appear when the network feature is started. ˙ 2. Initial Setup You can make the Initial - Onkyo TX-L50 | User Manual English - Page 67
> Before Start > Part Names > Install > Initial Setup > Playback Supplementary Information | Advanced Setup | Others ˙ 4. Load Default E Load Default Reset the unit to return the settings to the status at the time of N shipment. Reset is complete when "Clear" is displayed on the display and - Onkyo TX-L50 | User Manual English - Page 68
not limited to, compensation, reimbursement or damages on account of the loss of present or prospective profits, loss of data, or for any other 0 If "Firmware Update" is grayed out and cannot be reason whatsoever. selected, wait for a while until it starts up. 0 You will not be able to select - Onkyo TX-L50 | User Manual English - Page 69
problem. If you are still unable to connect to the Internet, the DNS server or proxy server may be temporarily down. Check the service are not supported. - USB hubs and USB devices with hub function are not supported. Do Select "6. Miscellaneous" - "Firmware Update" - "Update via USB" with the - Onkyo TX-L50 | User Manual English - Page 70
it has its own power supply. 0 ˎ -05, ˎ -13, ˎ -20, ˎ -21: The firmware file is not present in the root folder of the USB storage device, or the firmware file is for another model. Retry from the download of the firmware file. 0 Others: Disconnect then reconnect the AC power cord, then repeat - Onkyo TX-L50 | User Manual English - Page 71
the simple measures on both the unit and the connected device. If the problem is that the video or audio is not output or the HDMI linked operation of the terminal to which the TV is connected. 0 If the TV doesn't support the ARC function, along with connection by HDMI, connect the TV and this unit - Onkyo TX-L50 | User Manual English - Page 72
input format. Check the following if the above does not fix the problem: Cannot select a desired listening mode 0 Confirm that the connection between start immediately. 0 We plan to provide support for the Dolby Atmos and DTS:X audio format through firmware updates for this unit. About DTS signals - Onkyo TX-L50 | User Manual English - Page 73
must support the a network service, it problem: There is no linked operation with CEC compliant devices, such as a TV 0 In the Setup menu of the unit, set "5. Hardware" - "HDMI" - "HDMI CEC" to "On". 0 It is also necessary to set HDMI linking on the CEC compliant device. Check the instruction manual - Onkyo TX-L50 | User Manual English - Page 74
following if the above does not fix the problem: several issues such as interrupted playback and LAN router. For instructions on changing channels, see the instruction manual provided with your wireless SSID that includes multi-byte characters is not supported. Name the SSID of the wireless LAN - Onkyo TX-L50 | User Manual English - Page 75
> Before Start > Part Names > Install > Initial Setup > Playback Supplementary Information | Advanced Setup | Others ˙ Others E N Strange noises can be heard from this unit 0 If you have connected another unit to the same wall outlet as this unit, this noise may be an effect from the other - Onkyo TX-L50 | User Manual English - Page 76
40 Network Section Ethernet LAN 10BASE-T/100BASE-TX Wireless LAN IEEE 802.11 a/b/g/n standard HOGP-HID Device (Server) HID Service (HIDS) Supported Codecs SBC AAC Transmission range (A2DP) Atmos (to be supported in a future update), DTS, DTS:X (to be supported in a future update), DTS-HD Master - Onkyo TX-L50 | User Manual English - Page 77
> Before Start > Part Names > Install > Initial Setup > Playback Supplementary Information | Advanced Setup | Others Others E USB: 1 (Front, Ver.2.0, 5 V/1 A) N Ethernet: 1 Setup Mic: 1 77 - Onkyo TX-L50 | User Manual English - Page 78
HDMI cable, you can not only output the audio and video from this unit to the TV, but also output of the above audio formats. Supported resolutions input the audio from the TV to this unit. Copyright protection technology: HDCP1.4/HDCP2.2 HDMI Standby Through: Even if this unit is in standby - Onkyo TX-L50 | User Manual English - Page 79
, dass es in einigen Ländern Beschränkungen zur Nutzung der BLUETOOTH Geräte gibt. Prüfen Sie das bei Ihren lokalen Behörden. Onkyo Corporation garandeert niet de BLUETOOTH compatibiliteit tussen de AV-receiver en alle BLUETOOTH apparaten. Raadpleeg voor compatibiliteit tussen de AV-receiver en een - Onkyo TX-L50 | User Manual English - Page 80
> Before Start > Part Names > Install > Initial Setup > Playback Supplementary Information | Advanced Setup | Others "Alle andere handelsmerken zijn eigendom van de desbetreffende rechthebbenden." E N "Alla andra varumärken tillhör deras respektive ägare." 80 - Onkyo TX-L50 | User Manual English - Page 81
East, Africa> Please contact an Onkyo distributor referring to Onkyo SUPPORT site. http://www.intl.onkyo.com/support/ The above-mentioned information is subject to change without prior notice. Visit the Onkyo web site for the latest update. (C) Copyright 2016 Onkyo & Pioneer Corporation Japan. All
-
 1
1 -
 2
2 -
 3
3 -
 4
4 -
 5
5 -
 6
6 -
 7
7 -
8
-
9
-
10
-
11
-
12
-
13
-
14
-
15
-
16
-
17
-
18
-
19
-
20
-
21
-
22
-
23
-
24
-
25
-
26
-
27
-
28
-
29
-
30
-
31
-
32
-
33
-
34
-
35
-
36
-
37
-
38
-
39
-
40
-
41
-
42
-
43
-
44
-
45
-
46
-
47
-
48
-
49
-
50
-
51
-
52
-
53
-
54
-
55
-
56
-
57
-
58
-
59
-
60
-
61
-
62
-
63
-
64
-
65
-
66
-
67
-
68
-
69
-
70
-
71
-
72
-
73
-
74
-
75
-
76
-
77
-
78
-
79
-
80
-
81
 |
 |

E
N
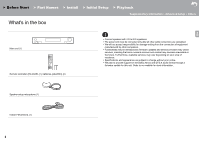
Before Start
What's in the box
....................................................................
2
Part Names
Front Panel
.............................................................................
3
Rear Panel
..............................................................................
4
Remote Controller
..................................................................
5
Display
....................................................................................
6
Install
1. Speaker Layout
..................................................................
7
2. Connect the Speakers
......................................................
12
3. Connect the TV
.................................................................
14
4. Connect the HDMI AV Components
.................................
15
5. Connect the Audio Components
.......................................
16
6. Connect Other Cables
......................................................
17
Initial Setup
Initial Setup with Auto Start-up Wizard
.................................
18
Playback
AV Component Playback
......................................................
21
Internet Radio
.......................................................................
22
Spotify
...................................................................................
23
Music Server
.........................................................................
24
USB Storage Device
.............................................................
26
AirPlay
®
................................................................................
28
BLUETOOTH
®
Playback
......................................................
29
Listening to the FM Radio
.....................................................
30
Listening Modes
...................................................................
32
Quick Menu
..........................................................................
50
Other Functions
....................................................................
52
Supplementary Information
Supplementary information for player functions
....................
53
Advanced Setup
Setup Menu
...........................................................................
54
Firmware Update
..................................................................
68
Others
Troubleshooting
....................................................................
71
General Specifications
..........................................................
76
About HDMI
..........................................................................
78
License and Trademark Information
.....................................
79
>
Before Start
>
Part Names
>
Install
>
Initial Setup
> Playback
Supplementary Information
|
Advanced Setup
| Others
NETWORK AV RECEIVER
TX-L50
Instruction
Manual