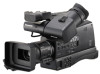
Panasonic AG-HMC80PJ Basic Operating Instructions - Page 37
Shooting in auto mode, Switch the AUTO/MANUAL switch to AUTO
 |
View all Panasonic AG-HMC80PJ manuals
Add to My Manuals
Save this manual to your list of manuals |
Page 37 highlights
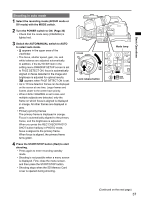
Basic Operations Shooting in auto mode 1 Select the recording mode (AVCHD mode or DV mode) with the MODE switch. 2 Turn the POWER switch to ON. (Page 30) • Check that the mode lamp (CAMERA) is lighted red. 3 Switch the AUTO/MANUAL switch to AUTO to select auto mode. • appears in the upper area of the viewfinder. • The focus, shutter speed, gain, iris, and white balance are adjusted automatically. In addition, if the AUTO SW item in the setting menu SW&DISP SETUP screen is set to FACE DETECT ON, focus is automatically aligned on faces detected in the image and brightness is adjusted for optimal results. A appears when FACE DETECT ON is set. • Up to 15 face detection frames can be displayed on the screen at one time. Larger frames and frames closer to the center have priority. • When FACE FRAMING is set to ALL and multiple subjects are detected, only the frame on which focus is aligned is displayed in orange. All other frames are displayed in gray. • Primary (priority) frames The primary frame is displayed in orange. Focus is automatically aligned to the primary frame, and the brightness is adjusted. When you press the REC CHECK/PHOTO SHOT button halfway in PHOTO mode, focus is aligned to the primary frame. When focus is aligned, the primary frame turns green. 4 Press the START/STOP button (Red) to start shooting. • Press again to enter recording standby mode. • Shooting is not possible when a menu screen is displayed. First, close the menu screen, and then press the START/STOP button. • Shooting stops when the SD Memory Card cover is opened during shooting. Lock release button Mode lamp (Continued on the next page) 37
-
 1
1 -
2
-
3
-
4
-
5
-
6
-
7
-
8
-
9
-
10
-
11
-
12
-
13
-
14
-
15
-
16
-
17
-
18
-
19
-
20
-
21
-
22
-
23
-
24
-
25
-
26
-
27
-
28
-
29
-
30
-
31
-
 32
32 -
 33
33 -
 34
34 -
 35
35 -
 36
36 -
 37
37 -
 38
38 -
 39
39 -
 40
40 -
 41
41 -
 42
42 -
43
-
44
-
45
-
46
-
47
-
48
-
49
-
50
-
51
-
52
 |
 |
