Panasonic AW-HS50 Basic Operating Instructions - Page 12
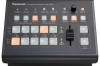
USER buttons [USER 1, USER 2], SHIFT button [SHIFT], OSD/TIME dial [OSD/TIME], OSD ON button [OSD ON]
 |
View all Panasonic AW-HS50 manuals
Add to My Manuals
Save this manual to your list of manuals |
Page 12 highlights
1. Parts and their functions USER buttons [USER 1, USER 2] Any four functions selected from among the menu items can be assigned to the USER 1 button and USER 2 button, and then used. The functions registered in [USER1] and [USER3] are assigned to the USER 1 button whereas the functions registered in [USER2] and [USER4] are assigned to the USER 2 button. While the SHIFT button () is held down, the function registered in [USER3] or [USER4] can be selected. Button indicator ON: The functions assigned to the USER buttons are enabled. Button indicator OFF: The functions assigned to the USER buttons are disabled. When "[2] WIPE Menu", "[3] PinP Menu" or "[5] KEY Adjust Menu" is displayed on the OSD menu or when the chroma key marker is in the ON status, these buttons function as short-cut buttons for specific setting items. Refer to "1-8. Setting the USER buttons" ( Operating Instructions). SHIFT button [SHIFT] This is pressed to call the [USER3] and [USER4] functions which have been assigned to the USER 1 button and USER 2 button or to call the XPT6 to XPT10 materials which have been assigned to crosspoint buttons [1] to [5]. Button indicator ON: The SHIFT button is enabled. Button indicator OFF: The SHIFT button is disabled. (The functions executed using the SHIFT button take effect only while the button is held down.) OSD/TIME dial [OSD/TIME] The following operations are performed using this dial. When the main menu is displayed: Turn the OSD/TIME dial to select a submenu, and press the dial to enter the selection. When a submenu is displayed: Turn the OSD/TIME dial to select a setting item, and press the dial to enter the selection. When the dial is turned while a setting is blinking, the setting changes, and when the dial is pressed, the blinking part moves to the right. When the dial is held down while a setting is blinking, the setting is restored to default value. (However, the network settings are not returned to their default values.) When the dial is turned while it is still held down after the PinP ON, KEY ON, FTB ON or AUTO button has been held down, the respective transition duration can be changed. OSD ON button [OSD ON] This selects whether the OSD menu is to be displayed or hidden. Each time the OSD ON button is held down, the OSD menu is switched between displayed and hidden. Button indicator ON: The OSD menu is displayed. Button indicator OFF: The OSD menu is hidden. PinP ON button [PinP ON] This is used to combine PinP (picture-in-picture) images for the transition duration which has been set. Press the button. The button indicator goes off. Images can no longer be combined. Blinks Image combining is now underway. Lights Image combining is now disabled. Lights Image combining is now completed. Press the button. By turning the OSD/TIME dial () while keeping the PinP ON button pressed after the button has been held down, the transition duration can be changed. 12
-
 1
1 -
2
-
3
-
4
-
5
-
6
-
 7
7 -
 8
8 -
 9
9 -
 10
10 -
 11
11 -
 12
12 -
 13
13 -
 14
14 -
 15
15 -
 16
16 -
 17
17 -
18
-
19
-
20
-
21
-
22
-
23
-
24
-
25
-
26
-
27
-
28
-
29
-
30
-
31
-
32
-
33
-
34
 |
 |
