Panasonic AW-HS50 Basic Operating Instructions - Page 13
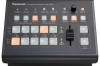
KEY ON button [KEY ON], CUT button [BKGD CUT], Slide lever, Button indicator
 |
View all Panasonic AW-HS50 manuals
Add to My Manuals
Save this manual to your list of manuals |
Page 13 highlights
1. Parts and their functions KEY ON button [KEY ON] This is used to combine key materials for the transition duration which has been set. Press the button. The button indicator goes off. Images can no longer be combined. Blinks Image combining is now underway. Lights Image combining is now disabled. Lights Image combining is now completed. Press the button. By turning the OSD/TIME dial () while keeping the KEY ON button pressed after the button has been held down, the transition duration can be changed. FTB ON button [FTB ON] Press this button to fade out the program image to a black screen for the transition duration which has been set. When the button is pressed again, the program image is faded in from the black screen. Press the button. The button indicator goes off. Program image Blinks Now fading out. Lights Now fading in. Lights Fade-out is now completed. Press the button. An image other than the black screen can be set as the screen to which the program image is to be faded out. Refer to "1-5. FTB (fade to black)" ( Operating Instructions). By turning the OSD/TIME dial () while keeping the FTB ON button pressed after the button has been held down, the transition duration can be changed. AUTO button [BKGD AUTO] This automatically initiates the transition for the transition duration which has been set. (Auto transition) Button indicator ON: Auto transition is being executed. Button indicator OFF: Auto transition is complete. If the AUTO button is pressed while auto transition is being executed, the auto transition operation is aborted. When the button is pressed again after the operation was aborted, the remaining transition is executed. When the AUTO button is pressed with the slide lever () at a midway setting, the transition is executed in the remaining time from the midway status. By turning the OSD/TIME dial () while keeping the AUTO button pressed after the button has been held down, the transition duration can be changed. Slide lever This is used when executing transitions manually. When the slide lever is moved to the end, the transition is completed. If it has been moved while an auto transition was being executed, operation will switch to manual as soon as the position of the slide lever has gone beyond the amount of the transition having been executed. It is possible to select a background, key or PinP using a menu for materials involving transitions. CUT button [BKGD CUT] This instantly initiates a transition for the currently selected operation. Button indicator ON: The transition is being executed. Button indicator OFF: The transition is complete. 13
-
 1
1 -
2
-
3
-
4
-
5
-
6
-
7
-
 8
8 -
 9
9 -
 10
10 -
 11
11 -
 12
12 -
 13
13 -
 14
14 -
 15
15 -
 16
16 -
 17
17 -
 18
18 -
19
-
20
-
21
-
22
-
23
-
24
-
25
-
26
-
27
-
28
-
29
-
30
-
31
-
32
-
33
-
34
 |
 |
