Panasonic BT-LH1710 User Manual - Page 25
Audio Level Meter, Closed Caption - comparison
 |
UPC - 092281890852
View all Panasonic BT-LH1710 manuals
Add to My Manuals
Save this manual to your list of manuals |
Page 25 highlights
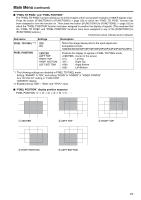
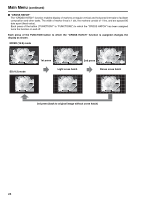
Main Menu (continued) ■ Functions displayed during FUNCTION button operation Pressing any of the [FUNCTION1] to [FUNCTION5] buttons displays the operations assigned to each button as shown below. • HV DELAY DELAY OFF/V DELAY/H DELAY/HV DELAY • AUTOSETUP AUTOSETUP/COMPLETE/INCOMPLETE/NOT RGB-COMP.CH • BLUE ONLY BLUE ONLY ON/BLUE ONLY OFF • GAMMA SELECT GAMMA STANDARD/GAMMA FILM/GAMMA STDIO/PST • SD ASPECT 4:3/16:9 • SCAN NORMAL SCAN/UNDER SCAN • SUB WINDOW SINGLE/FULL/PART/STILL • WFM/VECTOR WFM ON/WFM/VECTOR OFF/VECTOR × 1/ VECTOR × 2/VECTOR × 4/VECTOR × 8 • MARKER MARKER OFF/4:3 MARKER/13:9 MARKER/14:9 MARKER/VISTA MARKER/CNSCO MARKER/95% MARKER/93% MARKER/90% MARKER/88% MARKER/80% MARKER/MARKER ON • PIXEL TO PIXEL • PIXEL POSITION CENTER/LEFT TOP/LEFT BOTTOM/RIGHT TOP/ RIGHT BOTTOM/PIXEL TO PIXEL OFF • AUDIO LEVEL METER METER OFF/METER 2CH/METER 4CH/METER 8CH • CROSS HATCH CROSS HATCH HIGH/CROSS HATCH LOW/ CROSS HATCH OFF • MONO MONO ON/MONO OFF • TIME CODE LTC/VITC/LUB/VUB/TC OFF • CLOSED CAPTION CC1/CC2/CC3/CC4/CC OFF ■ "HV DELAY" This displays the blanking period. Each press of the button changes the display as follows: H blanking display J V blanking display J H and V blanking display J no blanking display. ■ "SUB WINDOW" Opening the "SUB WINDOW" function splits the screen (main window) in two as shown below to enable comparison of a recorded still image with live video. Use the "SUB WINDOW" setting (FULL, PART) in the "SYSTEM CONFIG" menu (J page 22) to set up the function as shown below. Press the button ([FUNCTION1] to [FUNCTION5] (J page 23)) to which the "SUB WINDOW" function has been assigned to turn the function on and off. (This assumes that the "SUB WINDOW" function has been assigned to any of the [FUNCTION1] to [FUNCTION5] buttons.) To setup "IP MODE" (J page 20), exit the "SUB WINDOW" function first. • FULL Resizes the main window to also display a second window (two sub-windows). Press the FUNCTION button to which the SUB WINDOW function has been assigned. Normal window (main window) Press the button again Before image input (two sub-windows) Press the button again After image input (two sub-windows) Video Video Video Still image Video 25
-
 1
1 -
2
-
3
-
4
-
5
-
6
-
7
-
8
-
9
-
10
-
11
-
12
-
13
-
14
-
15
-
16
-
17
-
18
-
19
-
 20
20 -
 21
21 -
 22
22 -
 23
23 -
 24
24 -
 25
25 -
 26
26 -
 27
27 -
 28
28 -
 29
29 -
 30
30 -
31
-
32
-
33
-
34
-
35
-
36
-
37
-
38
-
39
-
40
-
41
-
42
-
43
-
44
 |
 |
