Panasonic BT-LH1710 User Manual - Page 27
PIXEL TO PIXEL and PIXEL POSITION, PIXEL POSITION display position sequence, Sub menu, Settings
 |
UPC - 092281890852
View all Panasonic BT-LH1710 manuals
Add to My Manuals
Save this manual to your list of manuals |
Page 27 highlights
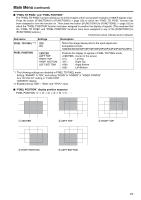
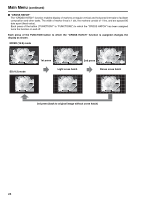
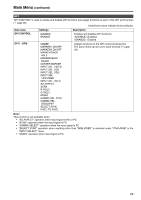
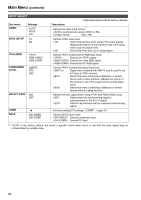
Main Menu (continued) ■ "PIXEL TO PIXEL" and "PIXEL POSITION" The "PIXEL TO PIXEL" function allows you to check images at their actual pixel resolution (1080I/P signals only). Press the button ([FUNCTION1] to [FUNCTION5] (J page 23)) to which the "PIXEL TO PIXEL" function has been assigned to turn the function on. Then press the button ([FUNCTION1] to [FUNCTION5] (J page 23)) to which the "PIXEL POSITION" function has been assigned to position the display of signals. (This assumes that the "PIXEL TO PIXEL" and "PIXEL POSITION" functions have been assigned to any of the [FUNCTION1] to [FUNCTION5] buttons.) Underlined values indicate factory defaults. Sub menu Settings PIXEL TO PIXEL*1*2 OFF ON Description Tailors the image display size to the input signal size. Compatible formats 1080/60I/59I/50I/60P/59P/50P/30P/29P/25P/24P/23P/24Psf/23Psf PIXEL POSITION CENTER LEFT TOP RIGHT TOP RIGHT BOTTOM LEFT BOTTOM Positions the display of signals in PIXEL TO PIXEL mode. Center of the screen Left Top Right Top Right Bottom Left Bottom *1 The following settings are disabled in PIXEL TO PIXEL mode. Setting "ANAMO" to "ON", and setting "SCAN" to "UNDER" in "VIDEO CONFIG" Any "HV DELAY" setting in "FUNCTION" "MARKER" display *2 Enabled during "SDI1", "SDI2" and "YPBPR" input. ■ "PIXEL POSITION" display position sequence PIXEL POSITION: ➀ J ➁ J ➂ J ➃ J ➄ J ➀ ....... ➀ CENTER ➁ LEFT TOP ➂ RIGHT TOP ➃ RIGHT BOTTOM ➄ LEFT BOTTOM 27
-
 1
1 -
2
-
3
-
4
-
5
-
6
-
7
-
8
-
9
-
10
-
11
-
12
-
13
-
14
-
15
-
16
-
17
-
18
-
19
-
20
-
21
-
 22
22 -
 23
23 -
 24
24 -
 25
25 -
 26
26 -
 27
27 -
 28
28 -
 29
29 -
 30
30 -
 31
31 -
 32
32 -
33
-
34
-
35
-
36
-
37
-
38
-
39
-
40
-
41
-
42
-
43
-
44
 |
 |
