Panasonic HDC-TM10K Hd Sd Camcorder - Multi Language - Page 16
Parts identification and, handling - manual
 |
UPC - 037988984374
View all Panasonic HDC-TM10K manuals
Add to My Manuals
Save this manual to your list of manuals |
Page 16 highlights
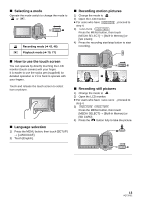
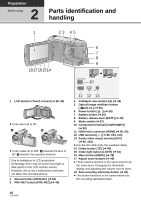
Preparation Before using 2 Parts identification and handling 1 23 45 18 17 161514 6 7 8 9 10 1 LCD monitor (Touch screen) (l 28, 36) ≥ It can open up to 90o. ≥ It can rotate up to 180o A towards the lens or 90o B towards the opposite direction. Due to limitations in LCD production technology, there may be some tiny bright or dark spots on the LCD monitor screen. However, this is not a malfunction and does not affect the recorded picture. 2 Manual button [MANUAL] (l 66) 3 PRE-REC button [PRE-REC] (l 45) 11 12 13 4 Intelligent auto button [iA] (l 39) 5 Optical image stabilizer button [ /O.I.S.] (l 50) 6 Power button [ ] (l 26) 7 Battery holder (l 20) 8 Battery release lever [BATT] (l 20) 9 Mode switch (l 27) 10 Component terminal [COMPONENT] (l 90) 11 HDMI mini connector [HDMI] (l 90, 94) 12 USB terminal [ ] (l 96, 104, 114) 13 Audio-video output terminal [A/V] (l 90, 103) ≥ Use the AV cable (only the supplied cable). 14 Delete button [ ] (l 80) 15 Video light button [LIGHT] (l 52) 16 Menu button [MENU] (l 29) 17 Adjust zoom buttons (l 49) ≥ These buttons function in the same manner as the zoom lever. Changing the thumbnail display and adjusting the volume can be done. 18 Sub recording start/stop button (l 38) ≥ This button functions in the same manner as the recording start/stop button. 16 VQT2H52
-
 1
1 -
2
-
3
-
4
-
5
-
6
-
7
-
8
-
9
-
10
-
 11
11 -
 12
12 -
 13
13 -
 14
14 -
 15
15 -
 16
16 -
 17
17 -
 18
18 -
 19
19 -
 20
20 -
 21
21 -
22
-
23
-
24
-
25
-
26
-
27
-
28
-
29
-
30
-
31
-
32
-
33
-
34
-
35
-
36
-
37
-
38
-
39
-
40
-
41
-
42
-
43
-
44
-
45
-
46
-
47
-
48
-
49
-
50
-
51
-
52
-
53
-
54
-
55
-
56
-
57
-
58
-
59
-
60
-
61
-
62
-
63
-
64
-
65
-
66
-
67
-
68
-
69
-
70
-
71
-
72
-
73
-
74
-
75
-
76
-
77
-
78
-
79
-
80
-
81
-
82
-
83
-
84
-
85
-
86
-
87
-
88
-
89
-
90
-
91
-
92
-
93
-
94
-
95
-
96
-
97
-
98
-
99
-
100
-
101
-
102
-
103
-
104
-
105
-
106
-
107
-
108
-
109
-
110
-
111
-
112
-
113
-
114
-
115
-
116
-
117
-
118
-
119
-
120
-
121
-
122
-
123
-
124
-
125
-
126
-
127
-
128
-
129
-
130
-
131
-
132
-
133
-
134
-
135
-
136
-
137
-
138
-
139
-
140
-
141
-
142
-
143
-
144
-
145
-
146
-
147
-
148
-
149
-
150
-
151
-
152
 |
 |
