Panasonic HMTA1 HMTA1 User Guide - Page 21
Setting date and time, Select the menu., Select the items to be set using, on the cursor button
 |
View all Panasonic HMTA1 manuals
Add to My Manuals
Save this manual to your list of manuals |
Page 21 highlights
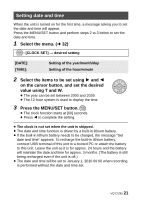
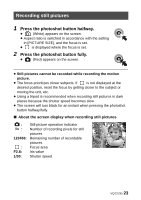
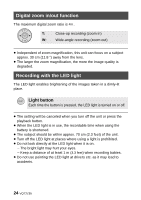
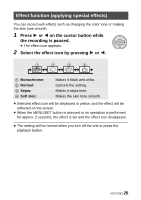
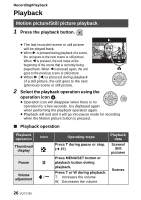
Setting date and time When the unit is turned on for the first time, a message asking you to set the date and time will appear. Press the MENU/SET button and perform steps 2 to 3 below to set the date and time. 1 Select the menu. (l 32) : [CLOCK SET] # desired setting [DATE]: [TIME]: Setting of the year/month/day Setting of the hour/minute 2 Select the items to be set using 1 and 2 on the cursor button, and set the desired value using T and W. ≥ The year can be set between 2000 and 2039. ≥ The 12-hour system is used to display the time. 3 Press the MENU/SET button. ≥ The clock function starts at [00] seconds. ≥ Press 2 to complete the setting. ≥ The clock is not set when the unit is shipped. ≥ The date and time function is driven by a built-in lithium battery. ≥ If the built-in lithium battery needs to be charged, the message "Set date and time" appears. To recharge the built-in lithium battery, connect USB terminal of this unit to a booted PC or attach the battery to this unit. Leave the unit as it is for approx. 24 hours and the battery will maintain the date and time for approx. 3 months. (The battery is still being recharged even if the unit is off.) ≥ The date and time will be set to January 1, 2010 00:00 when recording is performed without the date and time set. VQT2Z95 21
-
 1
1 -
2
-
3
-
4
-
5
-
6
-
7
-
8
-
9
-
10
-
11
-
12
-
13
-
14
-
15
-
 16
16 -
 17
17 -
 18
18 -
 19
19 -
 20
20 -
 21
21 -
 22
22 -
 23
23 -
 24
24 -
 25
25 -
 26
26 -
27
-
28
-
29
-
30
-
31
-
32
-
33
-
34
-
35
-
36
-
37
-
38
-
39
-
40
-
41
-
42
-
43
-
44
-
45
-
46
-
47
-
48
-
49
-
50
-
51
-
52
-
53
-
54
-
55
-
56
-
57
-
58
-
59
-
60
-
61
-
62
-
63
-
64
-
65
-
66
-
67
-
68
-
69
-
70
-
71
-
72
-
73
-
74
-
75
-
76
-
77
-
78
-
79
-
80
 |
 |