Panasonic HMTA1 HMTA1 User Guide - Page 9
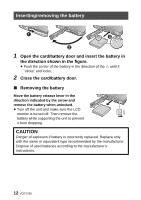
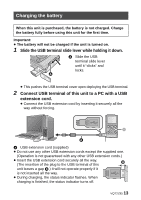
Parts identification and handling
 |
View all Panasonic HMTA1 manuals
Add to My Manuals
Save this manual to your list of manuals |
Page 9 highlights
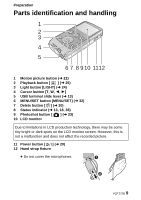
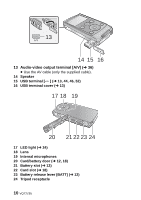
Preparation Parts identification and handling 1 2 3 4 5 6 7 8 9 10 1112 1 Motion picture button (l 22) 2 Playback button [ ] (l 26) 3 Light button [LIGHT] (l 24) 4 Cursor button [T, W, 2, 1] 5 USB terminal slide lever (l 13) 6 MENU/SET button [MENU/SET] (l 32) 7 Delete button [ ] (l 30) 8 Status indicator (l 13, 18, 36) 9 Photoshot button [ ] (l 23) 10 LCD monitor Due to limitations in LCD production technology, there may be some tiny bright or dark spots on the LCD monitor screen. However, this is not a malfunction and does not affect the recorded picture. 11 Power button [ ] (l 20) 12 Hand strap fixture ≥ Do not cover the microphones. VQT2Z95 9
-
 1
1 -
2
-
3
-
 4
4 -
 5
5 -
 6
6 -
 7
7 -
 8
8 -
 9
9 -
 10
10 -
 11
11 -
 12
12 -
 13
13 -
 14
14 -
15
-
16
-
17
-
18
-
19
-
20
-
21
-
22
-
23
-
24
-
25
-
26
-
27
-
28
-
29
-
30
-
31
-
32
-
33
-
34
-
35
-
36
-
37
-
38
-
39
-
40
-
41
-
42
-
43
-
44
-
45
-
46
-
47
-
48
-
49
-
50
-
51
-
52
-
53
-
54
-
55
-
56
-
57
-
58
-
59
-
60
-
61
-
62
-
63
-
64
-
65
-
66
-
67
-
68
-
69
-
70
-
71
-
72
-
73
-
74
-
75
-
76
-
77
-
78
-
79
-
80
 |
 |

VQT2Z95
9
Preparation
Parts identification and handling
1
Motion picture button (
l
22)
2
Playback button [
] (
l
26)
3
Light button [LIGHT] (
l
24)
4
Cursor button [T, W,
2
,
1
]
5
USB terminal slide lever (
l
13)
6
MENU/SET button [MENU/SET] (
l
32)
7
Delete button [
] (
l
30)
8
Status indicator (
l
13, 18, 36)
9
Photoshot button [
] (
l
23)
10
LCD monitor
11
Power button [
] (
l
20)
12
Hand strap fixture
≥
Do not cover the microphones.
Due to limitations in LCD production technology, there may be some
tiny bright or dark spots on the LCD monitor screen. However, this is
not a malfunction and does not affect the recorded picture.
1
6 7 8 910 1112
2
3
4
5