Panasonic KX-P1131E Operating Instructions - Page 36
Serial Interface Setup Mode
 |
View all Panasonic KX-P1131E manuals
Add to My Manuals
Save this manual to your list of manuals |
Page 36 highlights
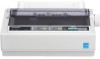
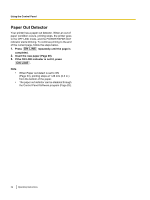
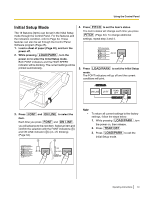
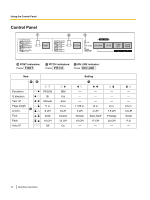
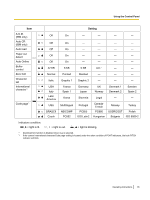
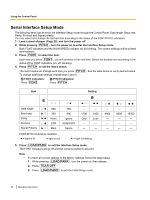
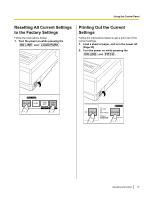
Using the Control Panel Serial Interface Setup Mode The following items can be set in the Interface Setup mode through the Control Panel: Data length, Baud rate, Parity, Protocol and Signal polarity. You can select and change the desired item according to the status of the FONT/PITCH indicators. 1. Load a sheet of paper (Page 20), and turn the power off. 2. While pressing PITCH , turn the power on to enter the Interface Setup mode. Both FONT indicators and the HIGH SPEED indicator will be blinking. The current settings will be printed automatically. 3. Press FONT to select the item. Each time you press FONT , you will advance to the next item. Select the desired item according to the status of the FONT indicators (on, off, blinking). 4. Press PITCH to set the item's status. The item's status will change each time you press PITCH . See the table below to verify desired status. To change additional settings, repeat steps 3 and 4. A FONT indicators: Press FONT . B PITCH indicators: Press PITCH . Item A Setting B Data length Baud rate Parity Protocol Signal Polarity 8Bit 300 None DTR Mark 7Bit 600 Ignore XON/XOFF Space - 1200 Odd - - - 2400 Even - - - 4800 - - - FONT/PITCH indicators condition: = light is lit. = light is out. = light is blinking. 5. Press LOAD/PARK to exit the Interface Setup mode. The FONT indicators will go off and the current conditions will print. Note • To return all current settings to the factory settings, follow the steps below. 1. While pressing LOAD/PARK , turn the power on, then release. 2. Press TEAR OFF . 3. Press LOAD/PARK to exit the Initial Setup mode. - 9600 - - - - 19200 - - - 36 Operating Instructions
-
 1
1 -
2
-
3
-
4
-
5
-
6
-
7
-
8
-
9
-
10
-
11
-
12
-
13
-
14
-
15
-
16
-
17
-
18
-
19
-
20
-
21
-
22
-
23
-
24
-
25
-
26
-
27
-
28
-
29
-
30
-
 31
31 -
 32
32 -
 33
33 -
 34
34 -
 35
35 -
 36
36 -
 37
37 -
 38
38 -
 39
39 -
 40
40 -
 41
41 -
42
-
43
-
44
-
45
-
46
-
47
-
48
-
49
 |
 |