Panasonic KX-P7310 Laser Printer - Page 103
Setting the PS Printer Driver (Mac OS X 10.1 - Mac OS X 10.2)
 |
UPC - 092281830131
View all Panasonic KX-P7310 manuals
Add to My Manuals
Save this manual to your list of manuals |
Page 103 highlights
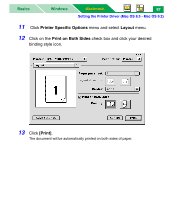
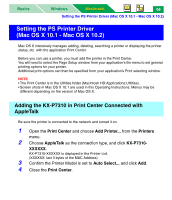
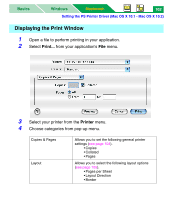
Basics Windows Macintosh 98 Setting the PS Printer Driver (Mac OS X 10.1 - Mac OS X 10.2) Setting the PS Printer Driver (Mac OS X 10.1 - Mac OS X 10.2) Mac OS X intensively manages adding, deleting, searching a printer or displaying the printer status, etc. with the application Print Center. Before you can use a printer, you must add the printer in the Print Center. You will need to select the Page Setup window from your application's file menu to set general printing options for your printer. Additional print options can then be specified from your application's Print selecting window. NOTE • The Print Center is in the Utilities folder (Macintosh HD:Applications:Utilities). • Screen shots in Mac OS X 10.1 are used in this Operating Instructions. Menus may be different depending on the version of Mac OS X. Adding the KX-P7310 in Print Center Connected with AppleTalk Be sure the printer is connected to the network and turned it on. 1 Open the Print Center and choose Add Printer... from the Printers menu. 2 Choose AppleTalk as the connection type, and click KX-P7310- XXXXXX. KX-P7310-XXXXXX is displayed in the Printer List. (XXXXXX: last 3 bytes of the MAC Address) 3 Confirm the Printer Model is set to Auto Select... and click Add. 4 Close the Print Center.
-
 1
1 -
2
-
3
-
4
-
5
-
6
-
7
-
8
-
9
-
10
-
11
-
12
-
13
-
14
-
15
-
16
-
17
-
18
-
19
-
20
-
21
-
22
-
23
-
24
-
25
-
26
-
27
-
28
-
29
-
30
-
31
-
32
-
33
-
34
-
35
-
36
-
37
-
38
-
39
-
40
-
41
-
42
-
43
-
44
-
45
-
46
-
47
-
48
-
49
-
50
-
51
-
52
-
53
-
54
-
55
-
56
-
57
-
58
-
59
-
60
-
61
-
62
-
63
-
64
-
65
-
66
-
67
-
68
-
69
-
70
-
71
-
72
-
73
-
74
-
75
-
76
-
77
-
78
-
79
-
80
-
81
-
82
-
83
-
84
-
85
-
86
-
87
-
88
-
89
-
90
-
91
-
92
-
93
-
94
-
95
-
96
-
97
-
 98
98 -
 99
99 -
 100
100 -
 101
101 -
 102
102 -
 103
103 -
 104
104 -
 105
105 -
 106
106 -
 107
107 -
 108
108 -
109
-
110
-
111
-
112
-
113
-
114
-
115
-
116
-
117
-
118
-
119
-
120
-
121
-
122
-
123
-
124
-
125
-
126
-
127
-
128
-
129
-
130
-
131
-
132
-
133
-
134
-
135
-
136
-
137
-
138
-
139
-
140
-
141
-
142
-
143
-
144
-
145
-
146
-
147
-
148
-
149
-
150
-
151
-
152
-
153
-
154
-
155
-
156
-
157
-
158
-
159
-
160
-
161
-
162
-
163
-
164
-
165
-
166
-
167
-
168
-
169
-
170
-
171
-
172
-
173
-
174
-
175
-
176
-
177
-
178
-
179
-
180
-
181
-
182
-
183
-
184
-
185
-
186
-
187
-
188
-
189
-
190
-
191
-
192
-
193
-
194
-
195
-
196
-
197
-
198
-
199
-
200
-
201
-
202
-
203
-
204
-
205
-
206
-
207
-
208
-
209
-
210
-
211
-
212
-
213
-
214
-
215
-
216
-
217
-
218
-
219
-
220
-
221
-
222
-
223
-
224
-
225
-
226
-
227
-
228
-
229
-
230
-
231
-
232
-
233
-
234
-
235
-
236
-
237
-
238
-
239
-
240
-
241
-
242
-
243
-
244
-
245
-
246
-
247
-
248
-
249
-
250
-
251
-
252
-
253
-
254
-
255
-
256
-
257
-
258
-
259
-
260
-
261
-
262
-
263
-
264
-
265
-
266
-
267
-
268
-
269
-
270
-
271
-
272
-
273
-
274
-
275
-
276
-
277
 |
 |
