Panasonic PVD4763S PVD4763S User Guide - Page 9
Front View of DECK, Reset All Memory Functions
 |
View all Panasonic PVD4763S manuals
Add to My Manuals
Save this manual to your list of manuals |
Page 9 highlights
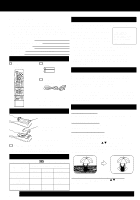
Initial Setup (Connection) FFrroonnttVVieiwewofoDfEDCEKCK Bold: VCR Function Italic: DVD Function Bold Italic: VCR and DVD Functions Normal: Others STOP/EJECT p. 20 If the disc cannot be removed... First, unplug DECK. Then, prepare a rigid wire (e.g. an extended paper clip) and, applying moderate force, insert it straight into the hole at the base of the tray. The tray will eject a little. Now, pull the tray all the way out and remove the disc. FAST FORWARD/SEARCH p. 20 PLAY p. 20 Over 2 inches REWIND/SEARCH p. 20 Remote Sensor POWER Cassette Disc Tray Compartment OPEN/CLOSE p. 22 Audio/Video Input Connector 2 (LINE 2) p. 35 CHANNEL / TRACKING/V-LOCK pp. 4, 21 REC p. 21 Multi Function Display p. 11 Reset All Memory Functions SD Card slot p. 58 PROGRESSIVE p. 10 PAUSE p. 23 SKIP SKIP p. 23 PLAY p. 22 STOP p. 22 Use when moving DECK to new location, or if a mistake was made in the Initial Setup section (return to Factory Setting). • Make sure a tape is not inserted in the DECK. 12 1 Turn DECK Power on. 2 Press and hold both VCR PLAY and CHANNEL on the DECK for more than 5 seconds. • The power shuts off. 3 Do "Initial Setup (Ready to Play)" on page 16. 9
-
 1
1 -
2
-
3
-
 4
4 -
 5
5 -
 6
6 -
 7
7 -
 8
8 -
 9
9 -
 10
10 -
 11
11 -
 12
12 -
 13
13 -
 14
14 -
15
-
16
-
17
-
18
-
19
-
20
-
21
-
22
-
23
-
24
-
25
-
26
-
27
-
28
-
29
-
30
-
31
-
32
-
33
-
34
-
35
-
36
-
37
-
38
-
39
-
40
-
41
-
42
-
43
-
44
-
45
-
46
-
47
-
48
-
49
-
50
-
51
-
52
-
53
-
54
-
55
-
56
-
57
-
58
-
59
-
60
-
61
-
62
-
63
-
64
-
65
-
66
-
67
-
68
-
69
-
70
-
71
-
72
 |
 |
